
Apple Hand Pies
March 15, 2013 § 3 Comments
March 14. Or, 3.14. Known throughout the world as Pi Day in honor of that irrational number beginning with 3.14. But wait – wouldn’t they write it 14.3 in Europe?
I would rather consider it Pie Day. It’s the middle of March—we need a good pie this time of year. I’m all for it, quite honestly. Think about it—have you eaten pie since Thanksgiving? I didn’t think so.
I decided to make pie yesterday for Pie Day. But what kind? My go-to pies are those traditional fruity treats—peach, rhubarb, peach rhubarb (see a theme here?), apple, pumpkin. Nah. What about a cream pie? They get runny after a few days. The problem with any of these pies (if there can be a problem with pie) is that they are so darn big for two people (I know, I could invite you over but…). And as much as I’d like to eat an entire pie, I just can’t do it. At the last piece, all old and soggy, I begin to detest it. We must not go there. Can’t ruin pie like that.
So I decided on hand pies: Pies that fit into your hand. Individual servings of pie, all wrapped up in their individual casings. Perfect! Thing is, I’d never made hand pies before. What to do? What to make?
A little Googling got me to the Smitten Kitchen blog and her recipe for Bourbon Peach Hand Pies. Hmmm…peaches. Peaches and bourbon. And, according to the recipe, this dough holds up to the inevitable leaks that result in boiling hot fruit juicy spilling away, while also being light and flaky. Print it up—I’m in.
Alas, Trader Joe had other dessert intentions for me. Not a fresh peach to be found. So apples it was.
Before I get to the recipe, a few notes about it and the resulting pies:
- I used a food processor. When you have one, use it.
- The dough did exactly what she said it would—it held up well, didn’t leak (much) and is tasty and flaky. I’m definitely keeping it in my repertoire. BUT—it’s not really a pie dough. It’s more of a flaky morning pastry. Which is fine, just not very pie-ey.
- I used the same amount of apples as peaches the recipe called for. WAY TOO MUCH. Below is my estimation of half the recipe.
- The filling I made was tasty but 1) wasn’t juicy enough – maybe more sugar or let it sit longer? and 2) not enough of it in the pie. But that’s all I could fit in the dough rounds while still being able to close them securely. I’ll just need to experiment more, won’t I? One thought is to slice the apples (or peaches) lengthwise and layer the slices in the center of the dough rounds.
Apple Hand Pies (adapted from Smitten Kitchen’s Bourbon-Peach Hand Pies)
For the pastry dough:
2 1/2 cups all-purpose flour placed in bowl of food processor and chilled one hour in freezer
1/2 tsp. salt
2 8 oz. sticks unsalted butter, cut into pieces, placed into small bowl and chilled for 1 hour in freezer
1/2 cup sour cream
4 tsp. fresh lemon juice
1/2 cups ice water
For the filling:1 lb. apples, peeled and finely chopped
2 tbs. flour
2-4 tbs. sugar (the more sugar, the juicier it should be if you let it sit awhile)
pinch of salt
1 tsp. lemon zest
To finish:
Egg wash (One egg yolk beaten with 2 tbs. water)
Sanding sugar
1. Remove bowls from freezer. Add salt to the flour and stir. Place flour bowl onto food processor and add in chilled butter. Using 2- to 3-second pulses, whir up the flour and butter until the mixture looks like course corn meal.
2. Combine sour cream, lemon juice and ice water to a small bowl and whisk until combined. Add to flour-butter mixture one half at a time, whirring in between. You’re looking for large clumps to form. Turn clumps out onto a work surface and bring mixture together with your hands to form a big ball. WARNING: Dough will be sticky. Lightly flour your hands before touching dough. Wrap dough ball in plastic wrap and refrigerate one hour. (At this point dough can be frozen up to one month. If doing so, wrap in something a bit more freezer proof.)
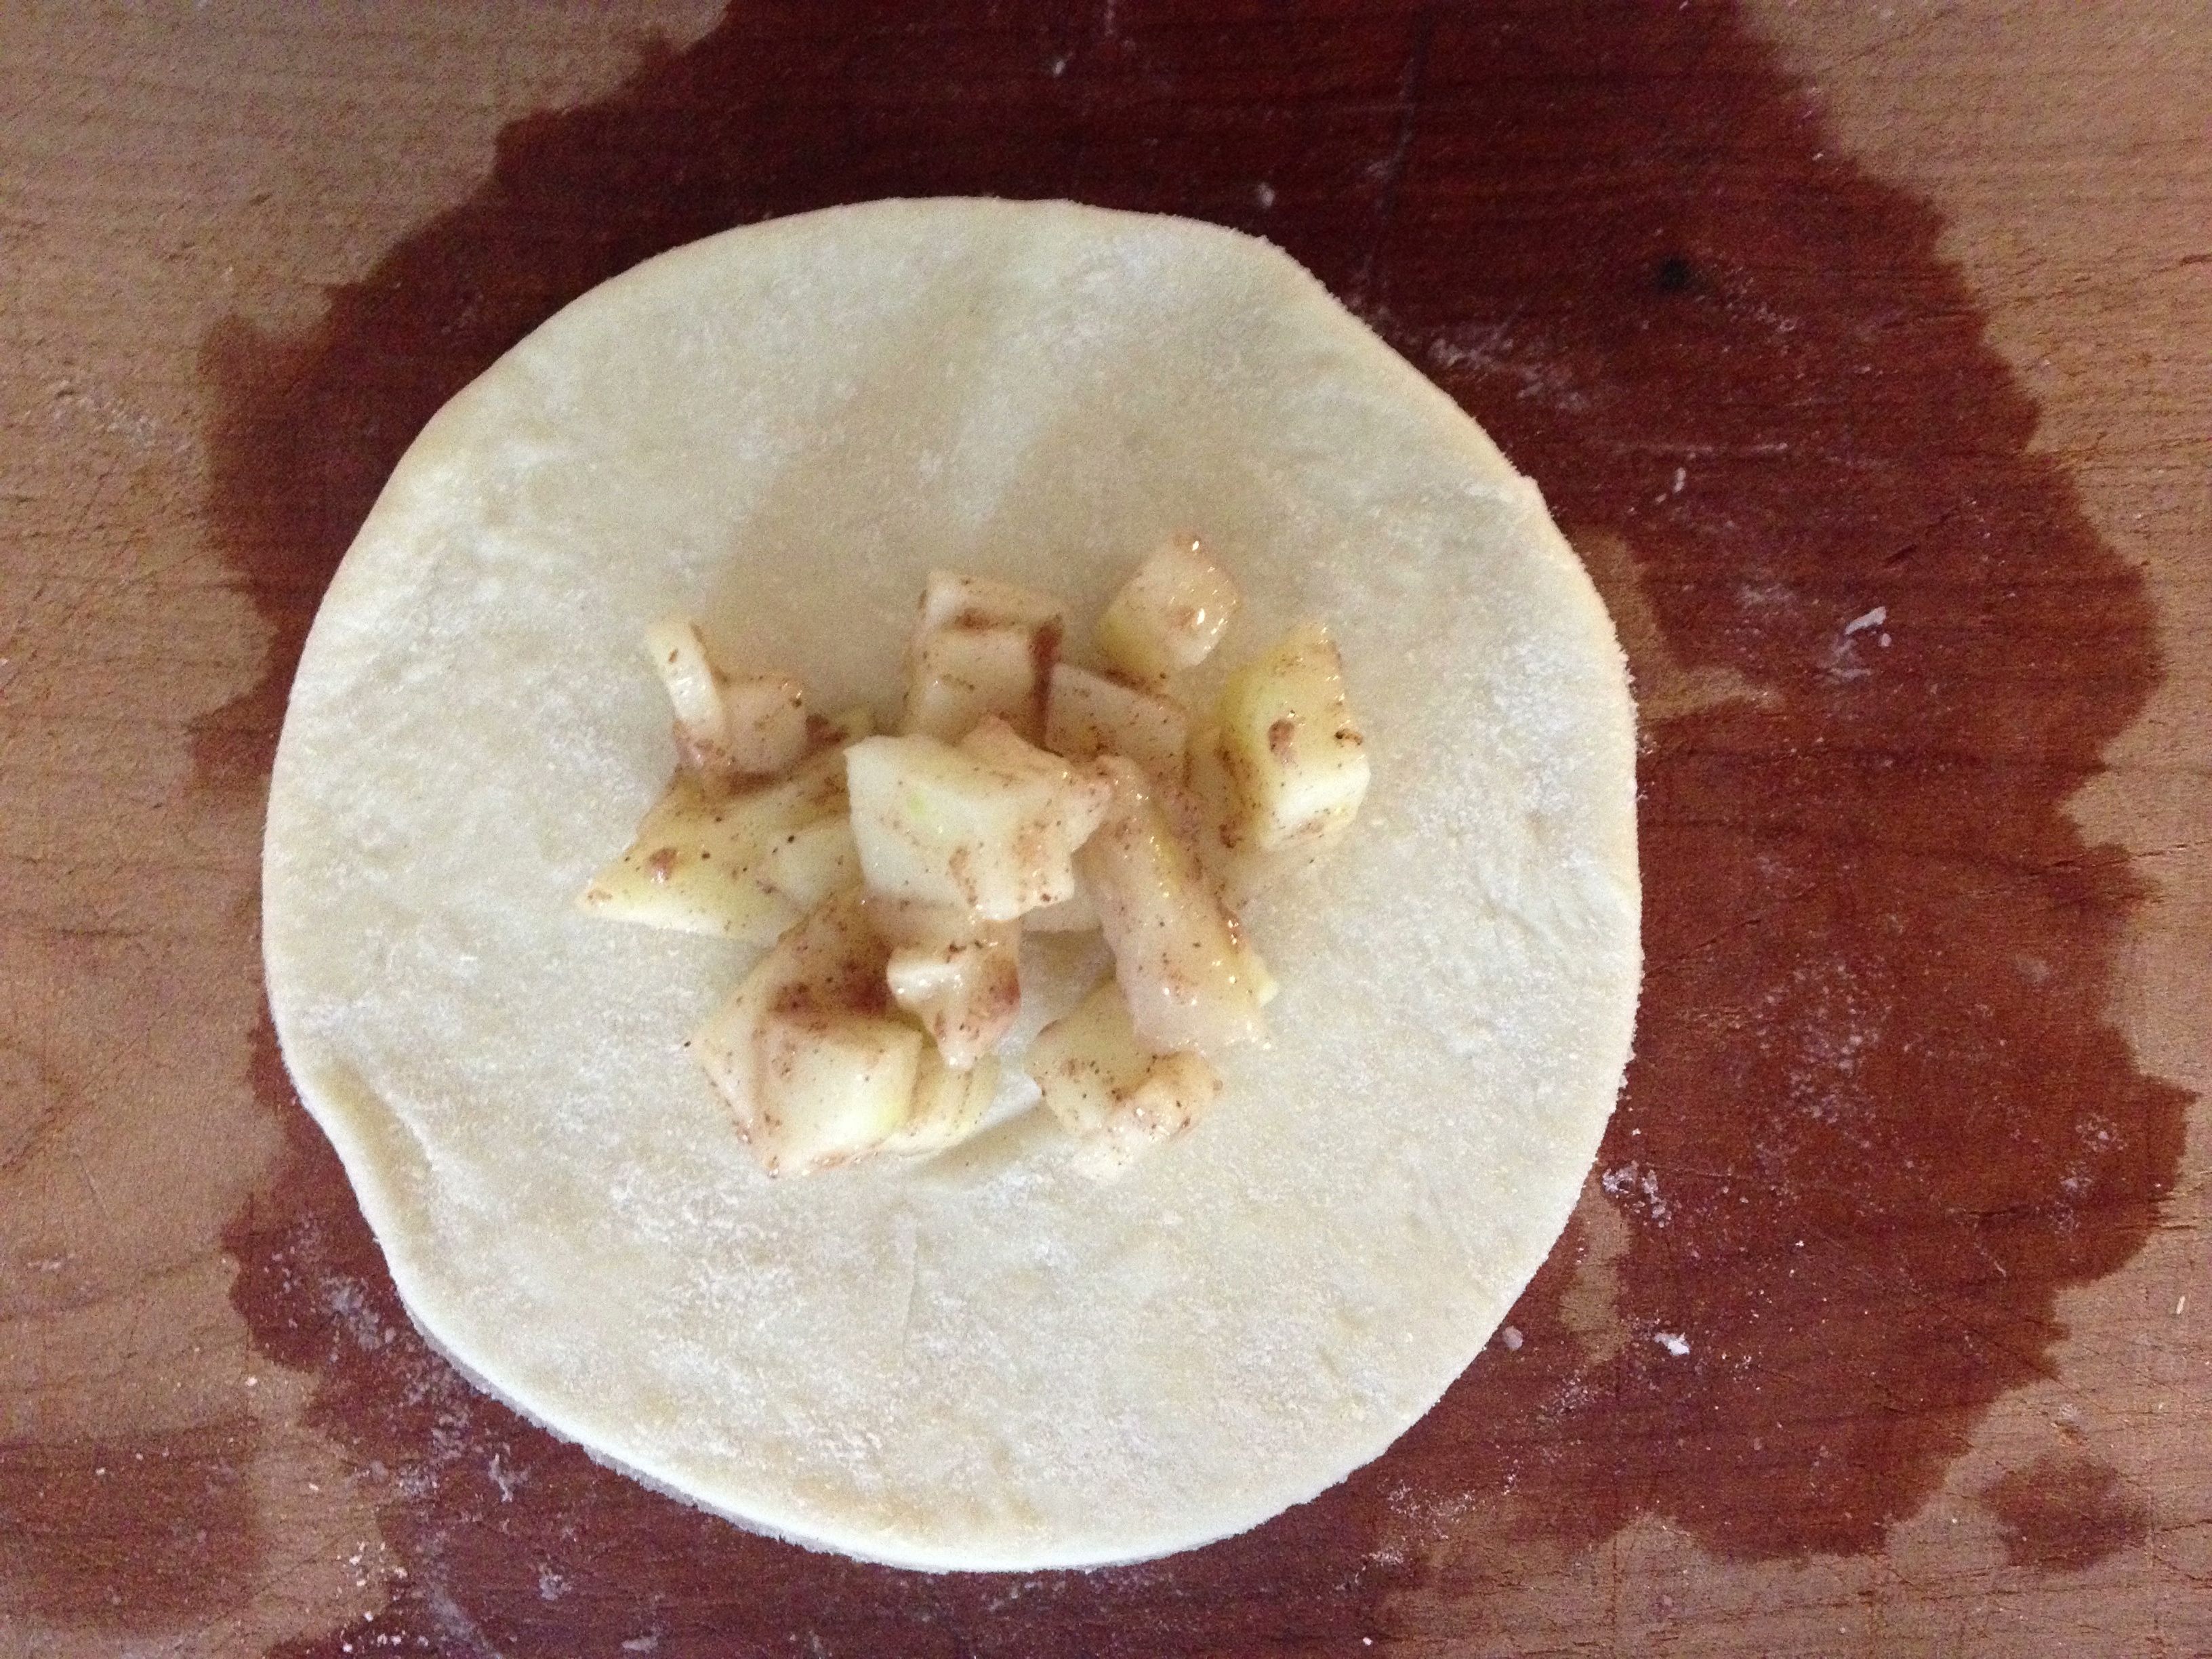
3. Divide dough ball into quarters. Work with one quarter at a time, leaving the others in the fridge while you work. Lightly flour the work surface (keep that flour handy). Roll the dough into a 1/8-in. thickness. Using something round with a 4.5-inch diameter, cut rounds out of the dough. NOTE: Only thing I had available was a 1-quart plastic container similar to the kind you’d get filled with potato salad at a deli. It’s about 4 inches, but it works. Use what you have on hand. Transfer these dough rounds onto a parchment paper-lined baking sheet and pop into the fridge. Repeat with other dough balls, filling up the parchment, and layering additional parchment on top of the previous. Keep these rounds chilled for 30 min. or more.

4. Filling: While the dough rounds chill, add the finely chopped apple to a large bowl. Add in the flour, sugar, pinch of salt and lemon zest. Let sit until the dough rounds are ready – this will let the sugars produce some juicy apple goodness—something I didn’t do this time around.
5. Assembly: Remove chilled dough from fridge and let them sit for 2-3 minutes to get a bit more workable. Spoon in about 1-2 tbs. of the apple mixture into the center of the round (more for larger circles, less for smaller). Brush the dough edges with water and fold one half over to meet the other to form a half circle. Seal it lightly with your thumb, then press closed with the back of a fork. Place each little pie back onto the parchment and return to the fridge for another 30 minutes.

ANOTHER OPTION: Place a slightly larger amount of apple mixture onto the center of one round and place another round on top, stretching the top dough a bit so it meets the bottom’s edges. Seal as before. This makes a fun UFO-shaped pie.
6. Heat oven to 375. Removing the pies from the fridge, give each one a small slice of poke with a fork (to let steam out). Lightly brush each pie with the egg wash and sprinkle with sanding sugar (optional of course but yummy). Bake until the pies are golden brown – 20 to 23 minutes. Remove and let cool.


If you serve them still slightly warm, you’ll want to serve with vanilla ice cream. Otherwise, these are excellent pastries to have on hand for breakfast.

Seriously bummed that Trader Joe’s didn’t have peaches. What would you fill these with? Any suggestions for other dough that might be more like a traditional pie?
Wheat Berries for Breakfast
January 15, 2013 § 3 Comments
Wheat berries. Never heard of them? Neither had I, until I came across them as an ingredient in a course-grained whole wheat bread recipe (more on that bread another day). And now, they’re a special breakfast treat.

Wheat berries with raisins, slivered almonds and apple cider.
How did they go from bread to breakfast? When I spotted them in the Amy’s Bread cookbook recipe I read up a bit on this whole grain. According to Wikipedia, “wheat berry” is just another term for the whole wheat kernel. Silly me, I thought they looked familiar. As a farm kid, I had wheat kernels end up in pant cuffs, socks and occasionally other locations on my person after a day on the wheat combine. If milled instead of left whole, the wheat berries become wheat flour. And as we know, grains left whole are good for you because none of the nutrients are processed out of the grain. Keeping it whole leaves all that good-for-you protein, fiber and iron (and I’m sure other good things) right in that wheat berry for your health and flavor enjoyment.
The whole wheat berry as an ingredient in bread gives the bread some chewy texture—something to bite into other than just the bread. They’re also a bit sweet and nutty in flavor—a great thing when used not just in breads, but also when added to salad greens or made into a grain-based dish.
My course-grained bread recipe called for just a 1/2 cup of cooked wheat berries with a half-cup of the reserved cooking liquid. Wanting to have some extra on hand, I added one cup of uncooked berries to about 2.5-3 cups boiling water, then let it simmer, mostly covered, for about 50 minutes. The result was about 2 cups of plump wheat berries and surprisingly just enough liquid.
The berries that didn’t make it into the bread made it into my breakfast bowl. Taking a cue from my typical steel-cut oats preparation, these berries received some raisins (highly recommend the jumbo raisin mix from Trader Joe’s) and slivered almonds. And to plump up the raisins while warming in the microwave, I added enough apple cider to come nearly to the surface of the wheat berries. Soul-satisfyingly delicious. And it filled my belly. I even slurped from last juices from the bowl.
I would love to try wheat berries in a savory application and have seen a recipe or two pairing them with mushrooms. If you have any recommendations—either savory or sweet—please leave me a comment below.
And now that I know my family has a barn full of these wheat berries at home, I think I’ll bring home a great big bag of them next time I visit.
Savory Steel-Cut Oats
March 5, 2012 § 7 Comments
I’m a fan of Steel-Cut Oats. We’ve established that before. I relegated the Quaker Oats man to just a few cookie recipes. Never shall a rolled oat appear in my breakfast bowl.
A quick recap of my steel-cut oatmeal recipe has me throwing in a handful of raisins when the oats are just about done and letting them plump up with steam. In the bowl they recipe a sprinkling of slivered almonds and a sometimes-generous pour of maple syrup. Five out of seven days that’s what I’m eating for breakfast. The other two days? I’ve skipped breakfast altogether.
Thanks to Jody and Ken over at The Garum Factory, I now have a new side of steel-cut oats to explore: the savory side. Their last post shined the light on how versatile steel-cut oats can be once you move beyond the sweet expectations. Exhibit A: Their Steel-Cut Oats with Eggs, Preserved Lemon and Olives.
For my first time exploring of the savory side, I tread a simpler path. I topped my Steel-Cut Oats with a poached egg, black pepper and parsley. Yeah, delicious. Really delicious.

Steel-cut oats with poached egg
I poached the egg separately, but a friend had a super suggestion: As the steel-cut oats are finishing—let’s say for the last three minutes—make a divot in the oats and crack the egg right into that puddle. Cover, and the egg “poaches” right in them there oats. And you only have to dirty one pot, she said.
Oh, to be as smart as she.
Have you explored steel-cut oats’ savory side? What yumminess have you found there? Do tell! Share your savory suggestion—I so want to give it a try.
Homegrown Food Challenge—Day 4
October 15, 2011 § 1 Comment
Day 4 … halfway through our week of eating and drinking stuff as homegrown and as local as possible. How’s it going? Great. In fact, we might have too much food. Well, we’ll make it to the end, definitely.
Okay, I had promised some scintillating breakfasts. Not happening on Day 4. The morning meal, to me, is utilitarian. I know, that’s the wrong way to think about it. You’re supposed to eat breakfast like a king, lunch like a queen and dinner like a pauper. Or something like that. I honestly don’t have the stomach for breakfast until, say, 9 am.
Day 4 was a whole two days ago. Let’s see if I can remember what we had.
Breakfast:
Flat Black coffee. Maine’s Own Organic Milk. And honestly, I may have had an apple. I know it wasn’t much. I was kinda busy and on a role with things, work-wise. Sometimes that happens. Kids, eat your breakfast and don’t be like Auntie Dainty.
Lunch:
Lunch … I have to say what I made for lunch was the best thing ever constructed out of two pieces of bread. Seriously. Some cookbook-writing chef is going to see my delicious creation and will put it front and center in his/her lunch options.

It’s a grilled eggplant and tomato paninni with smoky mayo. Recall the smoky mayo originally topped the broiled bluefish on Day 2. Imagine that spread not-too-thinly on two slices of homemade sourdoughish bread. And remember the eggplant on the grilled pizza from Day 3? Lay a couple of those grilled eggplant slices down on top. Add some sliced tomato, top with another mayo-slathered slice of bread. Put a bit of olive oil in a hot cast iron pan. Lay down the sammies. And add some wait to make them “pressed sandwiches.” In this case, I used a very heavy Dutch oven. Grill both sides to a nice crispness. Smoky mayo+grilled eggplant=the world’s perfect pairing. I wanted to share it with everyone and no one all at once.
Dinner:
We still had two bluefish fillets in the fridge from our Cape Ann Fresh Catch share on Tuesday. We did another round of Broiled Bluefish with Smoky Mayo since it was so good on Day 2. And we had a small side salad. See those beans on top? Vermont Cranberry Beans – the best homegrown beans. Ever.

That was it for Day 4. We won’t tell you if we finish the remaining Topsfield Fair-made kettle corn. We’ll let you think on that.
Homegrown Food Challenge—Day 3
October 14, 2011 § 1 Comment
Day 3 on the Homegrown Food Challenge and no fish heads were lopped off on this particular day. But the grill did get lit, and that’s always a fun thing. Here’s how our day progressed.
Breakfast:
Starting to look very familiar. Flat Black coffee with Maine’s Own Organic Milk. Stonyfield yogurt with local apple, honey and a crumbled Effie’s oatcake. We’ll get a bit more creative with breakfast on the weekend, no worries.
Lunch:
Jennifer and I both had big salads with local stuff, similar to the one I had for lunch on Day 2. Local lettuce and red pepper, pickled beets, homemade dressing, etc etc. I even made some homemade croutons from homemade bread.
Dinner:
This is where the grill gets lit—finally! We cranked it up for some pizza made with homemade pizza dough. Two pizzas are usually enough to take care of dinner plus give us enough for lunch the following day.

Pizza #1: Homemade sauce using slightly green homegrown tomatoes (similar to the roasted cherry tomato sauce I make), grilled eggplant (from farmers market) and locally made mozzarella.

Pizza #2: Homemade pesto using homegrown basil, grilled eggplant, roasted red pepper (from farmers market) and caramelized homegrown leeks.
Can’t have pizza without beer, right? We had some Whale’s Tale Pale Ale from Cisco Brewers on Nantucket. Pretty tasty stuff!
As I am two days behind in posting, I can hint at what awaits you for Day 4: One of the most fabulous creations to ever have been sandwiched between two pieces of bread. Think I over-exaggerate? Oh. No.
Homegrown Food Challenge: Day 1
October 11, 2011 § 1 Comment
Yesterday began our week-long Homegrown Food Challenge (HGFC). So, right from the beginning I have to amend the title, or rather—I should clarify and lay out the rules of this Homegrown Food Challenge we’ve undertaken:
- “Homegrown” … with such a small garden plot and the fact that it’s nearly done producing, we’re amending “homegrown food” to “local food.”
- “Local” for this challenge will mean somewhere in New England. I know, it could be more local than that. Maybe for the next challenge we’ll pull in the boundaries.
- Items that are in our allowable “pantry” include oils, vinegars and flours. And I reserve the right to add in quinoa as a “cheater” grain.
- Leftovers that were in our fridge need to be eaten, right? And trust me, we did not stock the fridge with “leftovers” so we could cheat with them.
- Our “veganish” diet – two out of three meals not containing animal products – will be put on hold for the week.
Hey, that’s not so bad, right? So far, so good.
To prep for the challenge, I hit the closest local farmers market I could find, which just happens to be at Boston Medical Center on Fridays. I came back with butternut squash, two eggplant, red peppers, dinosaur kale, two heads of leaf lettuce and romanesco – it’s like a fractal-influenced head of broccoli. All produce brought to us by the good folks at Farmer Dave’s in Dracut.

Farmers market fare from Farmer Dave's
We also stopped by Whole Foods to find some local dairy products. And you know what? We did actually find some.
So, with that, let the challenge begin!
DAY 1
Breakfast: We need coffee. Coffee doesn’t grow in this climate. What to do … Well, there are local coffee roasters. That counts. And our favorite local coffee roaster is Flat Black Coffee Company with locations in Dorchester and downtown Boston. We’ve known the owner for years and can attest he and his crew produce a great and responsible bean. Into that cup we usually pour some almond or soymilk. Not happening this week, so how about some local milk? We picked up some Maine’s Own Organic Milk.

Yogurt, apple and honey - all local!
The coffee accompanied a bowl of Stonyfield plain yogurt – I’m positive all that dairy is from New England cows and if not, someone clue me in – mixed with a local chopped apple and topped with Topsfield-produced honey. Breakfast, done.
Lunch: Okay, so … It’s Columbus Day. Jennifer’s off work, and I’m working but not all that hard … A friend calls us. Hadn’t seen her in a while. “Wanna go out for lunch?” Say no? No. We said yes. And we opted to eat at a small, local Mexican restaurant two blocks away where I know they a) make a lot of their own stuff and b) could use our dining dollars. I feel completely in-line with the challenge by supporting our local small eateries.
Dinner: Gotta clean out the leftovers from the fridge, right? Pasta with shrimp, red pepper and pesto. And just the pasta and shrimp weren’t local in that dish. Plus, we had homemade bread. And, a bottle of Harpoon IPA brewed right down the street in Southie.
Day 2 should be interesting—it’s our first Cape Ann Fresh Catch share pick-up. Fish with heads!! Awesome!
Sugar in Yogurt Will Astound You
July 27, 2011 § 2 Comments
I don’t mean to turn into the Nutrition Nazi here, but …
With not much being in the fridge or cupboards for breakfast—nothing quick, anyway—I pulled out a little cup of yogurt. Innocent enough, right? Plus, according to the Yoplait Greek yogurt packaging, it has twice as much protein and that regular ol’ yogurt. And I was hungry and in a hurry and it was blueberry flavored, so … I’ll just open it and eat it, although I’m basically off dairy for breakfast nowadays.
And I gobbled. It. Up. Oh my goodness, that was good. Really good. I mean, so very, very good. What was in there?
Ya know what was in there? Sugar. In some form, anyway. I normally don’t eat much sugar. I taught myself early on in my coffee-drinking adulthood to skip the sugar (and all those colored packets, too—really, don’t we eat enough artificial crap anyway?). Same with yogurt. Plain, unsweetened. That’s it. And, as an aside, same goes with the soymilk.
Back to the sugary yogurt. I was curious about exactly how much sugar was in that little 6 oz. cup. Seeing that it said 20 g. on the label, I decided to pull out my digital scale to see exactly what 20 g. of sugar looks like.

That's allota sugar!
That’s not just 20 g. of sugar. That is a MOUND of sugar. Eat that with a spoon and you’d feel really guilty. Really. Guilty.
Am I doing the math correctly? I don’t know. I hope I’m not. I do know that I’m not eating that again. Long live plain, unsweetened yogurt. Vive la Food Revolution.
Steel-Cut Oats
February 11, 2011 § 3 Comments
Where have you been all my life, steel-cut oats?
Ten years ago, I don’t believe I had ever eaten oatmeal. Maybe I had had one of those wimpy packet of instant oatmeal, if you want to call that oatmeal. Mom had a container of Quaker Oast around the house, but it was for cookies only, not breakfast. So, my uneducated and untested opinion of oatmeal was that its gloppiness reflected its taste and I wanted nothing to do with it.
Then Jennifer came along and made me the world’s best oatmeal. It wasn’t the instant stuff, and it wasn’t the quick oats, I don’t think. It was rolled oats, for sure, with that familiar flattened, flake-like appearance. Boil, stir, simmer, toss in some raisins for a minute and Whammo! Five minutes later there’s a tasty breakfast. With a pour of maple syrup and a smattering of slivered almonds on top, of course. Mmmm … nice and hearty. For the most part, I leave the oatmeal making to Jennifer. She’s good at it. It’s her job.

Steel-cut oats—they actually look like oats!
One day on a visit to New York, our friend Bernadett raved about the flavor of steel-cut oats. Now that’s a whole other animal, for sure, steel-cut oats. That familiar flaky oat appearance? Not happenin’ with steel-cut oats. When you look at rolled oats, you can’t really get a good idea of what that flake was previously. Not really. It is a smushed something. But when you look at steel-cut oats, its “grain-ness” just jumps right out at you. It looks like the oats we used to grow back on the farm—just chopped crosswise into smaller pieces. Cooking time—well, let’s say it’s not a breakfast food appropriate for a gotta-get-out-the-door morning.
Thanks to my baking of Flour’s Oatmeal Raisin Cookies and the depletion of our rolled oats, we found ourselves in front of the bulk bins at Whole Foods. Steel-cut oats in a bin to the left. Rolled oats in a bin to the right. We had experience with rolled. We knew we liked rolled. But we heard great things about steel cut. Plus, they were on sale. Steel-cut, it is.
Recipe (for 2)
- Put a scant 2 cups water in a small 2-qt. pot. Add a pinch of kosher salt. Heat on high until boiling.
- Stir in a generous 1 cup of steel-cut oats. IMMEDIATELY turn heat down as low as it can go. Cover.
- Set timer for 15 minutes. And go write your morning blog post.
- When timer goes off, stir in a handful of raisins. Cover. Set timer for 5 minutes.
- Divide into two bowls. Top with your favorite stuff. Enjoy.

Mmmmm ... breakfast.
*IMPORTANT NOTE! Jennifer just told me to leave the lid slightly ajar. This way we don’t get those flair-ups that result in oatmeal goo dripping down the pot and onto the stovetop that she just cleaned.
Don’t expect your typical oatmeal experience. Like I said before, this is a whole other animal. It’s more grainy. More chewy. More nutty. Less gooey. Maybe there’s less of a viscous texture because the oat hasn’t been smushed and there is less surface area. I dunno. But I do know that I prefer it.
Nutrition? Is it better for you? More nutritious? Maybe. Or maybe it’s the same. Honestly, I don’t really care about the details so much. I do know it’s oats, and it’s a whole grain, and it’s good for you. And, it’s filling.
Now I can be like my mom and keep that container of rolled oats exclusively for the cookies.
Fridge-tata: Going recipe-less with breakfast
January 18, 2011 § 3 Comments
Long weekend away in a ski house with friends + cooking in + stuffed refrigerator = “fridge-tata”
If you’re not an egg lover or have not gone out to for brunch in 15 years and aren’t familiar with a frittata, it’s the Italian take on the classic French omelette: Beaten eggs in a hot skillet, but with the fixins in them and presented flat, not folded. And finished off in the oven. Served in slices. Come to think of it, it’s like a slice of egg cake. Filled with sausage or salmon, chicken or chopped tomatoes, their many formulations stuff recipe sites and cookbooks.
I’m telling you now, throw out the recipes and create your own on auto-pilot. It’s as easy as opening your refrigerator.
We’ve been members of a gay ski house up in Vermont for going on eight years now. On any given fall or winter weekend, the house is filled with boys from NYC and Boston, boyfriends flying in from elsewhere and occasionally a few girls. There can be up to 12 or 14 folks sitting around the dinner table. The New York boys have a reputation for preparing over-the-tops meals – usually creatively fueled with several apre-ski cocktails. Caviar shows up on the menu several times a ski season.
At least one breakfast each weekend is something I’ve dubbed a “fridge-tata.” While I can take credit for the name, I can’t take credit for the process. That would go to the likes of Hal and Steve. They stare into the open fridge, assess the leftovers, and pull out the fridge-tata’s fillings. Chicken and green beans? Tuna and asparagus? As long as they have six or more eggs and that huge skillet (it must be 16 inches), they can create a breakfast fortified enough to fuel a day of downhill.
Personal-Sized Fridge-tata
On Sunday, I created my own single-serving fridge-tata for a post-snowshoeing snack.

I used only a portion of these leftovers for my personal-sized fridge-tata
- leftovers of salmon, rice (created from some seasoned packet and a half can of chopped tomatoes) and beans
- two eggs, beaten with salt and pepper and a touch of milk
- mango key-lime salsa to taste
-Using a small, 8-in. skillet set on medium, I heated up the rice and beans. Meanwhile, I whisked up my eggs with salt and pepper.
-After beans and rice formed a bit of a crust on the bottom, I broke it up a bit and added my little hunk of leftover salmon. I waited because I didn’t want the salmon to be cooked to much more than it already had been.
-With the salmon in there for about 30 seconds, I added the eggs and turned the heat down to medium low.
-I let the eggs set a bit – enough so that I could lift the sides with a spatula. This took only two to three minutes.

The eggs need to set up a bit
-The top of the fridge-tata needed to set, so I put a lid over the skillet for a minute or two.
-Serve with salsa.

The finished fridge-tata
I could have used another egg or two to make the fridge-tata thicker. But then it would have been too much for me to finish. Had I cooked a more massive fridge-tata in that larger 16-in. skillet, I would have used way more eggs – probably eight or more. And, I would have cooked it on the stovetop until the eggs set up, covered it and set it on medium low for maybe 14-15 minutes, and then put it under the broiler for a minute or two to make sure the top was crisp.
It’s not the gourmety-est dish. But it’s the perfect way to deal with leftovers when roughing it in a ski house.
