
Eggplant Rollatini
March 12, 2013 § 1 Comment
Sometimes you have to shop for dinner. Sometimes it’s in your fridge or freezer, in bits and pieces, just waiting for you to assemble.
That’s what happened with last night’s dinner—Eggplant Rollatini. Open the fridge and there’s an eggplant needing to be used ASAP. Open the freezer and there’s a cup or so of frozen ricotta and chard lasagna filling left over from last fall’s Roasted Vegetable Lasagna making festivities. And there’s a large can of whole peeled tomatoes in the cabinet.
Get out the mandolin, folks—it’s rollatini-making time. And having never made rollatini before, this was all off the cuff.
Eggplant Rollatini

Eggplant Rollatini
- olive oil (to be used throughout recipe)
- kosher salt and pepper to taste (to be used throughout recipe)
- 3-4 cloves garlic, depending on size, smashed and minced
- 1 28-oz. can whole peeled tomatoes
- 1-2 tsp. Italian seasoning
- 1 tsp. sugar
- 1 medium-large eggplant, sliced lengthwise to about 1/4-in. thickness with a mandolin (be careful!)
- Chard-ricotta mix from Roasted Vegetable Lasagna, or about 1-1.25 cups plain ricotta for this recipe
- About 1/ cup Parmesan cheese to sprinkle
1. Turn oven to 400F.
2. Add 1 tbs. olive oil to pan on medium heat. Add garlic and let it go until it becomes fragrant. Slowly pour in the liquid from the canned tomatoes. Take out each tomato from the can and gently mush and tear it into pieces with one hand and add to the pan. Messy, but it’s the best and easiest way to do it. Add in Italian seasoning, sugar (really, it helps brighten the sauce, trust me) and a large pinch of kosher salt.
3. The sauce will really be bubbling at this point. Turn it WAY down and let it simmer gently. Add in a turn or two from the pepper mill. Continue to simmer until it thickens a bit, about 20-30 minutes, just about until you’re ready to assemble the rollatini.
4. Meanwhile, slice eggplant. Place each slice on a sheet pan, and pour a bit of olive oil (not a lot, not a little) over each slice, using a brush to spread the oil over each slice. Sprinkle kosher salt and pepper on each slice. No need to do both sides, one side will do. Pop the sheet pan in the oven and bake for 15-16 minutes, or until the firmness of the eggplant is gone but the eggplant has not become wicked soft. When done, take out and let cool enough to handle, about 5-8 minutes. Keep oven on!

Eggplant, thinly sliced and baked.
5. Working with one slice of eggplant at a time, spread about a tablespoon of the ricotta mixture over the surface of the eggplant slice. You don’t want it too thick or you won’t be able to roll it very well. Starting at the narrow end of the eggplant slice, roll it into a “cigarello,” or, as I would rather imagine it, roll it up like you’d roll your yoga mat. Set aside. Continue with the next slice until you either run out of ricotta or eggplant.
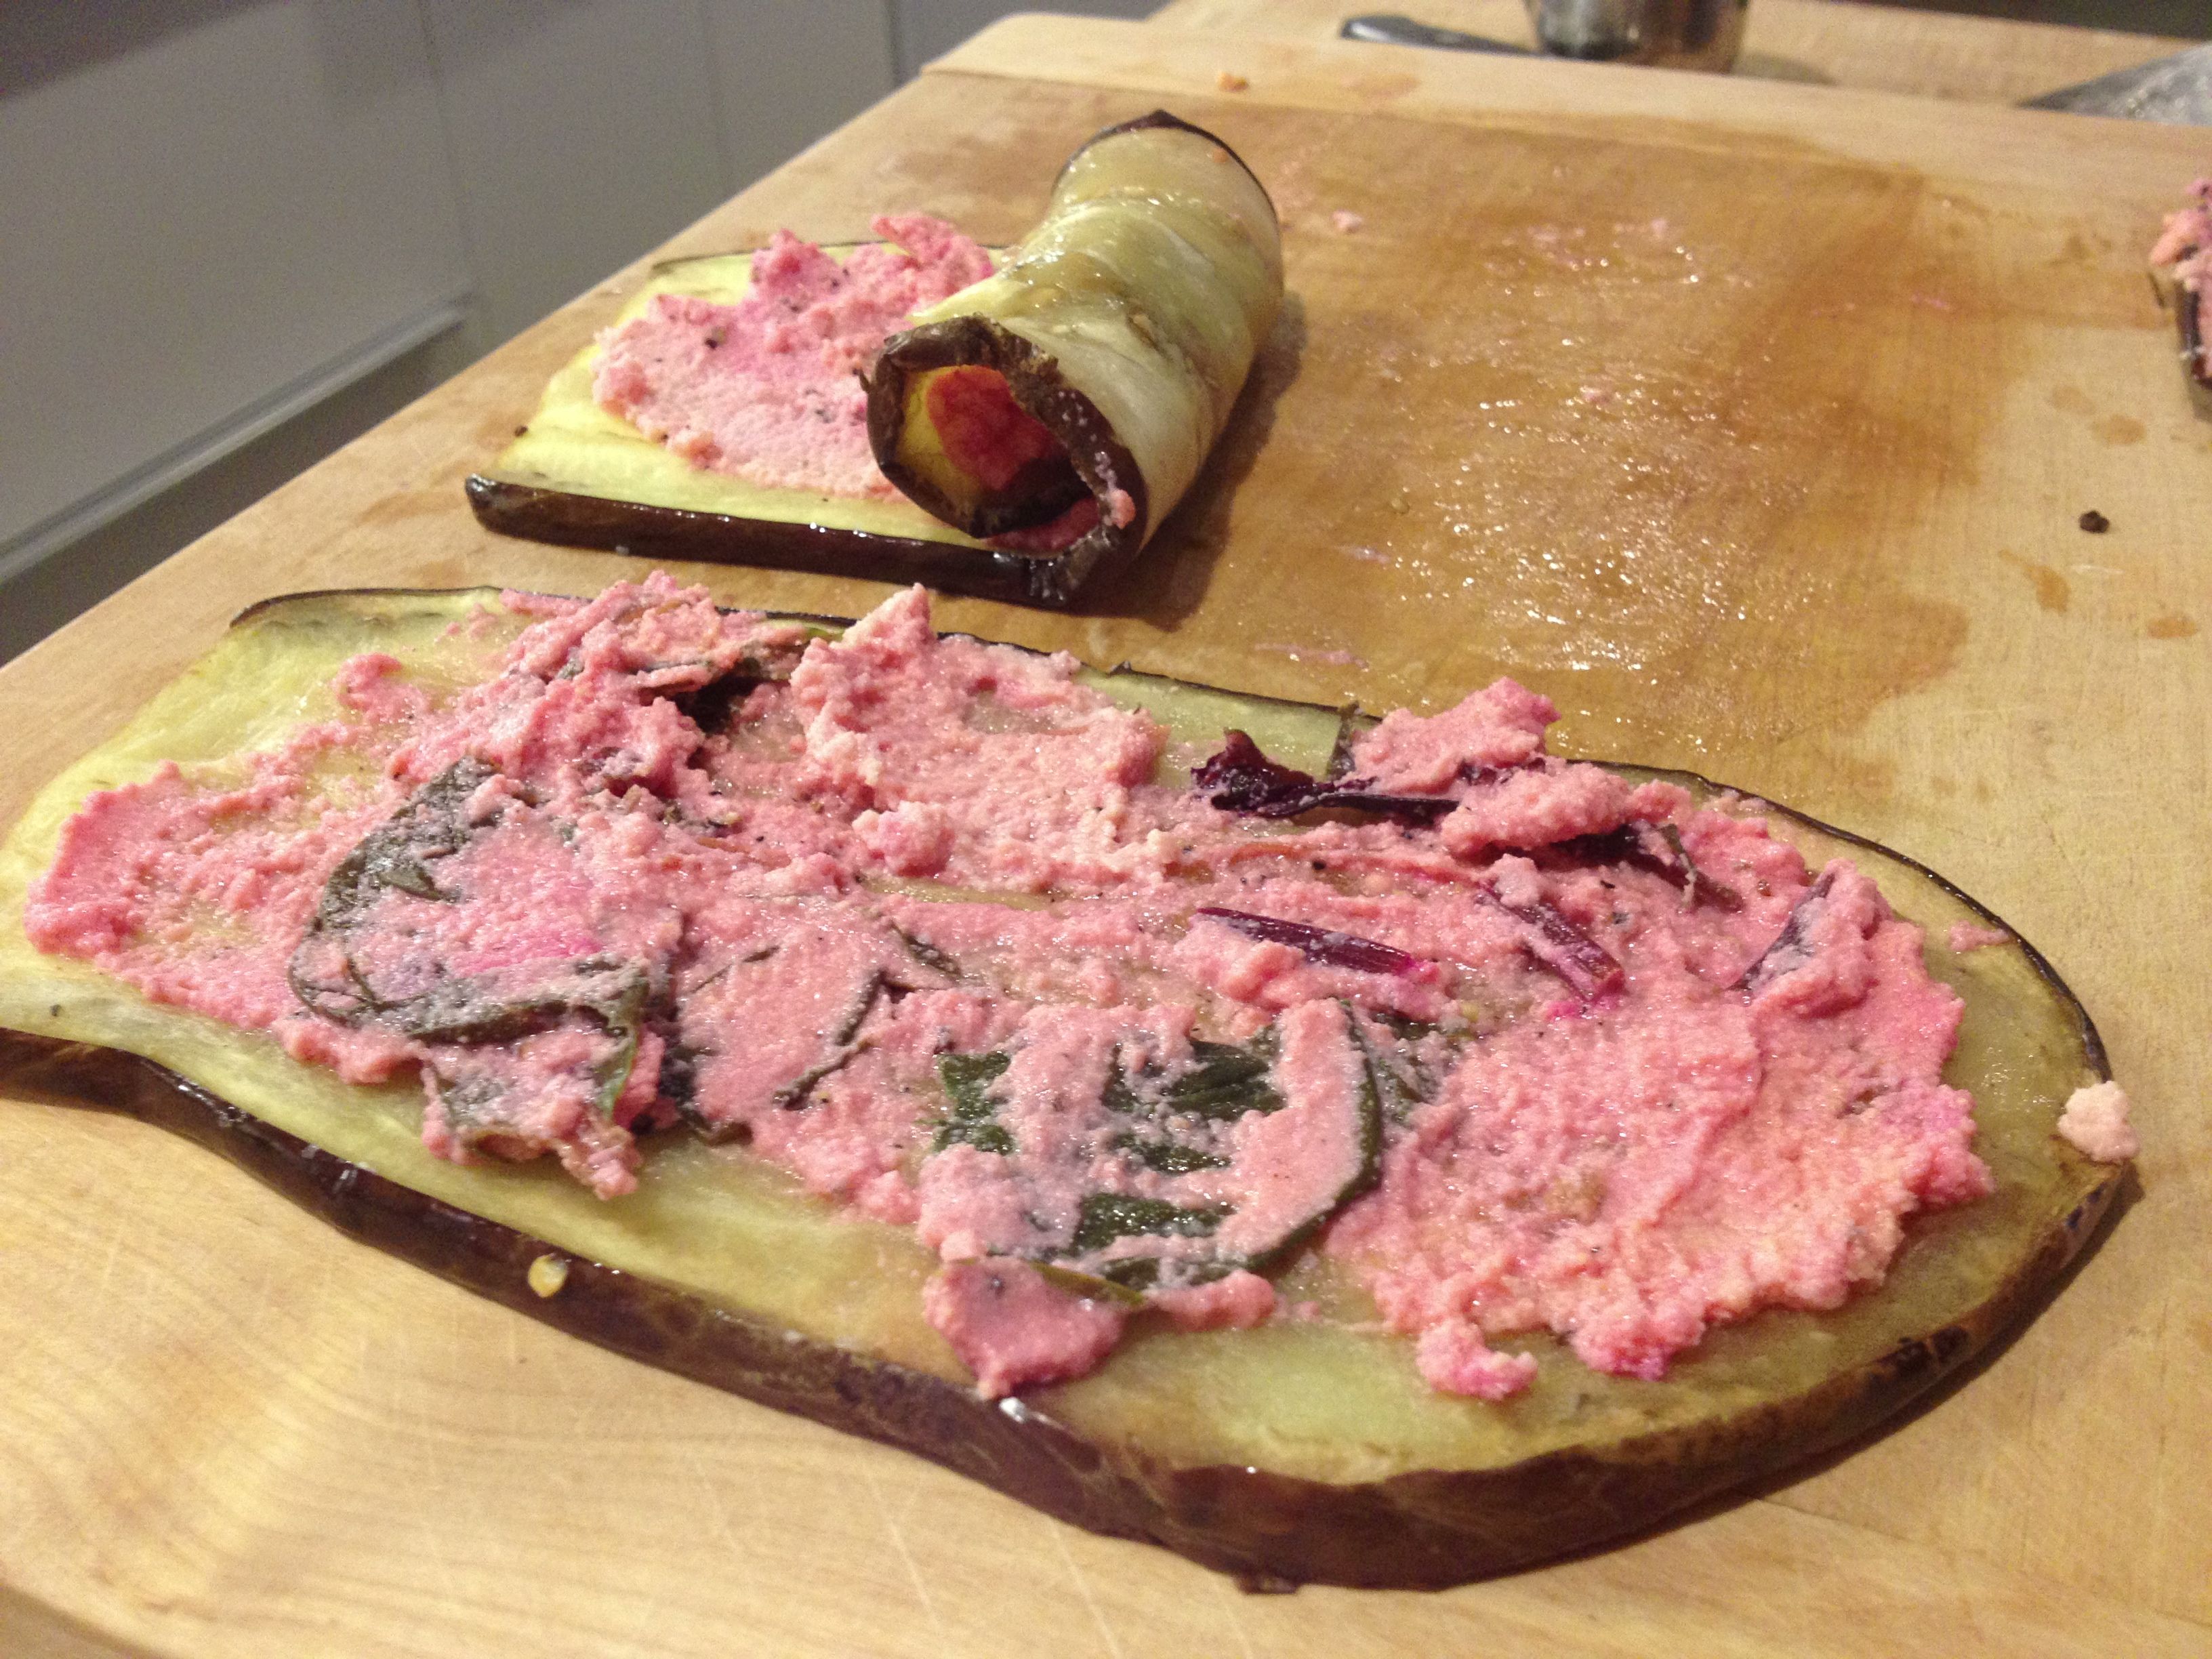
Eggplant slices spread with ricotta mixture and rolled.
6. Lay down about 1/4 cup of the tomato sauce in the bottom of an 8×8 baking dish. Place eggplant rolls in dish on their sides (not standing up). Fit as many as you can in there. When done, generously spoon sauce over the surface—but you don’t want it soaking wet, either. Find the happy medium. When done, sprinkle a coating of grated Parmesan on top and cover with foil.

Lay the rollatinis side by side in an 8×8 baking dish

Spoon sauce over top and sprinkle with Parmesan cheese
7. Pop back into the 400F oven for about 20 minutes. Remove foil and bake another 5 minutes or so. Remove and let cool for 5 minutes before digging in.
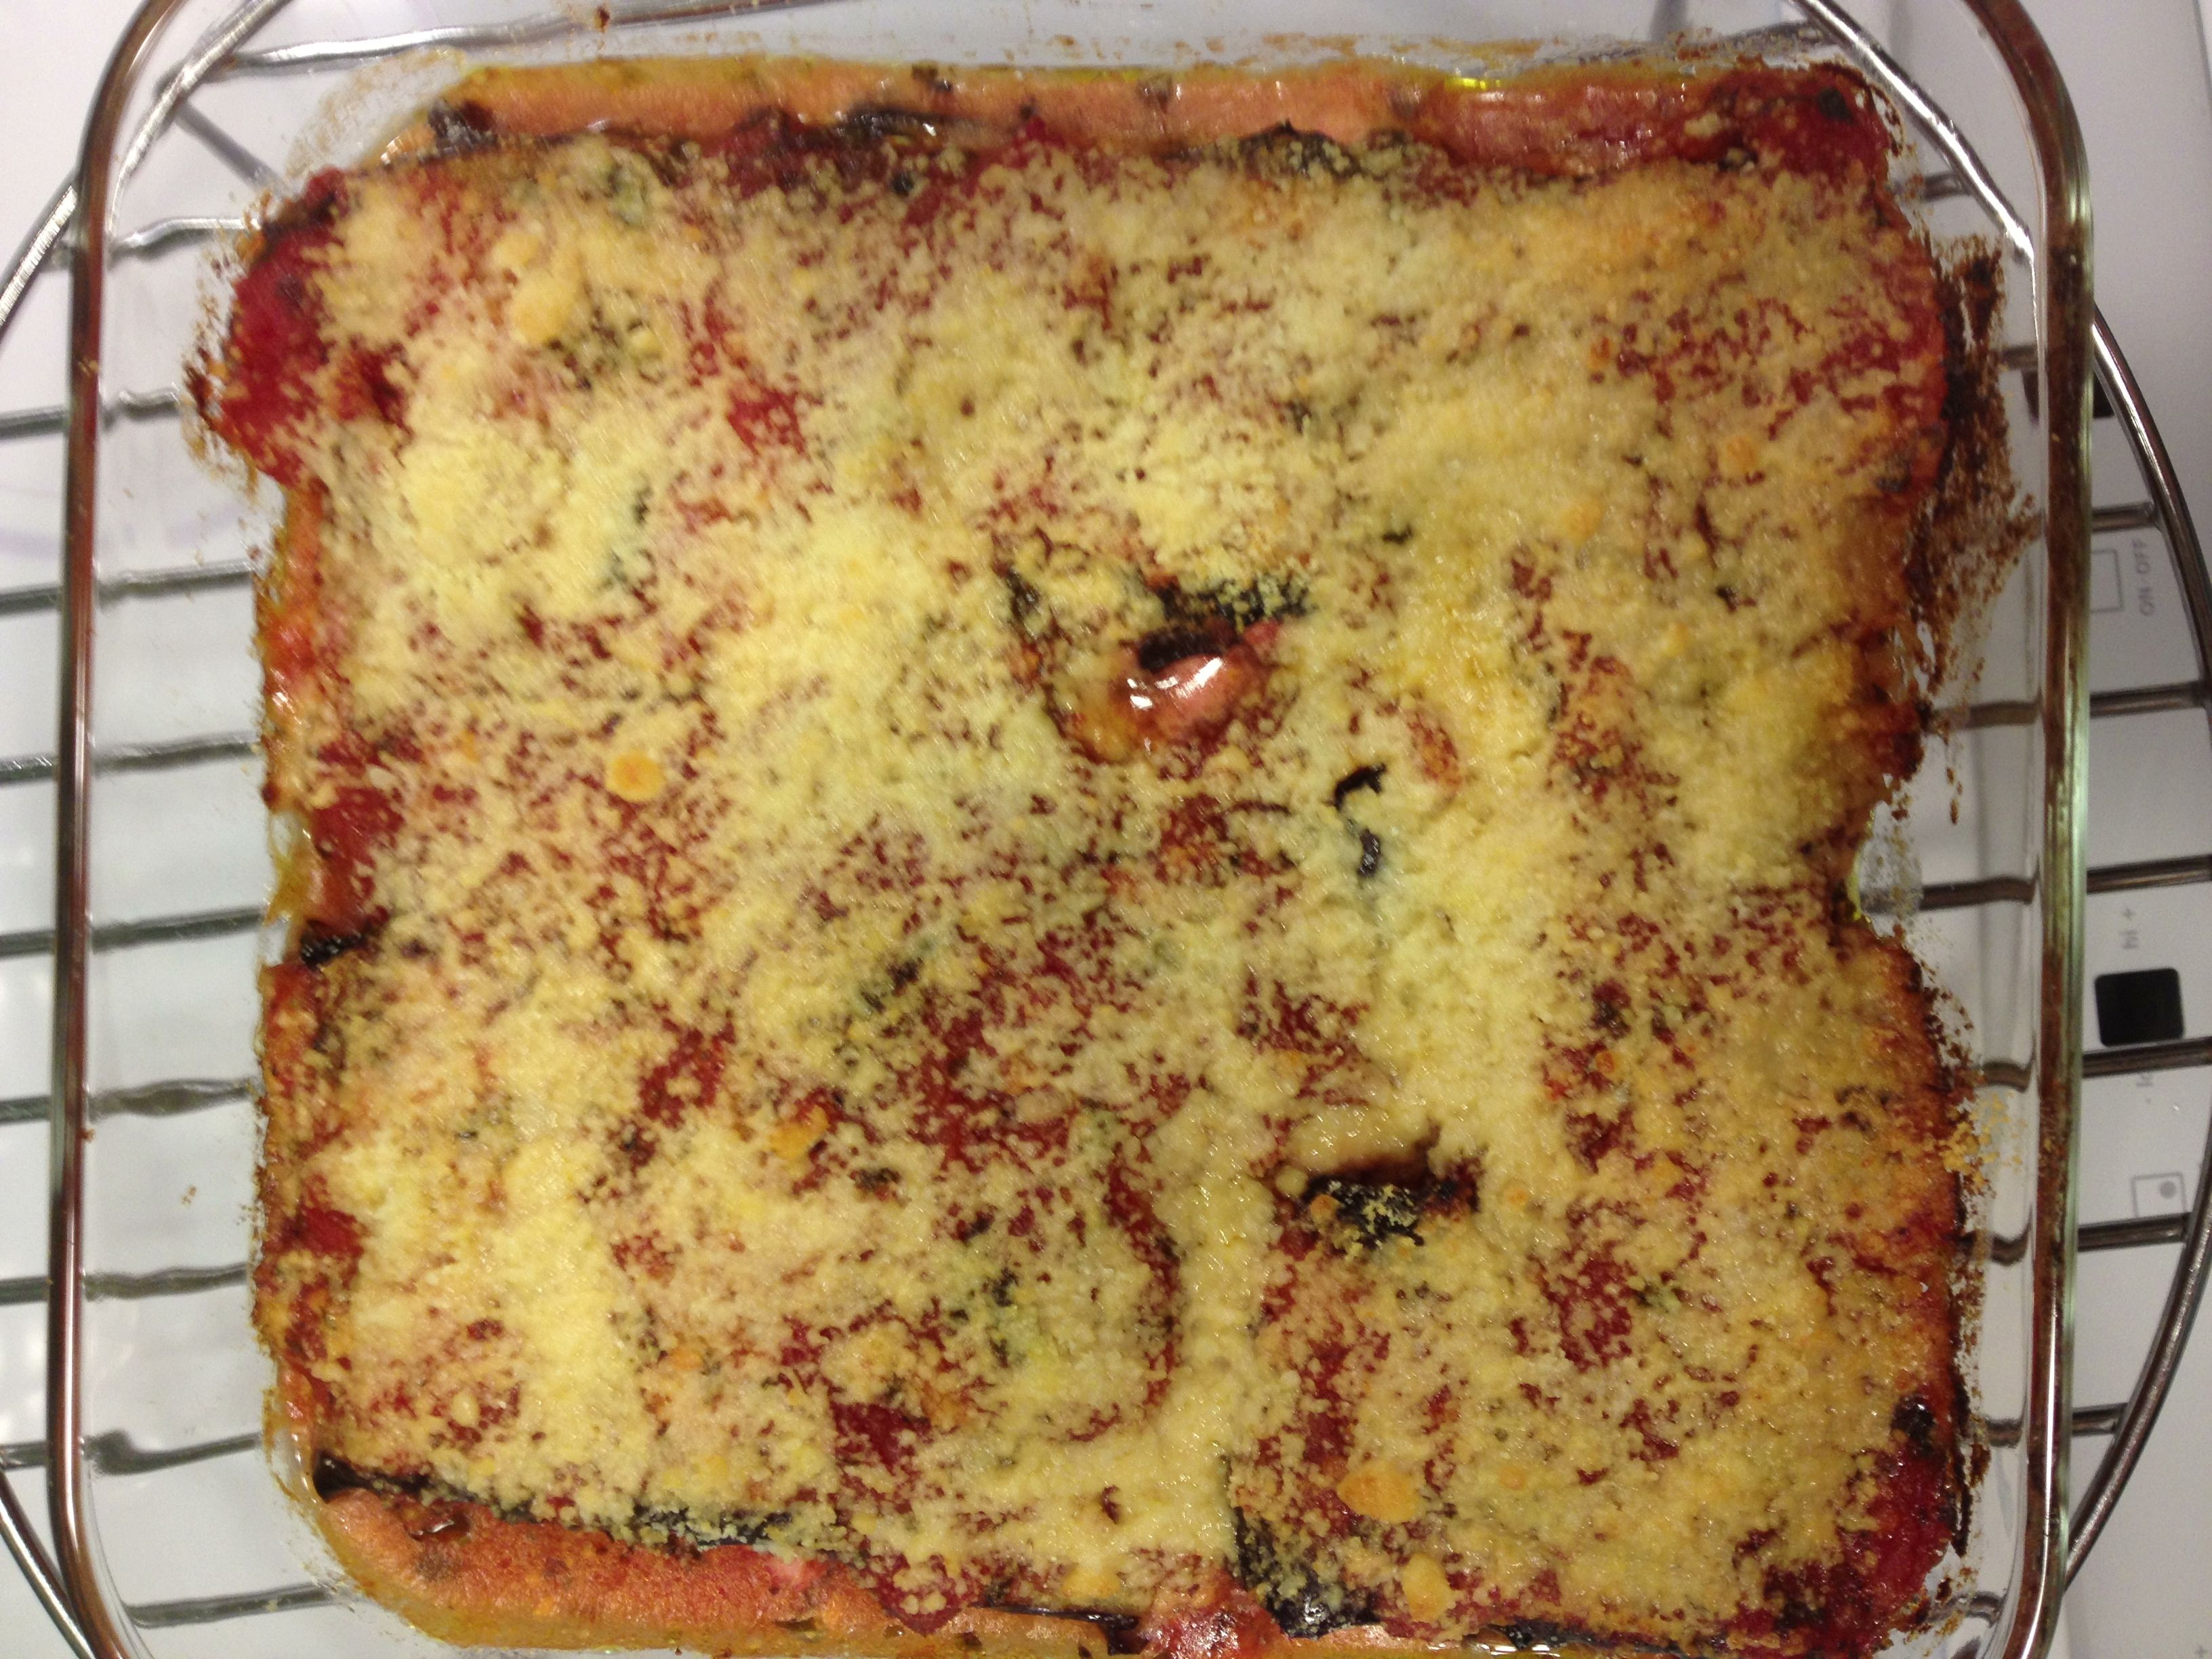
Bake for a total of about 20-25 minutes.
Have something like this in your repertoire? Let me know your version in the comments section.
Spicy Tomato Soup
October 2, 2011 § Leave a comment
Normally, if you let produce sit around for awhile, bad things happen. Soft spots. Wilt. Mold. Eyes sprouting. Ooze. Fruit flies. Rot.
Okay, I’ll stop with the grossness.
But sometimes, if you let produce sit around, good things happen. Like what? Like ripeness, for one.
This time of year, you just never really know what’s gonna happen in the garden. And I speak specifically of the summer hangers on—the zucchini and yellow squash, the basil, the peppers, the tomatoes. Especially the tomatoes. Less sun, cooler weather means they take a way long time to ripen on the vine. And the frustrating part is a tomato could be green and happy one day, and then the next day it could be on the ground, fodder for the ants.
So, I pick them up and bring them home. Or I pick them when they’re just turning orangy. Or I pick one or two whenever I visit the garden, which is about twice a week this time of year.
What to do with green tomatoes? Orangy tomatoes? Let them sit on the counter—they’ll ripen. Kinda. Not a nice and juicy vine-ripening experience, but they’ll turn red. Ish.

The fixins.

It's Tomato Christmas.

Look at that tomato in the middle—it's like the Italian flag.
With a mix of tomatoes in all stages of ripeness, I turn to a recipe from Emeril Lagasse I pulled off the Food Network website. The original calls for pancetta and three different types of hot peppers – jalapeno peppers and Anaheim and pasilla chiles. And, it calls for just green tomatoes.
Is it spicy? Oh yeah, it’s spicy. Feel free to add a dollop of sour cream to cool it down. Me? I like to add a spoonful of pesto. Tomatoes and basil – a perfect match.
Spicy Tomato Soup(this is a double batch)
-

Spicy Tomato Soup
1 Tbs olive oil
- 1 large sweet onion, sliced thinly
- 5-6 cloves garlic, peeled
- 2 bay leaves
- 5-6 hot peppers, whatever type you want to cook with, diced (I used jalapeno and Hungarian wax)
- 3.5 lbs tomatoes, cored and roughly chopped
- 6 cups chicken or vegetable stock
- Juice of 1 lemon
- Salt and pepper

-Heat oil in a pan over medium heat. Saute onion until just translucent – 4-5 minutes. Season with salt and pepper.
-Add garlic, bay leaves, garlic, and peppers and cook for 4-5 minutes. Add tomatoes and stock, then adjust seasonings with salt and pepper to taste. Bring soup to a boil, then turn down heat and simmer for 15 minutes or so, until the tomatoes are soft.
-Time to puree!! But remove the bay leaves first!! You can puree in batches in a blender. Or, we have an immersion blender that does a terrific job. Sure, you’ll get a bunch of tomato skins getting kinda caught in the blendery parts. Just remove, or put back into the soup—whatever your preference. If you’ve pureed in batches in a blender, pour the soup into a separate bowl.
-Add the lemon juice. Give it a taste. Spicy? That’s what it’s supposed to be.
Try with a bit of sour cream. Or shaved parm. Or the runny part of your stash of pesto. Be sure you have some crusty bread. You’re gonna want to sop up that goodness.
You know, this would be a great soup to make for the Homegrown Food Challenge. Luke, give this a try—I know you love spicy stuff!
Roasted Vegetable Lasagna
August 14, 2011 § 1 Comment
Sometimes … sometimes I just want to eat bad things. Good-tasting things but bad for you, or your waistline. Fried chicken. Wings. A big drippy pulled-pork sandwich. A pile o’pasta.
But if it’s homemade, I hear, it’s half as much calories, conveniently. At least that’s what I tell myself. And if it has vegetables in it, well … then it’s downright a health food.
So that makes our roasted vegetable lasagna not only calorie-free but good for you, too. And the best thing about this recipe is it’s a combination of three previous posts. Brilliant!
Recipe
- Roasted vegetables of your choice
- Homemade pasta
- Roasted cherry tomato sauce
- 1 lb. ricotta cheese
- 1/2 lb. chard
- 1 tsp nutmeg
- 3 balls of fresh mozzarella, thinly sliced.
- One rectangular casserole dish, what are they, 8×13?
NOTE: If you’re not making your own pasta … and really, you don’t have to … buy the lasagna sheets that you don’t have to pre-boil. A few cents more, but really, the convenience is worth it.
-Our roasted vegetables of choice for this lasagna are yellow squash. We sliced it into 1/4-in. slices, lengthwise. Glug of evoo, salt and pepper, and roast at 425F for 6 minutes each side.When done, set aside.
-Roasted cherry tomato sauce – just as the recipe says. You may want to puree it.
-Homemade pasta … prepare just as the recipe says. Make the sheets to fit half the width of the pan.
We have the sauce, the pasta, the veggies. Oh, wait – one more vegetable.
-Chard. Stem it and then steam it for 1 minute, 2 minutes max. Let it cool. Squeeze the water out of it. And chop. Set aside.
-Put the ricotta into a medium bowl. Add the chopped chard, nutmeg and a pinch of salt and combine. That’s your cheese filling.
Now it’s time to assemble! It’s all about layers. Get the layers, get the lasagna.
-Lay down a thin layer of sauce. Then top with two lengths of pasta sheets. If you crank out the pasta as you go, you can cut the pasta to the correct length. Top the pasta with some roasted vegetables. For the squash, we fit 4-5 lengths of squash per layer.
-Next, spread some of the ricotta – as much as you’d like – over the veggie layer. Dot with slices of mozzarella. A little cheese, a lotta cheese – whatever you want.
-Add another layer – sauce, pasta, veggies, cheeses. You can make as many layers as you have ingredients for. Three or four is typical. Just keep going until you fill the dish and have absolutely no more room.
-When you are done layering, you’re going to top with a layer of pasta, then a thin coating of sauce. Then top with as much mozzarella cheese as you like. And a dusting of parmesan, too. Done!

-Cover with aluminum foil. Pop into a 375F oven for 25 minutes. Remove foil and cook for another 15ish, or until the sauce and cheese are bubbling.
-Let it sit for 10 minutes.
Try not to make a pig of yourself at the dinner table. Really, you’re better than that.
Roasted Cherry Tomato Sauce
August 14, 2011 § 5 Comments
I’m telling you, some gardening years are better than others. A string of spectacular harvest sseasons from my small urban plot have made this summer a “meh” – that’s on a scale from “it sucks” to “this is freakin’ amazing.”
My cherry tomatoes—I’m not thrilled with them. They’re growing okay. I just don’t like the fruit. Too big. Too thick-skinned. And the flavor fell flat. Cherries are supposed to poppable, add a brightness to a salad. These? Meh.
When life gives you lemons, right?
So, these cherry tomatoes went straight into sauce. Roasting brings out the sweetness they lack when just sitting on your salad.
Step 1: Put about 2-3 lbs. cherry tomatoes in a cast iron skillet. Add a couple of tablespoons evoo, sprinkle with kosher salt and give it a couple of turns of fresh ground pepper.

Cherry tomatoes seasoned and waiting to be popped into a 425F oven.
Pop it into a 425F oven for about 40 min. or until the tomato skins start bursting and the liquid starts bubbling. Let it bubble along for a total time of about 1 hour.

Cherry tomatoes after an hour of roasting
Step 2: Your gonna get lots of juice from the tomatoes, and you want to let it cook off. And you also want the flavor of the tomatoes come through more and get the sauce a bit thicker. So, take the skillet out of the oven and put it on the stove top over a low flame. Add 2-3 cloves of crushed garlic. Add some herbage; whatever you like. Fresh thyme or basil. Will it top a pizza? Add some chopped fresh oregano. 2Tbs is about right. Taste it for seasoning and add salt/pepper if you need to. And cook loooow and sloooooow. How long? Until enough liquid has cooked out to get the sauce to the thickness you like. In my case, 2 hours.

After two hours simmering on the stove top.
How easy was that? You might find it still a bit too chunky to spread on a pizza or spoon onto layers of lasagna. Whir it up in a blender or use an immersion blender if you like.
And how sweet is this, uh? You may never go back to plum tomatoes for sauce again.
Biga-Based Pizza Dough
June 1, 2011 § 5 Comments
Pizza is one of our fallback meals in the Dainty domicile. And it’s not delivery; not even DiGiorno. It’s made with good ol’ homemade, hand-thrown dough. With a special addition. Let’s call it Dainty Dough.
There are two things that make the Dainty Dough a bit different. First, it’s made with biga, one of many types of dough starters. It’s a yeast-based starter, not a natural sourdough starter—meaning it contains commercial yeast and not yeast found naturally in the environment (have I lost you yet? Hang on for a minute.). The biga ferments—i.e. sits on your counter bubbling away—for 8 to 24 hours or so, all the while developing a richer, chewier flavor. Pizza crust with flavor, not just used as a platform for toppings, imagine that.
The second thing I do is add a dollop or two of my Sourdough Starter, aka Milo the Baby Dough, during the dough-making process. A few months back you may recall I was experimenting with natural yeast and tried creating a real sourdough. Well, after a month or so, Milo is alive and well. I feel like I created a golem, it’s so incredibly cool. It’s totally not necessary to add this sourdough starter, but I’ll explain in a minute why I do it.
Dainty Dough: Step 1
Biga Recipe (from my Basic Baking class at the Cambridge School of Culinary Arts)
- 1/4 oz. yeast
- 1/4 cup warm water (warm=dip in a finger and it should feel the same temp as your body)
- pinch of sugar
- 1 1/2 cups warm water
- 3 3/4 cups flour (I suggest all-purpose flour here. If you want wheat dough you can add wheat flour later)
-Add yeast and 1/4 cup warm water with sugar in a bowl and stir together. Let it sit for 10 minutes. Add remaining water and the flour and mix thoroughly. You’ll end up with a creamy mixture. Cover and either let sit on the counter 8 hours or place in the fridge for 24 hours. It will become creamy and bubbly. The biga will remain
-At this point you can proceed with the next step and make the pizza dough. Or, I suggest weighing out your biga into 4 oz. pieces, reserving one piece for your current pizza and placing the remaining into individual freezer baggies and popping them in the freezer. Label and date your baggies! Otherwise a year from now you’ll excavate your freezer and wonder what the heck that thing is. From this one batch of biga you will get up to 8 4 oz. pieces. And each 4 oz. biga gives you four pizza stone-sized pizzas. Do the math—that’s a lot of pizza!
Dainty Dough: Step 2
Pizza Dough Recipe
- 4 oz. biga
- 1/4 tsp. salt (kosher preferred)
- 2 Tbs. olive oil
- A dollop or two of Milo the Baby Dough sourdough starter (optional)
- 4 1/2 cup flour (for wheat dough use 2 1/2 cups all-purpose and 2 cups whole wheat)
- 1 1/2 cup water
-Add biga, salt, oil, sourdough starter and flour to the bowl of a stand mixer fitted with a dough hook. Turn on slow speed, let it mix together for up to a minute then add water slowly. Because I’ve added a bit of the sourdough starter, there is more moisture in the dough and depending on your weather conditions, you may not need all of that water. Yes, baking depends on weather conditions, believe it or not.
-If you’ve added all the water and the dough seems wet and watery, add a tablespoon of all-purpose flour and let it mix in. Keep adding flour one tablespoon at a time until the dough is no longer wet but not bone dry! You’ll likely need no more than four or five tablespoons of flour.
-Keep mixing on medium speed for about five minutes. The dough has a tendency to ride up the dough hook. Stop the mixer when the dough makes it above the hook’s collar and push the dough back down into the bowl. Keep mixing until the dough feels smooth and it’s started to relax a bit; i.e., it shouldn’t feel like a hard tight wad of flour.
-Oil a medium bowl. Roll the dough around in the oil so it’s slightly oily all over. Cover with plastic wrap and let it sit for an hour. The dough won’t have risen all that much—it’s not rising like bread, we just want it to become elastic.
-Cut the dough into four equally sized pieces—they’ll likely have a triangular shape. Want an oddly shaped pizza? Then place these dough pieces as they are on a baking sheet or on the counter and cover with oiled plastic wrap. Want a perfectly round pizza? Then do this: Holding the dough piece in your hands, pull all the dough from around the piece into a central point. Go around the outside a couple times pulling it all into the center. Now, do your best to pinch that central point closed, then place the dough with that point facing downward. What you will have is a little ball with a perfectly round top, no seams showing anywhere except on the bottom. Cover these with oiled plastic wrap and let sit for about 20 minutes.
So, about adding that dollop or two of sourdough starter to the dough … here’s why I did it. I did, in fact, excavate my freezer recently and found two baggies of 13 month-old biga. Doing a little research I found that the recommended time for biga in the freezer is a max of four months. Oops. I added the sourdough starter as a way to give the dough a kick of fresh yeast. I think it worked. Plus, I noticed the crust did have telltale sourdough bread-like air bubbles. Tasty!
Hmm … turns out I have absolutely no photos of any of this. Bummer. Guess I’ll have to make some biga and dough later today.
By the way, biga can be used for more than just pizza dough. So instead of making 4 oz. balls of biga for the freezer, you can use what you have left for bread baking.
Wait, what? Am I leaving you without actually making a pizza? You bet. That’s for another day, when Jennifer can chime in on her favorite toppings. I make the dough, but she’s the pizza master.
Scott Conant’s Scarpetta in South Beach
March 8, 2011 § 1 Comment
Where’s Dainty been these last few days? Not blogging, obviously. It think it’s a misdemeanor to blog while in the big warm world of South Beach. We jetted away last week to find some relief from this lagging winter.
While down there, I had to make good on a bet. Thanks to the Pittsburgh Steelers, I owed Jennifer a meal at the Fountainebleau Hotel – a fabulous haven for the young and rich who want to be seen. We just wanted to check out the glitz.
After a little research, we found that Scott Conant had a restaurant in the compound call Scarpetta. Scott Conant – he’s one of the judges on Chopped, the one who practically had someone cuffed and thrown into jail for including cheese with a fish dish, apparently a big Italian food no-no. You don’t know me if you don’t know how I feel about such restrictions. Wanting to learn more about the man’s culinary viewpoint—and secretly wanting to put cheese on fish while on the guy’s turf—we decided that Scarpetta would be it.
The restaurant – dimly lit, private, modernly comfortable. The front-of-house girls – Jennifer even called them vacuous to their faces and they giggled. The waitstaff – well-trained. Although our guy looked vaguely like a thin Charlie Sheen. We were seated on the veranda, which typically has ocean and pool views but was enclosed due to high winds. Maybe our seating had something to do with 50 Cent and his entourage dining inside. Who knows.
Anyway … I’m not going to tell you about our entire meal – I’m sure there are enough reviews out there for your reading pleasure. You can assume it was great. If it wasn’t, I’d write all about it. What I’m going to tell you about is my appetizer, which – and I’m not kidding – may be the best thing I’ve ever eaten in my life.
Burrata atop heirloom tomatoes. I will forever remember this dish, and here’s why.
A burrata is a fresh cheese creation consisting of a solid mozzarella shell and mozzarella and cream interior, served at room temperature. It takes a caprese salad and makes it look like McNuggets. The burrata is like a pillow of dairy with a creamy dairy filling. This topped a thick slice or two of fresh heirloom tomatoes, perhaps lightly tossed in evoo – it was a little hard to tell after I cut into the burrata, but more about that later. When I ordered, I was skeptical of the “fresh heirloom tomato” bit, but silly Northerner that I am, Florida can grow fresh produce during the winter. I do wish they had specified which tomato variety they used. I know they’d have to change out the menu frequently if they did that. Perhaps the waitstaff could relay that info as the “heirloom tomato of the day” like the “fish of the day.”
Now, about that burrata – this was a mozzarella that must have just begun to form and was immediately served to us, it was that fresh. And delicate. So, so delicate. Cutting into the burrata released a small dose of warm cream, coating the ripe yet firm tomato. Someone’s Italian grandmother was in the back making this. I just know it. So, there was this small bite of rich and creamy cheese contrasting with the bright light tang and texture of the thick slab of tomato. The taste and texture could make me believe angels exist, it was that good.
I had wanted to save a small corner of the burrata to put on my turbot entree, but I just could not leave a drop of it for later. I must learn to make burrata.
Dainty Rates: The burrata – off the charts.
