
A Healthy, Fruit-filled Cookie
June 11, 2013 § 1 Comment
Oh, and chocolate, too. There’s dark chocolate in these healthy cookies.
I was recently charged with finding a healthy cookie recipe for a gathering of friends. Healthy, but tasty. And a real cookie, not something that was just pretending to be a treat, something “cookie” in name only. And usually when I try to find a healthy alternative to a traditionally loaded-with-bad-stuff recipe, I turn to The Moosewood Cookbook. In this case, the Moosewood let me down.
But not Ellie Krieger. Ellie had (still has?) a Food Network show, Healthy Appetite, all about healthy cooking. When the Moosewood lets me down or becomes a little too earthy-crunchy-granola-ey, I turn to Ellie. And in this healthy cookie recipes, she totally did not disappoint.
First, I’m not a dietician. Is this recipe healthy? I’m taking Ellie’s word on it. But I can tell you it’s not loaded with a ton of butter, shortening, oil, cholesterol, and sugar. Some, but not a lot. There’s applesauce! There’s egg whites! Plus it has dried fruit – and I think we all agree fruit is a pretty good-for-you thing to eat. As for the dark chocolate, I think we’ve all heard reports about how it’s actually a good thing in small amounts.
Not only are they healthy, they are incredibly tasty. Incredibly. I’ve made four batches in the last week and there’s more on the way.
Healthy Cookies (aka Kitchen Sink Cookies) via Ellie Krieger’s Healthy Appetite
Note: The recipe says it makes 18-20 cookies. Don’t believe it.
Ingredients
2 tbs unsalted butter, softened
2 tbs canola oil
1/3 cup light brown sugar
1/4 cup applesauce
1 egg white
1 tsp vanilla
2/3 cup whole-wheat pastry flour
1/2 cup oatmeal
1/4 tsp salt
1/4 tsp ground cinnamon
1/2 cup chopped dried fruit (Ellie recommends cherries and apricots. I used a dried berry blend from Trader Joe’s)
1/4 cup lightly toasted walnuts
2 oz. dark chocolate, cut into chunks
1. Preheat oven to 375 F.
2. Combine butter, oil and brown sugar in the bowl of a mixer. Mix on high speed. Stop occasionally to scrape down bowl. Mix until mixture is light and fluffy, about 2 minutes. Add applesauce, egg white and vanilla, mix to combine. Add flour, oatmeal, salt and cinnamon and mix just until just combined. Add dried fruit, walnuts and chocolate and mix to combine.
3. Prepare a baking sheet by spraying with a light cooking spray OR use sheets of parchment. Scoop out 1 tbs of cookie dough at a time and roll into balls. (I used a small-sized ice cream scoop that’s a tad bit bigger than 1 tbs). Place 2-inches apart on the baking sheet. Press cookies down with the palm of your hand to flatten slightly (less butter = less spread). I advise you flour your palm a bit because the dough will stick.
4. Bake for 12 to 14 minutes, or until lightly browned but still soft. Remove and cool on racks.
You’ll find that 1 tbs doesn’t make a big enough cookie. You’ll want HUGE cookies because they are incredibly good. But then, the larger the healthy cookie the less healthy it is, right? Let’s just disregard that logic for now.
Homemade Fig Newtons
April 2, 2013 § 2 Comments
My mother is a sucker for cookies of any kind. And I, being her offspring, somehow inherited that trait. She would bake cookies, yes. But wasn’t it more exciting to experiment with the cookie treasures found on store shelves? Oh, what those Keebler Evles did to us. Chocolate-covered anything went directly into our shopping cart. Those chocolate-covered marshmallow puffs on a graham cracker-like cookie were Mom’s favorite. I also had a soft spot for those styrofoam-like wafer cookies with “vanilla creme” sandwiched inside.
But what I really, really liked were fig newtons.
I contend that I never ate that many fig newtons. Not really. Just one box on average a year. Thing is, I would eat an entire sleeve of them at each sitting. Why else would they put them in a sleeve? Ah, logic of childhood. And to have that metabolism again…
A few years ago when I saw that Joanne Chang’s Flour cookbook had a recipe for fig newtons, I was surprisingly conflicted. I love fig newtons—so wouldn’t gourmet fig newtons be the bomb? But … do I want the ability to create something so cravingly delicious? I mean, I’m not a calorie counter but these could be dangerous.
It took me three years to work up the nerve, but I finally made Flour’s fig newtons this weekend. Homemade fig jam in a shortbread cookie. Yes, they are cravingly delicious. Yes, it requires self control to not eat the entire batch. They’re also nothing like the original fig newton. It’s more of a pastry, really…like a slice of fig pie with a shortbread crust. This is dessert worthy of far more than a sleeve. This is a dessert of adult sophistication.
Homemade Fig Newtons (from Joanne Chang’s Flour Cookbook) 
Fig Jam Filling
2+ pints ripe black mission figs, stems removed and figs quartered (2 is too little, 3 makes slightly too much)
1 orange, peeled, seeded and finely chopped (try to remove the white pith and membrane, too)
110 grams light brown sugar
1 tbs finely grated lemon zest (about 1 lemon)
1 tsp vanilla extract
Shortbread Dough
1 cup (2 sticks/228 grams) unsalted butter at room temp
75 grams granulated sugar
2 tbs confectioners’ sugar
1 egg yolk
1 tsp vanilla extract
140 grams all-purpose flour
120 grams cake flour
1/2 tsp baking powder
1/4 tsp kosher salt
1. Make the filling: Place quartered figs into a medium-sized, non-reactive saucepan. Add orange, brown sugar, lemon zest and salt. Heat on medium to simmer. Reduce to medium-low and simmer, uncovered for 40 minutes. Stir occasionally to prevent sticking. The mixture will turn into something reminiscent of jam. Remove from heat and add the vanilla. Let cool completely and set aside for 2 hours. (You can also refrigerate for up to three days in an airtight container.)
2. Start to make the dough: Using a KitchenAid mixer with a paddle attachment, cream together the butter and both sugars on medium speed until mixture is fluffy. This takes about 5 minutes with stoppages now and then to scrape sides of bowls and the paddle. Once that is fluffy, add in egg yolk and vanilla on medium (stopping and scraping) for another 2 or 3 minutes.
3. Separately combine the two flours, baking powder and salt in a small bowl and sift or mix it together well (I added all into a sieve to sift). Add these dry ingredients into the wet ingredients with the mixer on low, and let it combine for another 15 seconds or so. Do the stop-and-scrape thing again.
4. Cut a large piece of plastic wrap and scoop out the dough onto it. Wrap it up well and press the dough into a 6-in. disk about an inch thick. Pop it in the fridge for at least 30 minutes. At this point you can store it for up to 5 days or freeze it. If in the fridge for a long while, let it come to room temp for about 30 minutes before working it. If in the freezer, let it thaw out in fridge overnight.
5. Heat oven to 350F. While that is heating up, upwrap the dough disk and place onto a large piece of parchment paper. Add a bunch of flour to the parchment and onto a rolling pin, then gently roll the dough into a rectangle about 9 in. by 16 in. and about a 1/4-in. thick. Be careful not to pull or push the dough as this dough tears easily. Fix any tears by pressing together with your fingertips. I found it useful to trim the edges straight (saving the extra dough for treats later!).
6. With the long edge of the dough facing you, spoon the jam lengthwise across the center of the dough, left to right. The width of this jam “river” should be about 2.5 inches. You might not be able to fit all of the jam onto the dough. That’s okay—it’s tasty on toast. Once the jam river is down, you’ll grab the left and right edges of the parchment above the jam river and fold it down overtop of the jam. The dough should fold halfway down over the jam. Do the same with the bottom half of the dough, folding it up. Take pains to make sure these two dough halves meet in the middle, not overlapping and not having a gap. Side by side is what you are looking for. Once that happens, pinch those two dough halves together to seal, as well as the ends. Now, flip the jam-filled dough log over so the seam is on the bottom. Be careful! You may need to finagle it with adding another piece of parchment and rolling it over. Use your brain to figure it out.


Use your brain to figure out how to turn this jam-filled log seam-side down without damaging it.
6 optional. At this point you can wrap it up and refrigerate or place in the freezer.
7. Pop it in the oven for 60 minutes or until golden brown all over. The recipe says 65-70 minutes, but it really depends on your oven. My edges were getting awfully dark, so I opted to take it out 5 minutes early. Let it cool on a wire rack for at least 2 hours—I know, it’s a crazy long time but you want the jam to firm up a bit. Once cool, cut into 1-in. pieces crosswise. Enjoy with hot tea or coffee. And realize things are so much better than when you were a kid.
Apple Hand Pies
March 15, 2013 § 3 Comments
March 14. Or, 3.14. Known throughout the world as Pi Day in honor of that irrational number beginning with 3.14. But wait – wouldn’t they write it 14.3 in Europe?
I would rather consider it Pie Day. It’s the middle of March—we need a good pie this time of year. I’m all for it, quite honestly. Think about it—have you eaten pie since Thanksgiving? I didn’t think so.
I decided to make pie yesterday for Pie Day. But what kind? My go-to pies are those traditional fruity treats—peach, rhubarb, peach rhubarb (see a theme here?), apple, pumpkin. Nah. What about a cream pie? They get runny after a few days. The problem with any of these pies (if there can be a problem with pie) is that they are so darn big for two people (I know, I could invite you over but…). And as much as I’d like to eat an entire pie, I just can’t do it. At the last piece, all old and soggy, I begin to detest it. We must not go there. Can’t ruin pie like that.
So I decided on hand pies: Pies that fit into your hand. Individual servings of pie, all wrapped up in their individual casings. Perfect! Thing is, I’d never made hand pies before. What to do? What to make?
A little Googling got me to the Smitten Kitchen blog and her recipe for Bourbon Peach Hand Pies. Hmmm…peaches. Peaches and bourbon. And, according to the recipe, this dough holds up to the inevitable leaks that result in boiling hot fruit juicy spilling away, while also being light and flaky. Print it up—I’m in.
Alas, Trader Joe had other dessert intentions for me. Not a fresh peach to be found. So apples it was.
Before I get to the recipe, a few notes about it and the resulting pies:
- I used a food processor. When you have one, use it.
- The dough did exactly what she said it would—it held up well, didn’t leak (much) and is tasty and flaky. I’m definitely keeping it in my repertoire. BUT—it’s not really a pie dough. It’s more of a flaky morning pastry. Which is fine, just not very pie-ey.
- I used the same amount of apples as peaches the recipe called for. WAY TOO MUCH. Below is my estimation of half the recipe.
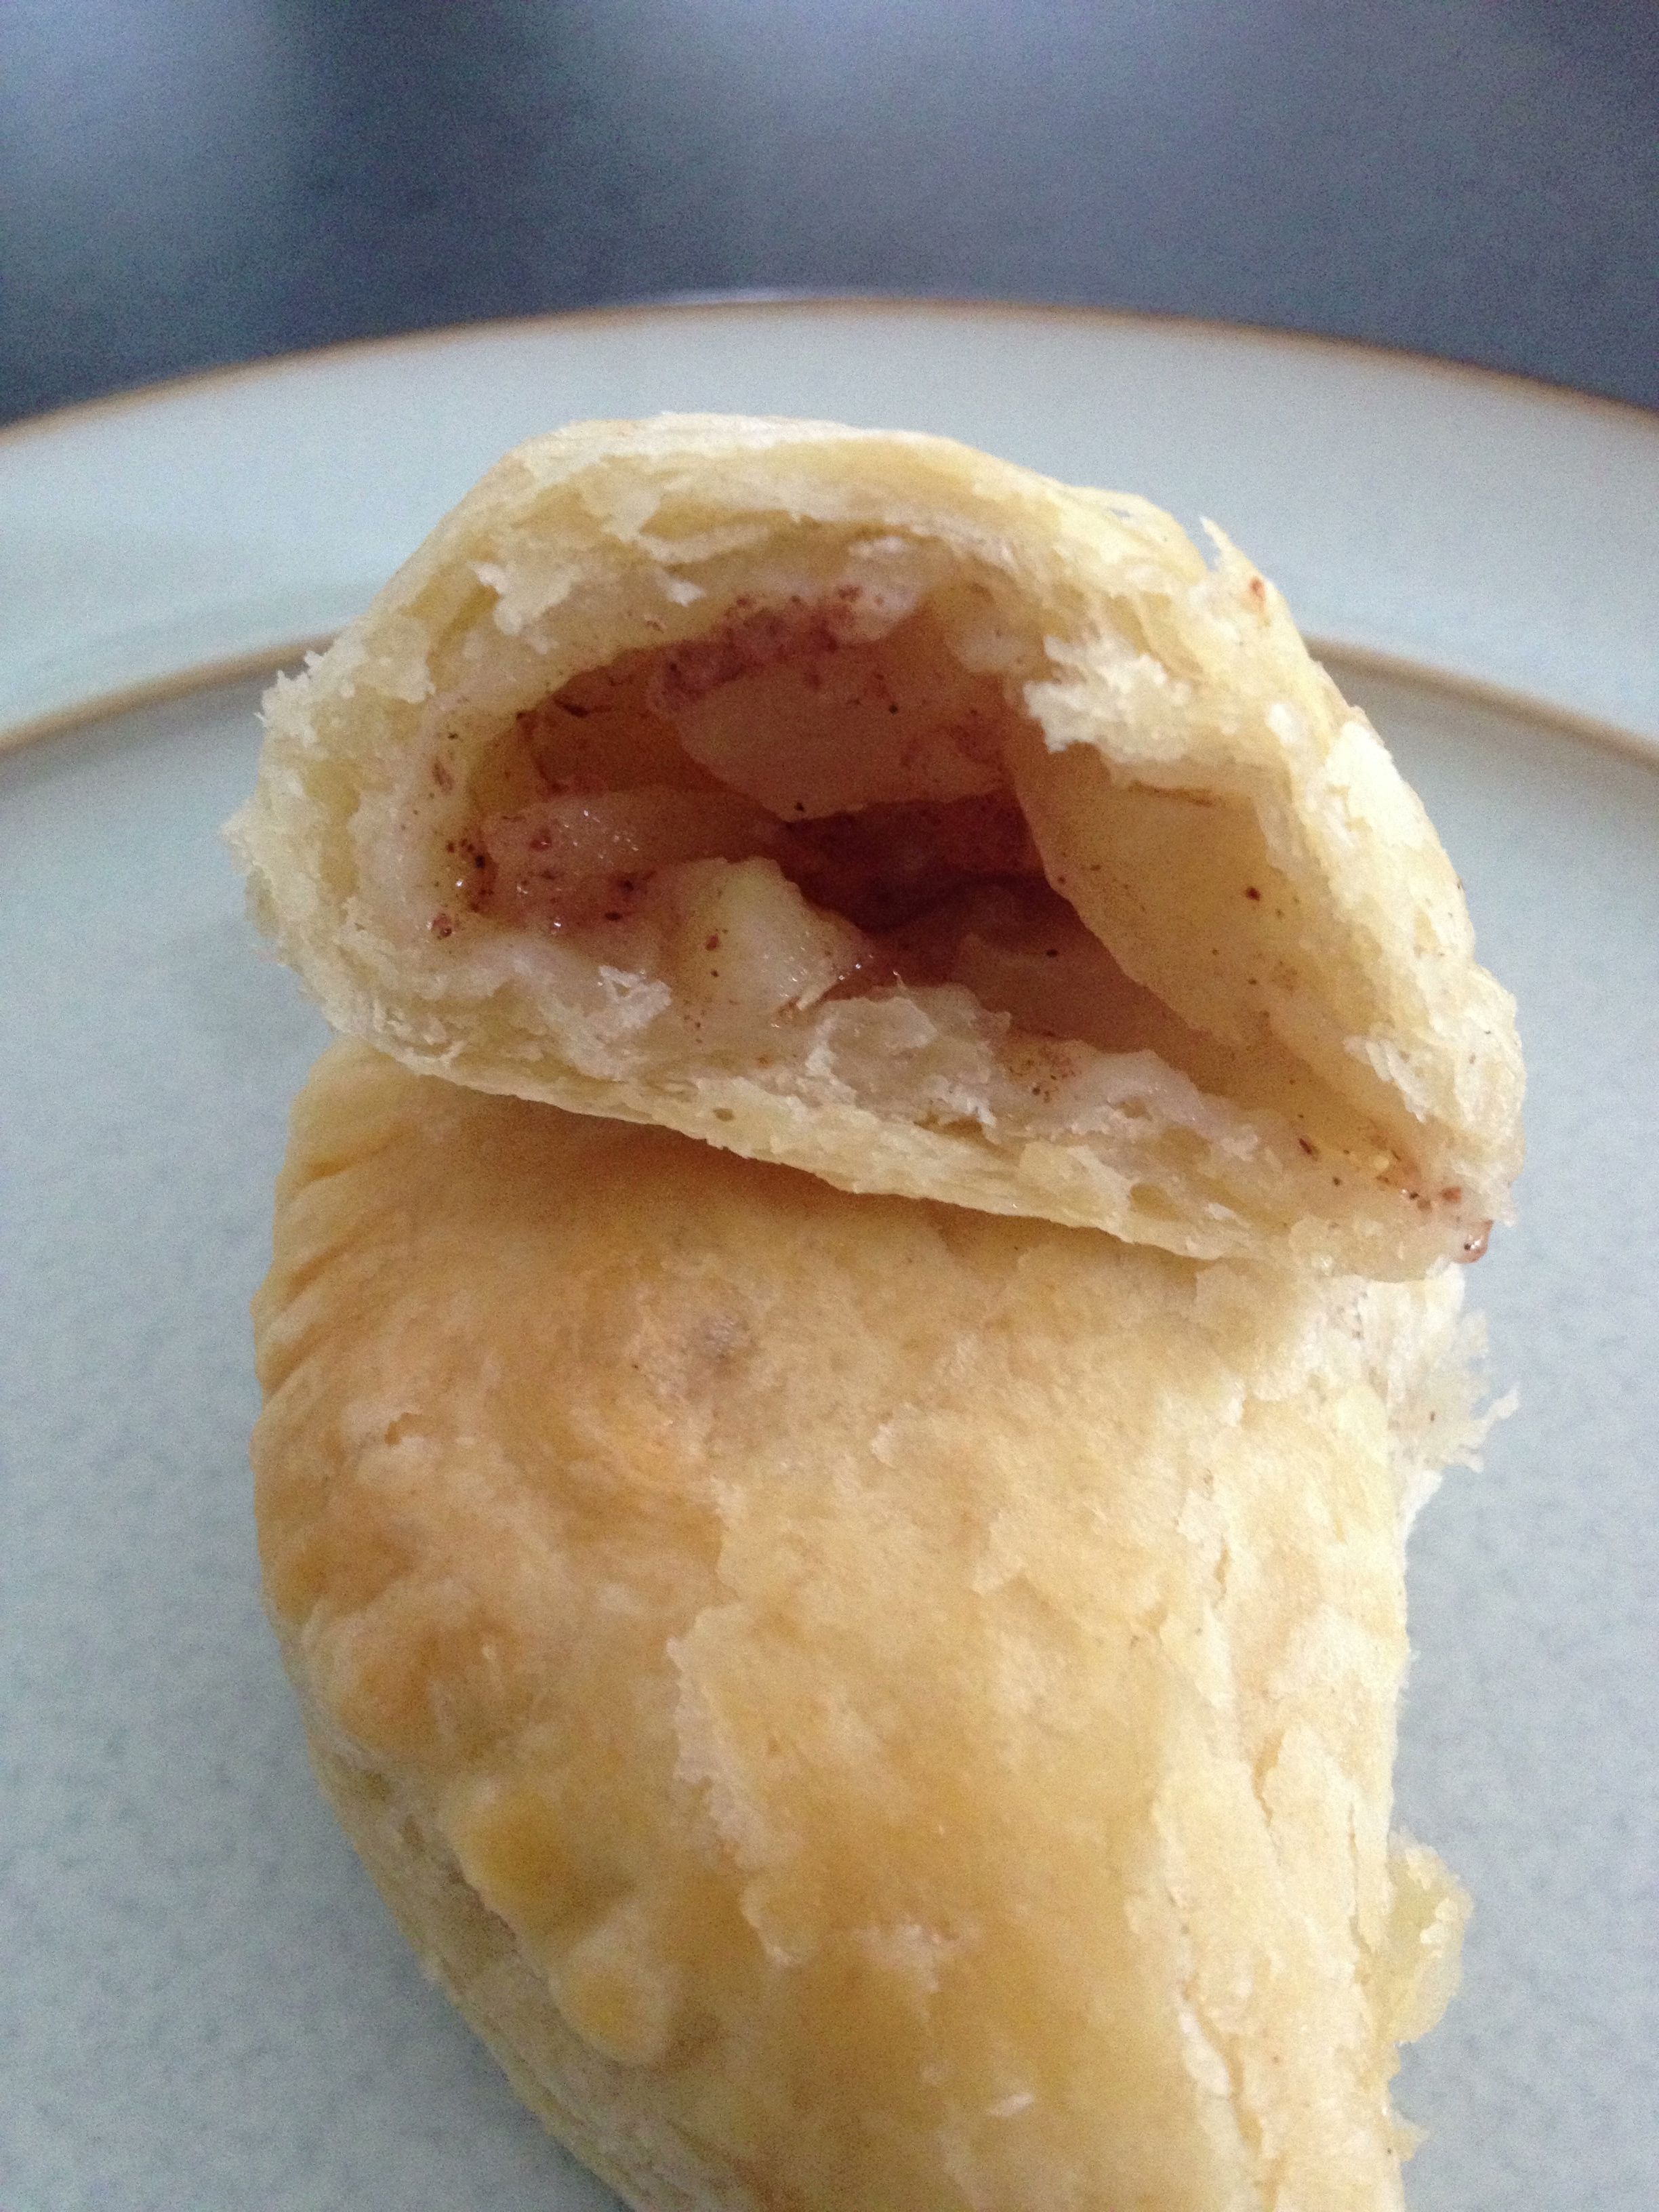
- The filling I made was tasty but 1) wasn’t juicy enough – maybe more sugar or let it sit longer? and 2) not enough of it in the pie. But that’s all I could fit in the dough rounds while still being able to close them securely. I’ll just need to experiment more, won’t I? One thought is to slice the apples (or peaches) lengthwise and layer the slices in the center of the dough rounds.
Apple Hand Pies (adapted from Smitten Kitchen’s Bourbon-Peach Hand Pies)
For the pastry dough:
2 1/2 cups all-purpose flour placed in bowl of food processor and chilled one hour in freezer
1/2 tsp. salt
2 8 oz. sticks unsalted butter, cut into pieces, placed into small bowl and chilled for 1 hour in freezer
1/2 cup sour cream
4 tsp. fresh lemon juice
1/2 cups ice water
For the filling:1 lb. apples, peeled and finely chopped
2 tbs. flour
2-4 tbs. sugar (the more sugar, the juicier it should be if you let it sit awhile)
pinch of salt
1 tsp. lemon zest
To finish:
Egg wash (One egg yolk beaten with 2 tbs. water)
Sanding sugar
1. Remove bowls from freezer. Add salt to the flour and stir. Place flour bowl onto food processor and add in chilled butter. Using 2- to 3-second pulses, whir up the flour and butter until the mixture looks like course corn meal.
2. Combine sour cream, lemon juice and ice water to a small bowl and whisk until combined. Add to flour-butter mixture one half at a time, whirring in between. You’re looking for large clumps to form. Turn clumps out onto a work surface and bring mixture together with your hands to form a big ball. WARNING: Dough will be sticky. Lightly flour your hands before touching dough. Wrap dough ball in plastic wrap and refrigerate one hour. (At this point dough can be frozen up to one month. If doing so, wrap in something a bit more freezer proof.)
3. Divide dough ball into quarters. Work with one quarter at a time, leaving the others in the fridge while you work. Lightly flour the work surface (keep that flour handy). Roll the dough into a 1/8-in. thickness. Using something round with a 4.5-inch diameter, cut rounds out of the dough. NOTE: Only thing I had available was a 1-quart plastic container similar to the kind you’d get filled with potato salad at a deli. It’s about 4 inches, but it works. Use what you have on hand. Transfer these dough rounds onto a parchment paper-lined baking sheet and pop into the fridge. Repeat with other dough balls, filling up the parchment, and layering additional parchment on top of the previous. Keep these rounds chilled for 30 min. or more.

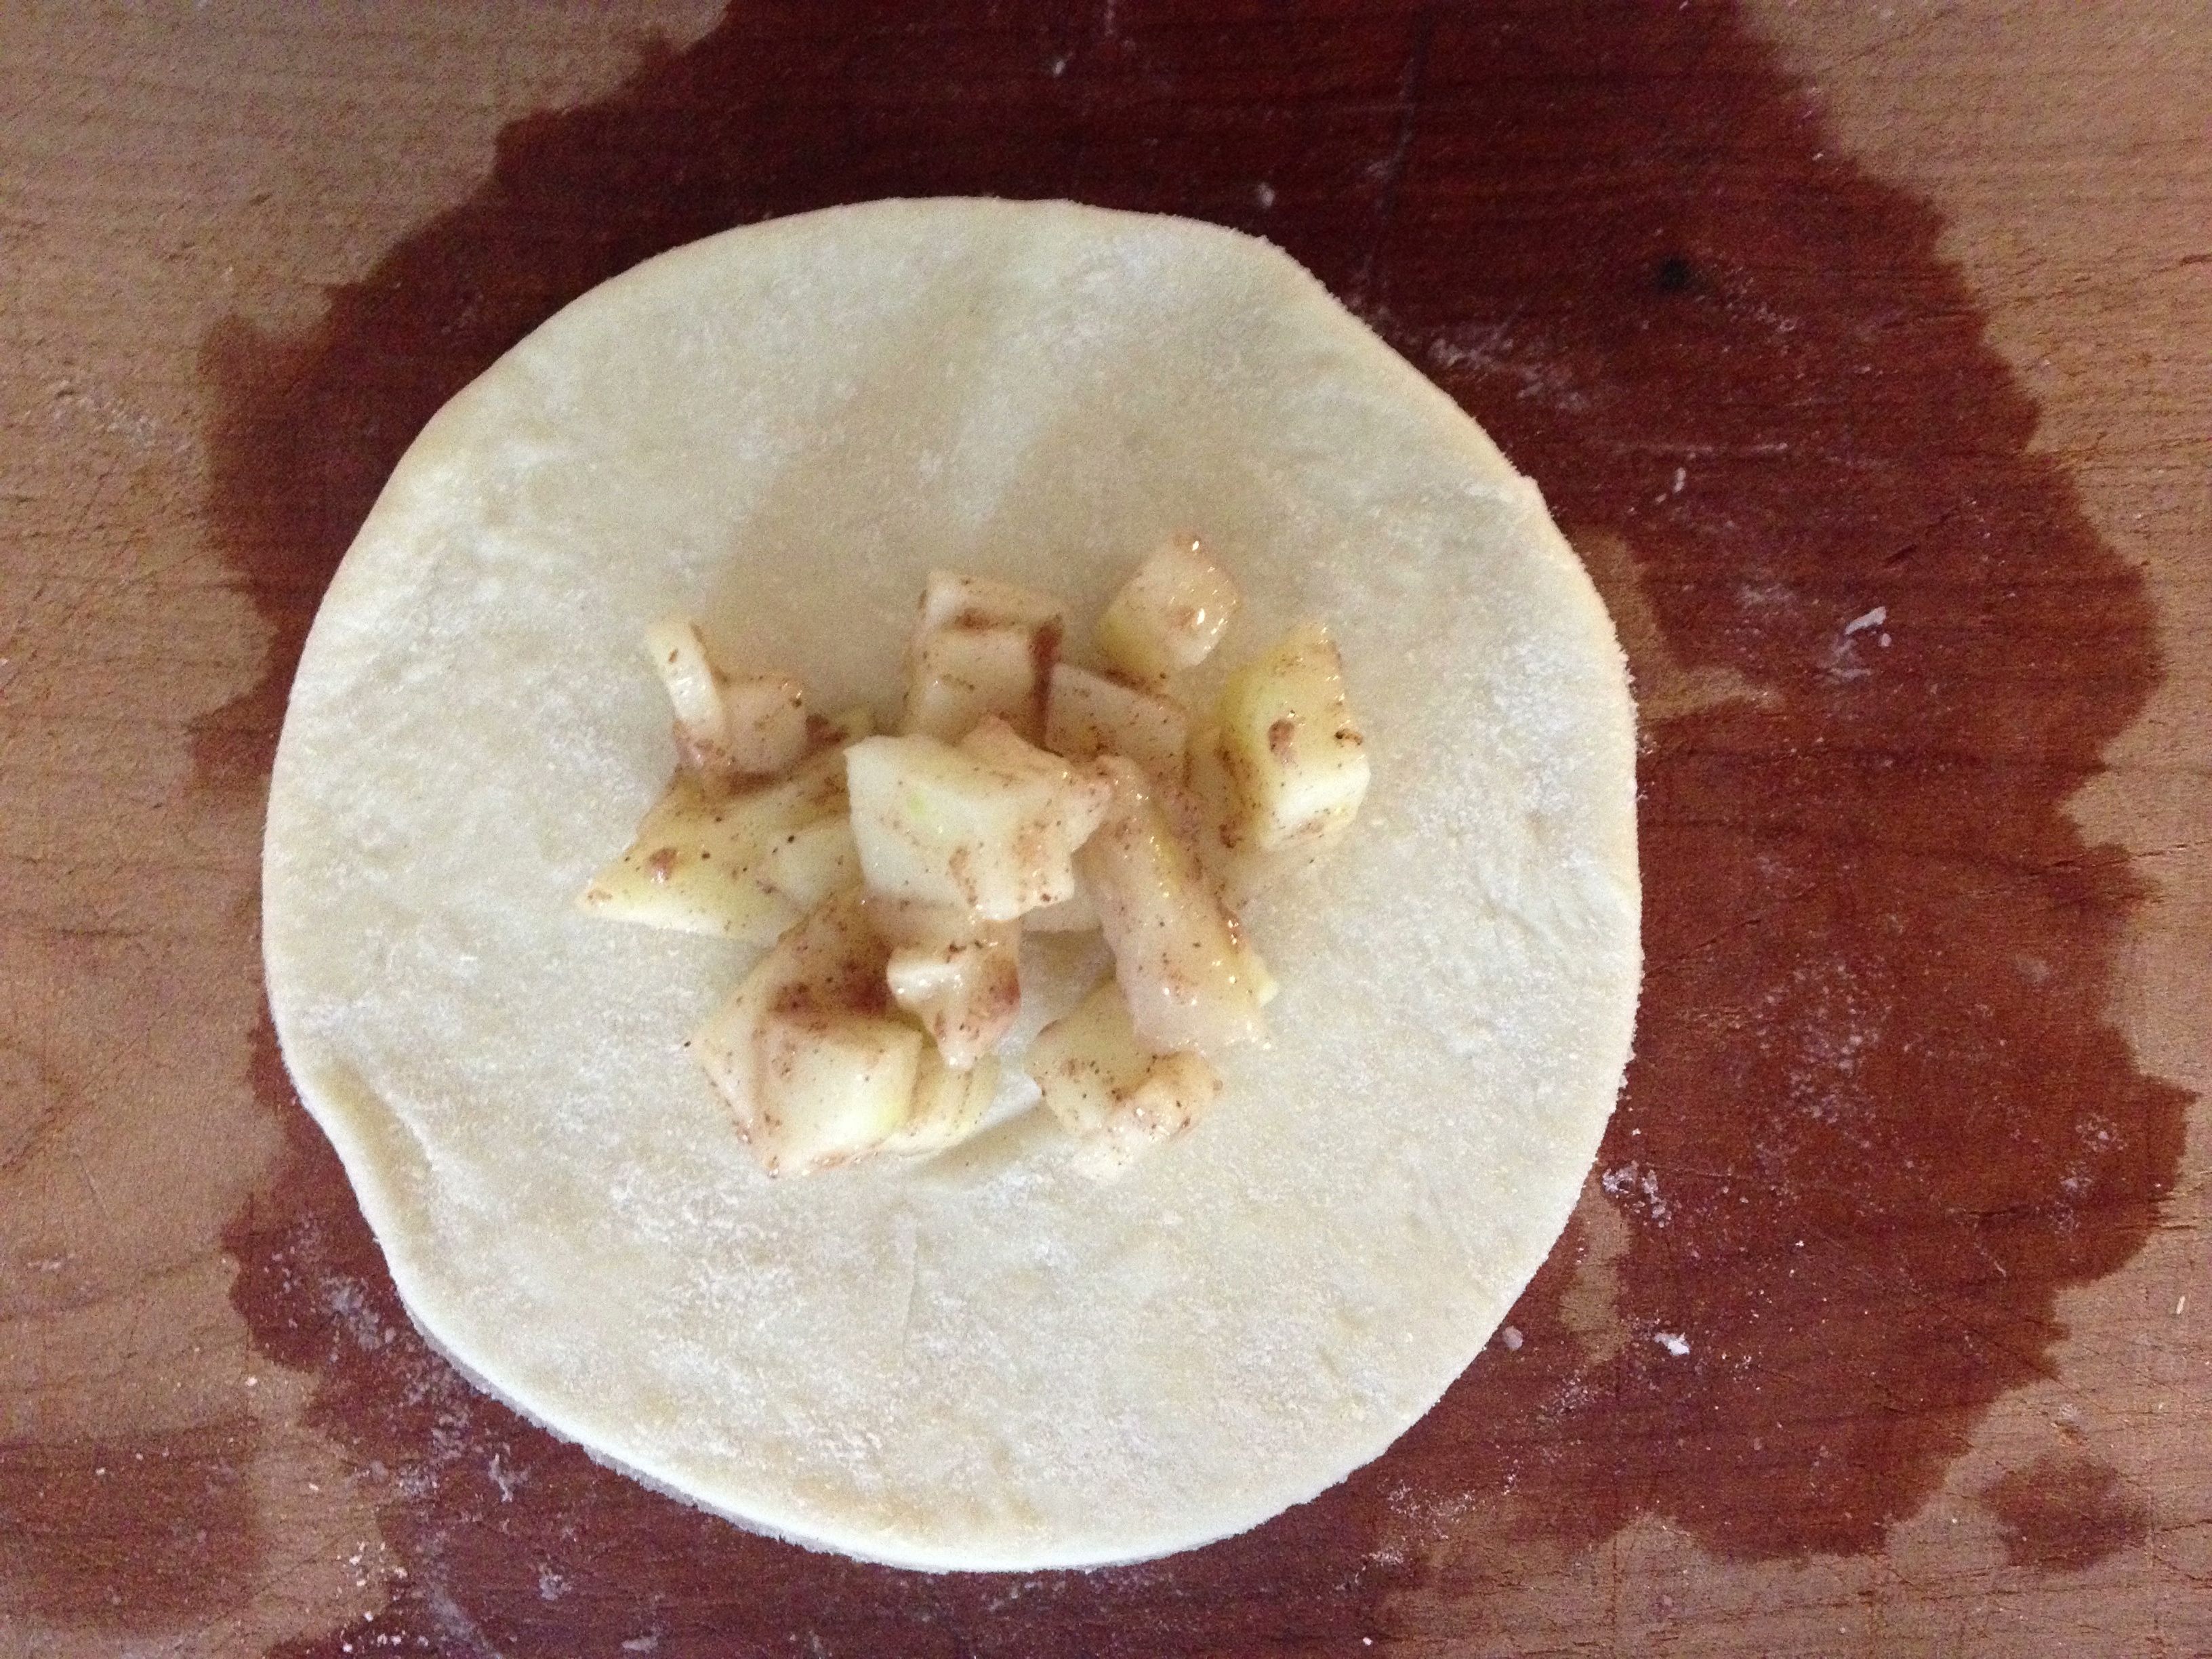
4. Filling: While the dough rounds chill, add the finely chopped apple to a large bowl. Add in the flour, sugar, pinch of salt and lemon zest. Let sit until the dough rounds are ready – this will let the sugars produce some juicy apple goodness—something I didn’t do this time around.
5. Assembly: Remove chilled dough from fridge and let them sit for 2-3 minutes to get a bit more workable. Spoon in about 1-2 tbs. of the apple mixture into the center of the round (more for larger circles, less for smaller). Brush the dough edges with water and fold one half over to meet the other to form a half circle. Seal it lightly with your thumb, then press closed with the back of a fork. Place each little pie back onto the parchment and return to the fridge for another 30 minutes.

ANOTHER OPTION: Place a slightly larger amount of apple mixture onto the center of one round and place another round on top, stretching the top dough a bit so it meets the bottom’s edges. Seal as before. This makes a fun UFO-shaped pie.
6. Heat oven to 375. Removing the pies from the fridge, give each one a small slice of poke with a fork (to let steam out). Lightly brush each pie with the egg wash and sprinkle with sanding sugar (optional of course but yummy). Bake until the pies are golden brown – 20 to 23 minutes. Remove and let cool.

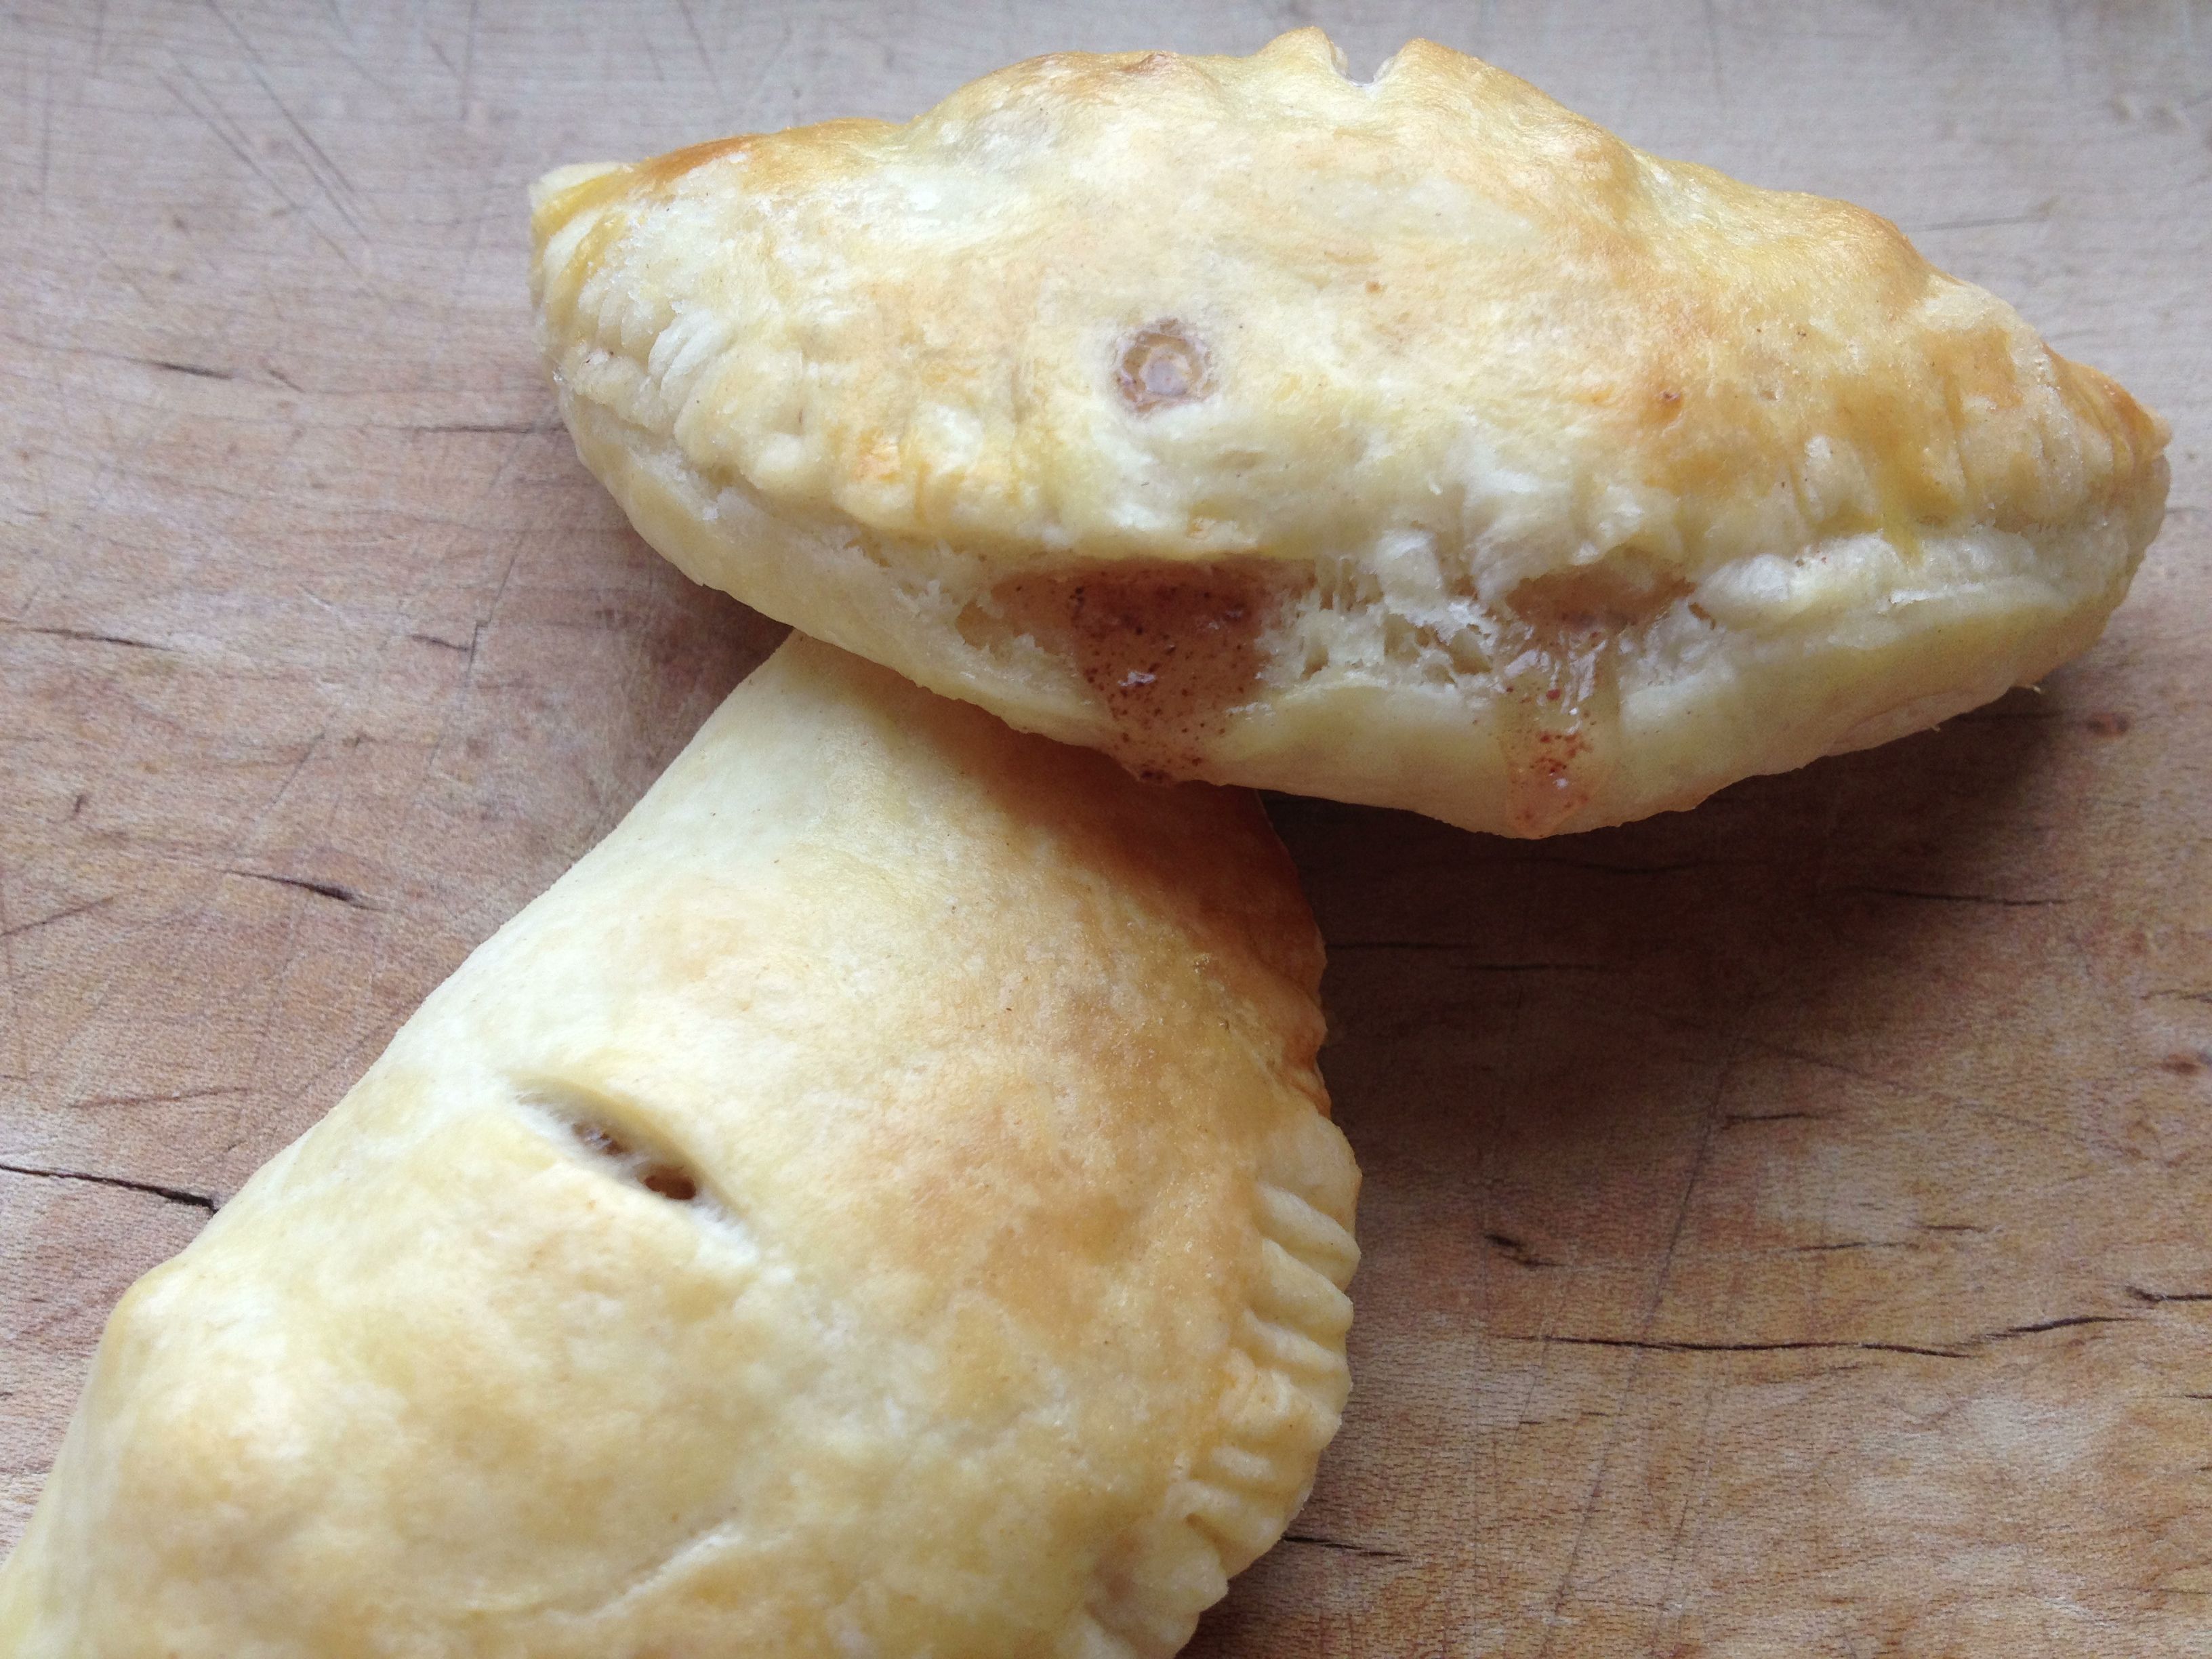
If you serve them still slightly warm, you’ll want to serve with vanilla ice cream. Otherwise, these are excellent pastries to have on hand for breakfast.
Seriously bummed that Trader Joe’s didn’t have peaches. What would you fill these with? Any suggestions for other dough that might be more like a traditional pie?
Ginger Ice Cream Sandwich
February 20, 2012 § Leave a comment
Sometimes I think crazy thoughts.
Such as …
-Will the universe implode if temperatures reach 0 Kelvin?
-How would civilization be different if we only had four fingers per hand and foot?
-Could we all just be toys in the toybox of some celestial kid?
Over the years, my crazy-deep thoughts have turned toward the culinary. And more recently they have focused on the pinnacle (at least in my book) of creative dessert forms: the ice cream sandwich.
I do have a soft spot in my heart for those vanilla-soft-serve-between-soft-chocolate-cookie creations. They’re reliable and the eater has no expectations at all—except perhaps to have chocolate goo between their front teeth for at least 10 minutes afterward. But when it comes to a real ice cream sandwich created by hand, the vanilla and chocolate combo becomes passe.
And dare I say it, so does the chocolate chip cookie and vanilla combo. It’s a good starting point. But there’s oh-so many possibilities. Start by staring at the Ben & Jerry’s selections.

Ginger Ice Cream Sandwich
Credit for this Ginger Ice Cream Sandwich’s inspiration comes from a friend – let’s call her Ginger – who is the spice’s biggest fan. The Ginger Ice Cream is courtesy of the local Jamaica Plain ice creamists at Batch. And yes, there are bits of crystallized ginger scattered about its creaminess. A generous 1/4 cup—more, perhaps—is sandwiched between two massive Ginger-Molasses Cookies, whose recipe comes from Joanne Chang’s Flour cookbook. And here’s a key step to keep in mind for anyone constructing an ice cream sandwich: Let it firm up in the freezer for about a day so the ice cream doesn’t escape when you bite into it.
Oh, yeah. It’s good. And there’s one in my freezer right now.
Other crazy ice cream sammy combos are on my to-bake list. And if Ginger has any say in the matter, each sammy will have a corresponding cupcake. One person’s crazy is another’s brilliance.
Homemade Oreos: Even better than the original
February 1, 2012 § 6 Comments
“Dainty, where have you been?”
Well, I um … I’ve been around.
“Around? I haven’t heard from you in ages. What’s up? I mean, is something wrong? We’ve been kinda worried. Is it us? Did we do something? Or not do something?”
What? No! No no no. I’ve just been … well, remember when I said I wanted to read more? I’ve been reading. Every morning for an hour. And that was usually the time I hung around here.
“Oh. Well, what about switching it up to some other time?”
Yeah, about that … I’ve also gotten really into yoga. Like, every day or as much as I can. It’s exactly the thing I’ve been missing in my life and I love it. Time’s tight …
“No kidding. Well, what about that – yoga. Good for you. So … you’re here again … ”
I am. Absolutely. Here again. With some changes in the works over the next month or so. I know … I know, I teased y’all about that before. “Major stuff in the works!” But this time the ball is rolling – actually rolling – and there will definitely be bigger and better Dainty stuff to interest everyone in the coming weeks.
I promise.
Meanwhile, let’s talk homemade oreo cookies. It could be the most awesome childhood-memory-inducing cookie ever. That’s to Joanne Chang at Flour Bakery in Boston … literally at the end of my block … adults now have a decadent deep-chocolately lustful version to dream about. Seriously good stuff.
Now, with food blogging, printed cookbook recipes are shared all the time. And I really don’t like publicly posting recipes from bakeries in my neighborhood or who I kinda/sorta have a connection with. They gotta make money, right? How can they do that if their recipes are out in Googlespace?
BUT … I’ve made Flour’s version of oreos—and with several different additions—for several events now and I keep getting requests for the recipe. I owe it to my peeps to share. So, Joanne, please do forgive me for what I’m about to reveal.
A note before I get started: I make a Christmas version of these with 1/2 tsp of peppermint extract in the cream filling. And for my most recent batch—whose cream filling was made in an ice bucket in a hotel room in Louisville (no kidding)—I omitted the milk and added a full shot of bourbon. And believe me, the chocolate pairs really well with bourbon.

A shot of bourbon in the cream filling pairs really well with the chocolate.
So, with full credit going to Joanne and her sheer brilliant baking skills, here’s the recipe.
Homemade Oreos ala Flour Bakery
Chocolate Cookie Ingredients and Recipe
- 1 cup (2 sticks unsalted butter, melted and cooled a bit
- 150 g granulated sugar
- 1 tsp vanilla
- 200 g semisweet chocolate chips, melted and cooled a bit
- 1 egg
- 210 g unbleached all-purpose flour
- 90 g Dutch-processed cocoa powder
- 1 tsp salt (kosher)
- 1/2 tsp baking soda
1. In the bowl of a stand mixer, blend butter and sugar with the whisk attachment. Add in the vanilla and chocolate, then the egg, and mix until thoroughly combined.
2. In a different bowl, stir together the flour, cocoa powder, salt and baking soda. With the stand mixer on slow, carefully add the mixed dry ingredients. Turn up to low-medium for a bit until the dry and wet ingredients are well combined. Let the mixture sit at room temp for about an hour so it firms.
3. This is the tricky part so pay attention. Where going to take this dough and make it into long logs. And from these logs you’ll slice off individual rounds that’ll bake up into the chocolate cookies. Got it?
First, let me say that Joanne makes these logs with a diameter of about 2.5 inches. That’s a pretty big cookie—and a fine cookie size, actually. But when I bake these, I am typically taking them to a party or something, and I find that smaller bite-sized cookies are better suited for partytime. That said … once the dough is firm, I split the dough into three or four equal piles. Place one pile onto a half-sheet-sized piece of parchment paper or waxed paper. With your hands, shape it into a log of about 1 or 1.5 inches in diameter. Roll the paper around the log a bit and roll it along the counter to make it a bit smoother, trying to get the air bubbles out (you can see them through the paper). Repeat with the remaining piles of dough, and then place the rolled dough into the refrigerator for 2 hours. You might find it helpful to reroll the logs a few times during the 2 hours so keep that log shape.
4. Preheat the oven to 325 and position a rack smack-dab in the middle. Prepare a couple of half-sheet pans with parchment paper. Remove a log from the fridge and unwrap. You might want to trim off both ends of the log so they are flat. Then slice the log into 1/4-inch thick rounds. With a 1 or 1.5 inch log, you’ll end up with about 30-35 slices. Place the slices onto the parchment paper about an inch apart. I can fit one whole log’s worth of cookies onto one sheet.
5. Pop them in the oven. For Joanne’s 2.5 inch cookies, they bake about 20-25 minutes. These smaller cookies will be done in 18 minutes. They’ll just be firm to the touch. Remove from the oven and let cool for about 5 minutes, then put them onto cooling racks. Chocolate cookies: Done.
Cream Filling Ingredients and Recipe

Slightly overfill the oreo so the filling oozes out a bit, then roll in crushed candy canes. People won't stop calling you Martha.
- 1/2 cup (1 stick) unsalted butter, softened
- 230 g confectioner’s sugar
- 1 tsp vanilla extract
- 1 tbsp milk
- pinch of kosher salt
- suggested additions: 1/2 tsp peppermint extract for Mint Oreos; a shot of bourbon for Derby Oreos (omit milk)
This is awesome and easy to do while your cookies are hangin’ out and cooling.
1. Remember that stand mixer? Wash out the bowl, give it a dry, attach the paddle to the mixer and then beat the butter on low for about 30 seconds. You want it to be smooth.
2. Carefully add the confectioner’s sugar (you don’t want to make a cloud of it!) and the vanilla and beat until it’s perfectly smooth. Add the milk and salt and beat yet again until smooth. At some point the concoction will go from a butter yellow color to a whitish, and it’ll be stiff. You’re done!
Note about adding bourbon: I made two batches with bourbon. The first I included the milk and the filling was too soft. The second batch sans milk was much better. You need about a shot’s worth of liquor in order for the flavor to be apparent.
3. Now the fun part: filling. What I do is pair lay out the cookies – top side down – and match them up in pairs, hopefully getting them partnered with someone about their same size. I then put the filling into a Ziploc bag, seal it up, and push the filling down into one corner, creating a makeshift piping bag. Cut the corner, and carefully pipe out however much filling you want – about 2 tsp should do for a small cookie – onto one cookie in the pair. Top with the other and there you have it—an actually homemade oreo cookie.
Use a great-quality chocolate chip, vanilla and other flavorings and these can be orgasmic. I’ve had nothing but raves. These are truly a spectacular cookie. Thanks, Joanne!
Given the realm of possibilities here, what flavorings would you add to make these cookies your own? Leave a comment and let Dainty know.
Martha’s Chocolate Chip Cookie Icebox Cake
July 24, 2011 § Leave a comment
Martha, Martha, Martha … what where you thinking? Turning cookies into a cake? It’s this kind of thinking that made you rich and famous.

Martha's Chocolate Chip Cookie Icebox Cake
Spotted in the July issue of Martha Stewart Living, I just knew this dessert—alternating layers of homemade chocolate chip cookies with a marscapone whipped cream—would make my recuperating friend very, very happy. Okay, okay, I admit it, it would make me very happy, too. But I needed an excuse … and a houseful of people to eat it. No better time than weekend visit to Provincetown, I say.
As I said, the cake is layers of cookies—seven layers, in fact—and whipped cream. As it sits in the fridge overnight, the cookies soften a bit, just enough, from the whipped cream surrounding them. By the next day, you can slice right through the cake with no trouble.
Ingredients
8 dozen 2 1/4-in. chocolate chip cookies (use your favorite recipe)
4 cups heavy cream
8 oz. marscapone cheese
2+ tbs. sugar
-Chill a mixing bowl (preferably from a standing mixer). Whip up the heavy cream, cheese and sugar on medium high speed at first. It takes a while to form soft peaks. When it does, taste for sweetness and add a bit more sugar if you wish. Continue whipping until the mixture stiffens. Refrigerate until you’re ready to assembly the “cake.” At least an hour.
-Arrange 5-7 cookies on a plate or cake stand. If you use a plate, make the surface as flat as possible.
-Scoop out a big dollop or two of the cream mixture and spread it over the first layer of cookies. Don’t make it too thick or you’ll run out before you build up your seven layers. And don’t make it too thin or there won’t be enough cream to soften the cookies.
-Continue stacking the layers of cookies and spreading cream. Put your structural engineer’s cap on and try to build it as sturdily as you can.
-Really, it doesn’t matter how many layers you make it. If you want leftover cookies, great – don’t add as many layers. Just make sure you end with a layer of cookies on top and about a heaping cup of cream. Pop the cream in the fridge.

After sitting in the fridge overnight, the cookies are surprisingly easy to slice through.
-Cover the cake with plastic wrap. I lightly inserted a few toothpicks on top to make sure the wrap didn’t cling too much to the cake. Pop that in the fridge, too. Let it sit overnight.
-When you’re ready to serve, spread the last cup of cream over the top of the cake. Grate some chocolate shavings on top if you wanna get fancy.
This would be a fun cake for a kid’s birthday party. If you cover the cake completely with cream – sides, too – they’ll have no idea it’s filled with cookies. Surprise! Cookies! Cake! Whipped cream! You’ll be the hero.
De Kas Restaurant: A Hot Table in Amsterdam
May 24, 2011 § 3 Comments
More than a week after lunching at De Kas Restaurant in Amsterdam, I’m still dreaming of the meal. It’s one of the hottest tables in Amsterdam, and no wonder, given its fresh, bright flavors, dedication to locally grown foods and airy environment. And I mean airy environment: The restaurant is under glass in a state-of-the-art greenhouse.

Restaurant De Kas
De Kas is certainly in unique surroundings. The history of the property goes something like this: Back in the 1920s, the parcel of land was home to Amsterdam’s municipal nurseries. All of the plants and flowers used for Amsterdam’s municipal plantings were grown on these grounds and in greenhouses. Over the decades, the nurseries were shut down and the buildings and greenhouses became dilapidated—such a shame! About 10 years ago the greenhouses were scheduled for demolition, but a Michelin-rated chef, Gert Jan Hageman, came up with the idea of converting one of the greenhouses into a restaurant and growing area. The dining room was designed by renowned designer Piet Boon and is lovely. The kitchen is open, and there’s even a chef’s table, where guests can enjoy their meal just steps from the hot grill (honestly, not something on the top of my list to do). And the bar area, while open and visible, is tucked away and is just shady enough for any self-respecting bar fly.

The Piet Boon-designed dining room, with the just-shady-enough bar in the background.
As I mentioned, they believe in fresh, local food. And it can’t get more local than the greenhouse adjacent to the kitchen and the gardens that surround the restaurant. The team also has a farm that produced a great deal of their produce. What they don’t grow and raise themselves is sourced from nearby farms and the North Sea.

The veggie gardens outside De Kas.

The growing area inside De Kas's greenhouse, adjacent to the kitchen.
Enough about that, let’s move on to the food. The three-course menu is fixed; i.e. you are served what they are preparing that day (they do ask if the chef should take into account for any dietary restrictions). And they do offer a wine pairing, which I eagerly agreed to. Can’t recall the first wine, but the second was an unoaked chardonnay from Spain. Tasty!
The meal was fabulous, that’s a given. And beautiful – not something every restaurant gets right. Instead of attempting to describe the meal, I’ll just leave you to enjoy the photos.

First of two first-course salads: Roasted beets and steamed rhubarb over baby beet (?) greens with a pea puree and nasturium flowers.

Second of two first-course salads: White asparagus, turnip and a boiled quail's egg over young lettuce greens with a sauce of some kind (sorry, whatever it was, it was delicious) and sweetpea blossoms.

Second course: Lobster with a bechamel sauce topped with a light frisee salad.

Third course: Pollack over roasted eggplant and cauliflower with a North Sea-shrimp and caper brown butter sauce. (Oh man, was this good.)

First dessert: Pistachio meringue with salt-touched white chocolate ice cream and pansy petals.

Second dessert: Platter of three cheeses with fruit and nut brown bread and a dot of apple-pear stroop (syrup) to the right and a candied cherry (?). Translation of cheese on right is "cheese that sticks to your knife."
While the municipal nurseries are long gone, the remainder of the property has retained its “municipalness”—it’s now a public park enjoyed by people and wildlife alike.

Children's play area below, and a stork nest with baby on top of the smoke stack.
Lacy Almond Cookies
April 18, 2011 § 4 Comments
I have a secret. One of my favorite cooking mags is Everyday Food. That small-sized Martha Stewart pub is packed with some simple, easily put together recipes. We’ve been getting it for a few years now and it’s one of those things that if I don’t read one or two or three issues in a row, I don’t really miss out on much. There’ll be something I can get out of it the next time.
For it being The Year of Ellen Baking, I haven’t really been baking all that much. Yes, I bake bread a LOT more than I mention here. And I am working my way through the Flour cookbook, although not that steadily. So when I saw the recipe for Lacy Almond-Orange Cookies in the April issue of Everyday Food, I decided to put that apron back on and give it a go. In fact, the cookies were in the oven by 7am today.
Lacy Almond-OrangeLemon Cookies

Lacy Almond Lemon Cookies
- 1/2 cup blanched slivered almonds
- 3/4 tsp anise or fennel seed (I used fennel)
- 1/4 cup unsalted butter
- 1/4 cup sugar
- 3 tbs honey
- 1/2 tsp course salt (like I use any other kind!)
- 1/4 cup flour
- 1 tbs grated orange zest. Um, where’d that orange go? It was here yesterday. Hence the lemon substitution in the header.
-Preheat oven to 375F with racks in middle. Line baking sheets with parchment paper.
-It says to put almonds and fennel in food processor and pulse until coursely ground. I used my coffee grinder instead.
-Put mixture in small saucepan, add butter, sugar, honey and salt and bring to a boil over medium-high heat. You may want to keep an eye on it or turn it down slightly. Mine started to burn a bit sooner than I expected it would. Stir to combine ingredients.
-Boil 1 minute. Remove from heat and add flour and zest. This stuff is going to seize up on you fast, so work quickly to spoon teaspoonfuls of batter onto the parchment about 2.5 inches apart. It says the recipe makes 24 but I only got 18, so if you want 24, make the spoonfuls on the smaller side.
-Put in the oven for 4 minutes, take out and turn the sheet pans around and put back in for another 3-4 minutes. Let the cookies cool on the trays on wire racks.
I must never have had a lacy cookie like this before. Otherwise I would not have made these. They aren’t as crisp as I thought. Wait, that’s not true. I just ate another bit of a cookie. Maybe as they continue to sit they become more crisp. Okay, let me put it this way: As a cookie all by itself, I would never eat these. The lemon substitution was okay, but that’s not the problem. They are just too buttery. My face swells with fat just looking at them. Now, I could eat these as an accompaniment to ice cream. Oooh, yeah, that sounds good. But, these are not cookies I’d keep around and just munch on, which means I probably don’t need two dozen of them anyway. And, that also means I’m giving them to Jennifer to distribute to her work colleagues. I wonder if they freeze well … I’ll keep a couple in the freezer for the next time I have some ice cream. I’ll let you know.
Mini Mint Oreos ala Flour Bakery
March 17, 2011 § Leave a comment
From now on—for the rest of my life—whenever I say the word “oreo,” I am exclusively referring to the oreo as envisioned and interpreted into chocolate cookie and filling by Joanne Chang of Flour Bakery. Have one bite of the Flour Oreo and you will agree. That other … cookie … it’s a dime-a-dozen cookie. Flour’s oreo is a treat.
If there is one negative I have to nail onto Flour’s oreo, it’s that the chunk of dark chocolately heaven is too big. Is it possible? Slightly. That’s why I had the idea to make them smaller.
Last December I promised I would bring homemade oreos to a holiday party. The recipe – which is a slice-cookies-from-a-dough-log type of cookie – makes about 18 cookies. Definitely not enough for a holiday party. “Minis!” I thought. And why not add some peppermint flavoring for that added holiday pizzazz.
They were the hit of the party.
Well, Erin Go Bragh, it’s now St. Patrick’s Day. For St. Patty’s Day, you’ve got to do something green. Well, let’s add green food coloring to the oreo filling. And if the filling is going to be green, the eater of the cookie is expecting mint. Right?
Green Mint Oreos for St. Patrick’s Day. And minis, too.

Mini Mint Oreo Cookies ala Flour Bakery
Adjustments to Oreo cookie recipe ala Flour cookbook:
Dough log: After leaving dough to firm up for 1 hour, divide dough into 4 equal batches. Roll it into a 1-in. log on parchment paper, as opposed to the instructed 2.5-in log.
Mint: Add 1/2 tsp. peppermint extract. That’s enough! Seriously. All you need.
Green: Add 3-5 drops green food coloring. You can’t tell from the photo, but it’s a nice medium green.
The one thing that I would adjust next time … because the mixer really needs to beat in the food coloring, it makes the filling a bit softer than I’d like. I may decrease the addition of milk from 1 tbs to 1/2 tbs next time.
Oatmeal Raisin Cookies
February 7, 2011 § 3 Comments
That’s Jennifer’s favorite cookie. So when presented with the roughly 18 cookie recipes in Joanne Chang’s Flour cookbook, I made it a priority to bake these. (I did make the oreo recipe first – how could I not attempt oreos??)
About three weeks ago, when I decided to make this recipe, I bought an oatmeal raisin from Flour Bakery in the South End, luckily just a couple blocks away. It was a sturdy cookie, but flexible. Easily chewed – and I chewed quickly. The flavor was unbelievable. The sweetness was exposed with just the right amount of salt. And, most appealing to me – the taste of fresh nutmeg.
Oh, yeah. Looking forward to this recipe.
I cracked open the cookbook, read over the recipe, and followed the instructions word for word. Three hours with the dough in the fridge to firm (that was a brutal waiting game), 1/4 cup dough scooped onto a baking sheet (or the volume of an ice cream scoop). 19-20 minutes in the oven. A couple of nibbles on the cookie dough assured me I was on the road to cookie oatmeal raisin perfection.
Not so.
What emerged from the oven was a cookie – yes. But it was a flat cookie. Not the sturdy cookie I had purchased from Flour the day before. They had spread too much and had cooked into each other. I can take blame for that last bit – I may have put my dough scoops too close together. BUT! why had the flattened into oatmeal raisin pancakes? You know exactly what kind of cookie I mean – flat, with remains of sugary bubbles on the surface. They tasted phenomenal, by the way, but come on, I followed the recipe word for word. . What happened?

Oatmeal raisin cookies, flat as pancakes
I did a little Googling, a little tweeting, searching for reasons why my cookies ended up like thin crisps. Baking soda. The problem lay in that little golden orange box. Expiration date: 2006.
It has an expiration date, really? I mean, I knew it had a date on the box. But those dates are just … made up to cover their asses in a lawsuit or something. I don’t know what I thought. Apparently, my baking soda’s effectiveness stopped four years ago. What a knucklehead.
A fresh box later, my second batch of oatmeal raisin cookies turned out to perfection. Really. They were perfect.

Perfection!
Again, I bought a sample from Flour to compare. Okay, so the original was perfectly round. And a tad bit lighter in color than my first half dozen – perhaps a minute less in the oven. But I have to say – comparing taste and consistency, my cookies certainly matched or exceeded Flour’s. Jennifer preferred my version – and she didn’t just say that because she loves me.

Which one is mine, and which one is Flour's? Both are delicious.
Four of these cookies became ice cream sandwiches last night for dessert. I scooped out … yikes, I’m looking through my measuring cups as a volume comparison … I’d say I put close to a 1/2 cup of softened French vanilla (from Whole Foods) between two of these 4-in. cookies and let them set for about hour. Firm cookie with firm, flavorful rich vanilla. I had been searching for cinnamon ice cream, but French vanilla was the perfect blank canvas I guess you could say to that featured the cookies’ profile perfectly.
No photos available – the cookie didn’t last long enough.
Most importantly, the point of this whole story isn’t that I made some really amazing cookies. The point for me is I had a success. In something. In a several week period where I’m feeling like an unaccomplished individual I did something right. I made something tasty. And although most of the Super Bowl crowd I hung out with last night didn’t eat my cookies, I felt pretty damn good about them myself. I may be a schlub when it comes to my day job, but I make a pretty fine ice cream sandwich.
