
Spicy Eggplant Relish
June 18, 2013 § 1 Comment
Funny how when I make a salad, sauce or spread for a gathering of friends, the recipe always turns out to be from the Moosewood Cookbook. Not kidding. For flavor profiles that were developed back in the crunchy ’70s, the Moosewood’s recipes really seem to be a hit with people in the 2010s. Their popularity doesn’t seem to have anything to do with being mindful of healthy eating and instead has EVERYTHING to do with the fact that this food tastes awesome. Good-tasting food is an instant classic.

Spicy Eggplant Relish on a Stacy’s Pita Chip
The most recent dish to receive the “Oh man, I seriously need this recipe” comment is Spicy Eggplant Relish. Keep it in an all-veggie-ingredients-minced form, or mash it into a chunky puree after cooking. In either state of consistency, it can be used as a topping for crackers and pita, as a sandwich spread, or even tossed onto a veggie burger (or a real burger if you’re into that kind of thing).
And don’t let the “spicy” descriptor dissuade you. You’re in control of the spice. Make it as light or spicy as you wish.
Spicy Eggplant Relish (ala The Moosewood Cookbook)
2 tbs. olive oil
1 cup minced onion
1 medium eggplant, diced (I kept the skin on, it’s fine)
1/2 tsp. kosher salt
1/2 tsp. cumin
1 medium red bell pepper, minced
1 medium clove garlic, minced
1 tbs. lemon juice
cayenne to taste (start with 1/4 tsp.)
1. Heat oil in pan. Add onions, eggplant, salt and cumin. Saute on medium for 15-20 minutes or until the eggplant is tender (but not mush). 2. Add in the pepper. Saute for about 8-10 minutes.
3. Stir in garlic and lemon juice and continue cooking another 5 minutes. Sprinkle in the cayenne, let it sit for a bit, then taste. Add more if you need more heat. Same goes for salt. Mash or not to mash, it’s up to you. Serve it straight away or let it come to room temperature. Cold is good, too, straight out of the fridge, but I prefer it room temp.
A Healthy, Fruit-filled Cookie
June 11, 2013 § 1 Comment
Oh, and chocolate, too. There’s dark chocolate in these healthy cookies.
I was recently charged with finding a healthy cookie recipe for a gathering of friends. Healthy, but tasty. And a real cookie, not something that was just pretending to be a treat, something “cookie” in name only. And usually when I try to find a healthy alternative to a traditionally loaded-with-bad-stuff recipe, I turn to The Moosewood Cookbook. In this case, the Moosewood let me down.
But not Ellie Krieger. Ellie had (still has?) a Food Network show, Healthy Appetite, all about healthy cooking. When the Moosewood lets me down or becomes a little too earthy-crunchy-granola-ey, I turn to Ellie. And in this healthy cookie recipes, she totally did not disappoint.
First, I’m not a dietician. Is this recipe healthy? I’m taking Ellie’s word on it. But I can tell you it’s not loaded with a ton of butter, shortening, oil, cholesterol, and sugar. Some, but not a lot. There’s applesauce! There’s egg whites! Plus it has dried fruit – and I think we all agree fruit is a pretty good-for-you thing to eat. As for the dark chocolate, I think we’ve all heard reports about how it’s actually a good thing in small amounts.
Not only are they healthy, they are incredibly tasty. Incredibly. I’ve made four batches in the last week and there’s more on the way.
Healthy Cookies (aka Kitchen Sink Cookies) via Ellie Krieger’s Healthy Appetite
Note: The recipe says it makes 18-20 cookies. Don’t believe it.
Ingredients
2 tbs unsalted butter, softened
2 tbs canola oil
1/3 cup light brown sugar
1/4 cup applesauce
1 egg white
1 tsp vanilla
2/3 cup whole-wheat pastry flour
1/2 cup oatmeal
1/4 tsp salt
1/4 tsp ground cinnamon
1/2 cup chopped dried fruit (Ellie recommends cherries and apricots. I used a dried berry blend from Trader Joe’s)
1/4 cup lightly toasted walnuts
2 oz. dark chocolate, cut into chunks
1. Preheat oven to 375 F.
2. Combine butter, oil and brown sugar in the bowl of a mixer. Mix on high speed. Stop occasionally to scrape down bowl. Mix until mixture is light and fluffy, about 2 minutes. Add applesauce, egg white and vanilla, mix to combine. Add flour, oatmeal, salt and cinnamon and mix just until just combined. Add dried fruit, walnuts and chocolate and mix to combine.
3. Prepare a baking sheet by spraying with a light cooking spray OR use sheets of parchment. Scoop out 1 tbs of cookie dough at a time and roll into balls. (I used a small-sized ice cream scoop that’s a tad bit bigger than 1 tbs). Place 2-inches apart on the baking sheet. Press cookies down with the palm of your hand to flatten slightly (less butter = less spread). I advise you flour your palm a bit because the dough will stick.
4. Bake for 12 to 14 minutes, or until lightly browned but still soft. Remove and cool on racks.
You’ll find that 1 tbs doesn’t make a big enough cookie. You’ll want HUGE cookies because they are incredibly good. But then, the larger the healthy cookie the less healthy it is, right? Let’s just disregard that logic for now.
Jicama Salad
June 4, 2013 § Leave a comment
My new favorite item to add to a salad is jicama, otherwise known as Mexican potato or yam bean. My fondness of the roundish, beige and nondescript tuber with a potato-pear texture began in an Asian restaurant in California (surprisingly not a Mexican place) about a month ago, when I had it in a jicama-grapefruit salad. And that was pretty much all it was: matchsticked jicama mounded on a plate and dressed with a spicy but light dressing. The grapefruit, ringed around the pile of jicama, was there to cool the heat. Toasted cashews added some crunch.

Jicama salad with apples, grapefruit and toasted cashews
I attempted to recreate my own jicama salad. Online searches gave me oodles of salad dressings that would serve the purpose. But I failed. And I failed because I attempted to recreate what I had experienced previously. I had a pile of poorly julienned jicama, grapefruit that I hadn’t segmented properly, and well, the Cat Cora-inspired dressing was okay. But just okay. And aside from properly preparing the jicama and grapefruit, the success of a jicama salad really pivots on its dressing.
Turns out friends returning from a vacation in Sedona also became infatuated with jicama in salads. They had a delectable jicama salad in one of Sedona’s best restaurants, Elote. Wisely, they bought the restaurant’s cookbook, complete with the recipe for the jicama salad dressing.
We have since used this to dress traditional salad greens to which we’ve added all sorts of things including jicama, orange, grapefruit, apple, cashews, peppers, etc. You could put it on an old shoe and it would taste wonderful. My suggestion is to keep a jar of this in your fridge at the ready for any type of salad (or shoe) you may be serving.
Jicama Salad Dressing (courtesy Elote Cafe Cookbook)
1 cup olive oil
2/3 cup lime juice
1/4 cup Cholula hot sauce
1 tsp kosher salt
1 tsp fresh ground pepper
1 tsp sugar
1. Add all ingredients to a lidded jar and shake vigorously until combined.
2. That’s it! You’re done! Pour it on! As with any salad, use a combination of whatever and however much you’d like: julienne a chunk of jicama, chop up an apple, segment half a grapefruit, add in a 1/2 cup of toasted cashews, through in some thinly sliced red peppers, and toss it all on top of some salad greens. Your salad is served.
NOTE: The brand of hot sauce matters here, or at least makes a difference in taste. Our friends make it with Cholula and the dressing is quite spicy. We have used Frank’s Red Hot (it’s what we have in the fridge) and it results in a less spicy-hot experience. Both are delightful on a salad. In fact, it’s what I’m having for lunch.
Shoyu Sauce
May 7, 2013 § 4 Comments
This is another “It’s not you, it’s me” posts. Meaning, this is a recipe I have kept on a slip of paper for well over a year now and if I lose it, I’d have NO idea how to recreate the proportions correctly. So, yes, I do hope you enjoy this recipe, but really, I’m putting it out there so I have a place to find it.
Okay, about this “I can’t remember it but I can’t live without it” recipe. If you live in the Boston/Cambridge area and you are a vegetarian, you have eaten at a crunchy, mostly raw food place called Life Alive. Think wheat grass juices, chia seed smoothies, barely cooked kale-based warm salads topped with marinated tofu, red lentils, quinoa and all sorts of good-for-you things. And quite tasty, too. Most of these salads are topped with an addictive ginger nama shoyu-based dressing. What’s nama shoyu? Good question. The short answer without going into the details (because I don’t know the details) is it’s an unpasteurized soy sauce. One taste of it and you must either eat every meal at Life Alive or find a DIY recipe.
I am not sure exactly where I found this recipe, but whoever it belongs to, I thank you immensely. Absolutely love it. We’ve only used it as a salad dressing but it could also be used to marinate tofu or top cooked veggies and rice. Is this exactly like the dressing at Life Alive? Not really, but that gives us an excuse to go back.
Shoyu Sauce 
1/2 cup nama shoyu
1/2 cup tahini
1/4 cup sesame oil
2 tbs agave
1/4 cup cider vinegar
1 tsp salt
1 inch ginger, grated
1/4 cup olive oil
1 tsp lime
Combine all ingredients in a blender and liquify. Or combine in a high-sided bowl and use an immersion blender to whirr it all together.
A note about the ginger. We keep our ginger in the freezer because a) it won’t shrivel up in there like it does in the fridge and b) frozen ginger is WAY easier to grate with a microplane. It’s also easier to peel if frozen. Give it a try if you aren’t familiar with this technique.
Suggestions for what else to use this sauce with? Leave a comment below.
Homemade Pita Bread
April 25, 2013 § Leave a comment
I had a horrible experience, an embarrassing experience, a humility-inducing experience with homemade bread about 20 years ago. It was a “loaf” of rye bread that more accurately could be called an anvil. It defied some law of physics in how something so small could become so dense.
I swore off baking yeast breads for … oh, I’d say 15 years. And then, I let the embarrassment go. I’m a different person, I said. I can make different bread. I can make bread and be successful at it.
I’ve made a bunch of different bread overs the last five years or so. Various takes on wheat, white, whole grain, pizza, focaccia, sourdough—made with my very own sourdough starter! And it’s all turned out pretty tasty, too. I admit I need to work on my loaf shaping, but that will come with practice.
There’s one recipe for which I don’t need to shape up my boule-making skills, and that’s for pita bread. It’s flat and round, slightly puffy in the middle. I thought I could handle that pretty well. And it turns out it’s as easy as it seems. Why everyone everywhere isn’t making pita bread everyday, I have no idea. Get after it, people.
Pita Bread, adapted from The Moosewood Cookbook
1 cup wrist-temp water (about 95-100F)
1.5 tsp. active dry yeast
1 tbs. sugar or honey (I used raw sugar)
1 tsp. salt
3 to 3.5 cups flour (1 cup can be whole wheat)
a bit of oil
extra flour
1. Combine yeast and water in the bowl of a stand mixer and let it get foamy over the next 5 minutes.
2. Add sugar/honey and salt and stir until dissolved.
3. Put bowl onto mixer with a dough hook attachment, add one cup of flour and start to combine on low speed. Slowly add in two more cups of flour and continue to let the dough need in the bowl over the next 3-5 minutes. If it seems wettish, add in a sprinkling of flour as it mixes. You’re looking for a smooth dough.
4. Put dough in an oiled bowl and roll it around in there until the dough surface is oiled, too. Cover with a clean tea towel or plastic wrap, set in a warmish place (75F is good) for about an hour or until the dough has doubled in bulk. It could take up to 1.5 hrs.
5. Punch down dough and set it onto a clean and floured surface. Kneed it by hand for 5 minutes. Cut the dough into equal-sized pieces, anywhere from 6 to 12 segments. I made 8 because it was simple, and the pitas turned out just the size I wanted. . Knead each little dough ball for a minute or so (I turned each 30 times and figured that was about right). With a rolling pin, roll out each dough piece into a VERY THIN circle (or near circle, it doesn’t matter exactly). You WILL need to throw down extra flour. DO make sure the dough is no more than 1/8 inch thick—otherwise you end up with a pizza crust, no kidding. Let the dough circles rest for 30 minutes. After I rolled out each circle I placed it on a half sheet-sized piece of parchment, four per sheet overlapping slightly. It’s ok, don’t worry.

NOTE: This circle-making process takes some time. By the time you are done rolling out the whole batch, the first circles have already been resting about 15 minutes. So at this point set the timer for 15 minutes, get your oven ready and start moving toward the next step.
6. Preheat oven to 500F. OR, if you have a silly oven like mine that will not go above 450F (Ggrrrrr…), set it to 450F and work with it. Place a sheet pan in the oven to warm up a bit then brush it with oil or cornmeal to prevent the dough from sticking. OR, place the dough circles on parchment and slide them onto the baking sheet, fitting as many dough circles in the oven as you can without them touching. Due to the craziness of my oven I am able to fit just two dough circles, which were placed on the parchment.
7. Let the circles bake for 6-8 minutes or until the circles puff up and are lightly browned and, more importantly, look like pita! At 450F, 8 minutes was the perfect amount of time. As soon as one batch is done, remove from the oven and wrap the pitas in a clean but damp tea towel and place them in a brown paper bag. Close the bag for 15 minutes. This keeps them soft(ish) for a day or so. After a day I would transfer them to a plastic bag.

As an experiment, roll out one dough circle a little thicker than 1/8 inch and bake. Whereas the thinner circles puff up like you’ve filled them with helium, you’ll notice the thicker circle doesn’t puff up much at all—if at all. It’s ends up more like a pizza crust. Which tells me why not have this same recipe handy for when you want to make pizza?

Give pita a try and let me know what you think!
Homemade Fig Newtons
April 2, 2013 § 2 Comments
My mother is a sucker for cookies of any kind. And I, being her offspring, somehow inherited that trait. She would bake cookies, yes. But wasn’t it more exciting to experiment with the cookie treasures found on store shelves? Oh, what those Keebler Evles did to us. Chocolate-covered anything went directly into our shopping cart. Those chocolate-covered marshmallow puffs on a graham cracker-like cookie were Mom’s favorite. I also had a soft spot for those styrofoam-like wafer cookies with “vanilla creme” sandwiched inside.
But what I really, really liked were fig newtons.
I contend that I never ate that many fig newtons. Not really. Just one box on average a year. Thing is, I would eat an entire sleeve of them at each sitting. Why else would they put them in a sleeve? Ah, logic of childhood. And to have that metabolism again…
A few years ago when I saw that Joanne Chang’s Flour cookbook had a recipe for fig newtons, I was surprisingly conflicted. I love fig newtons—so wouldn’t gourmet fig newtons be the bomb? But … do I want the ability to create something so cravingly delicious? I mean, I’m not a calorie counter but these could be dangerous.
It took me three years to work up the nerve, but I finally made Flour’s fig newtons this weekend. Homemade fig jam in a shortbread cookie. Yes, they are cravingly delicious. Yes, it requires self control to not eat the entire batch. They’re also nothing like the original fig newton. It’s more of a pastry, really…like a slice of fig pie with a shortbread crust. This is dessert worthy of far more than a sleeve. This is a dessert of adult sophistication.
Homemade Fig Newtons (from Joanne Chang’s Flour Cookbook) 
Fig Jam Filling
2+ pints ripe black mission figs, stems removed and figs quartered (2 is too little, 3 makes slightly too much)
1 orange, peeled, seeded and finely chopped (try to remove the white pith and membrane, too)
110 grams light brown sugar
1 tbs finely grated lemon zest (about 1 lemon)
1 tsp vanilla extract
Shortbread Dough
1 cup (2 sticks/228 grams) unsalted butter at room temp
75 grams granulated sugar
2 tbs confectioners’ sugar
1 egg yolk
1 tsp vanilla extract
140 grams all-purpose flour
120 grams cake flour
1/2 tsp baking powder
1/4 tsp kosher salt
1. Make the filling: Place quartered figs into a medium-sized, non-reactive saucepan. Add orange, brown sugar, lemon zest and salt. Heat on medium to simmer. Reduce to medium-low and simmer, uncovered for 40 minutes. Stir occasionally to prevent sticking. The mixture will turn into something reminiscent of jam. Remove from heat and add the vanilla. Let cool completely and set aside for 2 hours. (You can also refrigerate for up to three days in an airtight container.)
2. Start to make the dough: Using a KitchenAid mixer with a paddle attachment, cream together the butter and both sugars on medium speed until mixture is fluffy. This takes about 5 minutes with stoppages now and then to scrape sides of bowls and the paddle. Once that is fluffy, add in egg yolk and vanilla on medium (stopping and scraping) for another 2 or 3 minutes.
3. Separately combine the two flours, baking powder and salt in a small bowl and sift or mix it together well (I added all into a sieve to sift). Add these dry ingredients into the wet ingredients with the mixer on low, and let it combine for another 15 seconds or so. Do the stop-and-scrape thing again.
4. Cut a large piece of plastic wrap and scoop out the dough onto it. Wrap it up well and press the dough into a 6-in. disk about an inch thick. Pop it in the fridge for at least 30 minutes. At this point you can store it for up to 5 days or freeze it. If in the fridge for a long while, let it come to room temp for about 30 minutes before working it. If in the freezer, let it thaw out in fridge overnight.
5. Heat oven to 350F. While that is heating up, upwrap the dough disk and place onto a large piece of parchment paper. Add a bunch of flour to the parchment and onto a rolling pin, then gently roll the dough into a rectangle about 9 in. by 16 in. and about a 1/4-in. thick. Be careful not to pull or push the dough as this dough tears easily. Fix any tears by pressing together with your fingertips. I found it useful to trim the edges straight (saving the extra dough for treats later!).
6. With the long edge of the dough facing you, spoon the jam lengthwise across the center of the dough, left to right. The width of this jam “river” should be about 2.5 inches. You might not be able to fit all of the jam onto the dough. That’s okay—it’s tasty on toast. Once the jam river is down, you’ll grab the left and right edges of the parchment above the jam river and fold it down overtop of the jam. The dough should fold halfway down over the jam. Do the same with the bottom half of the dough, folding it up. Take pains to make sure these two dough halves meet in the middle, not overlapping and not having a gap. Side by side is what you are looking for. Once that happens, pinch those two dough halves together to seal, as well as the ends. Now, flip the jam-filled dough log over so the seam is on the bottom. Be careful! You may need to finagle it with adding another piece of parchment and rolling it over. Use your brain to figure it out.


Use your brain to figure out how to turn this jam-filled log seam-side down without damaging it.
6 optional. At this point you can wrap it up and refrigerate or place in the freezer.
7. Pop it in the oven for 60 minutes or until golden brown all over. The recipe says 65-70 minutes, but it really depends on your oven. My edges were getting awfully dark, so I opted to take it out 5 minutes early. Let it cool on a wire rack for at least 2 hours—I know, it’s a crazy long time but you want the jam to firm up a bit. Once cool, cut into 1-in. pieces crosswise. Enjoy with hot tea or coffee. And realize things are so much better than when you were a kid.
Roasted Eggplant on Toasted Pita
March 26, 2013 § Leave a comment
Ah, an over-stuffed pita sandwich…yum.
Who am I kidding!? When have I ever stuffed a pita and have it NOT break apart on me? Never. Ever. And once it breaks, it’s just all downhill from there. Your fingers get full of hummus. Whatever dressing you’ve put on the sandwich runs down your wrist into your sleeve. It’s no good, stuffing a pita.
Better to use pita like a sandwich bread.
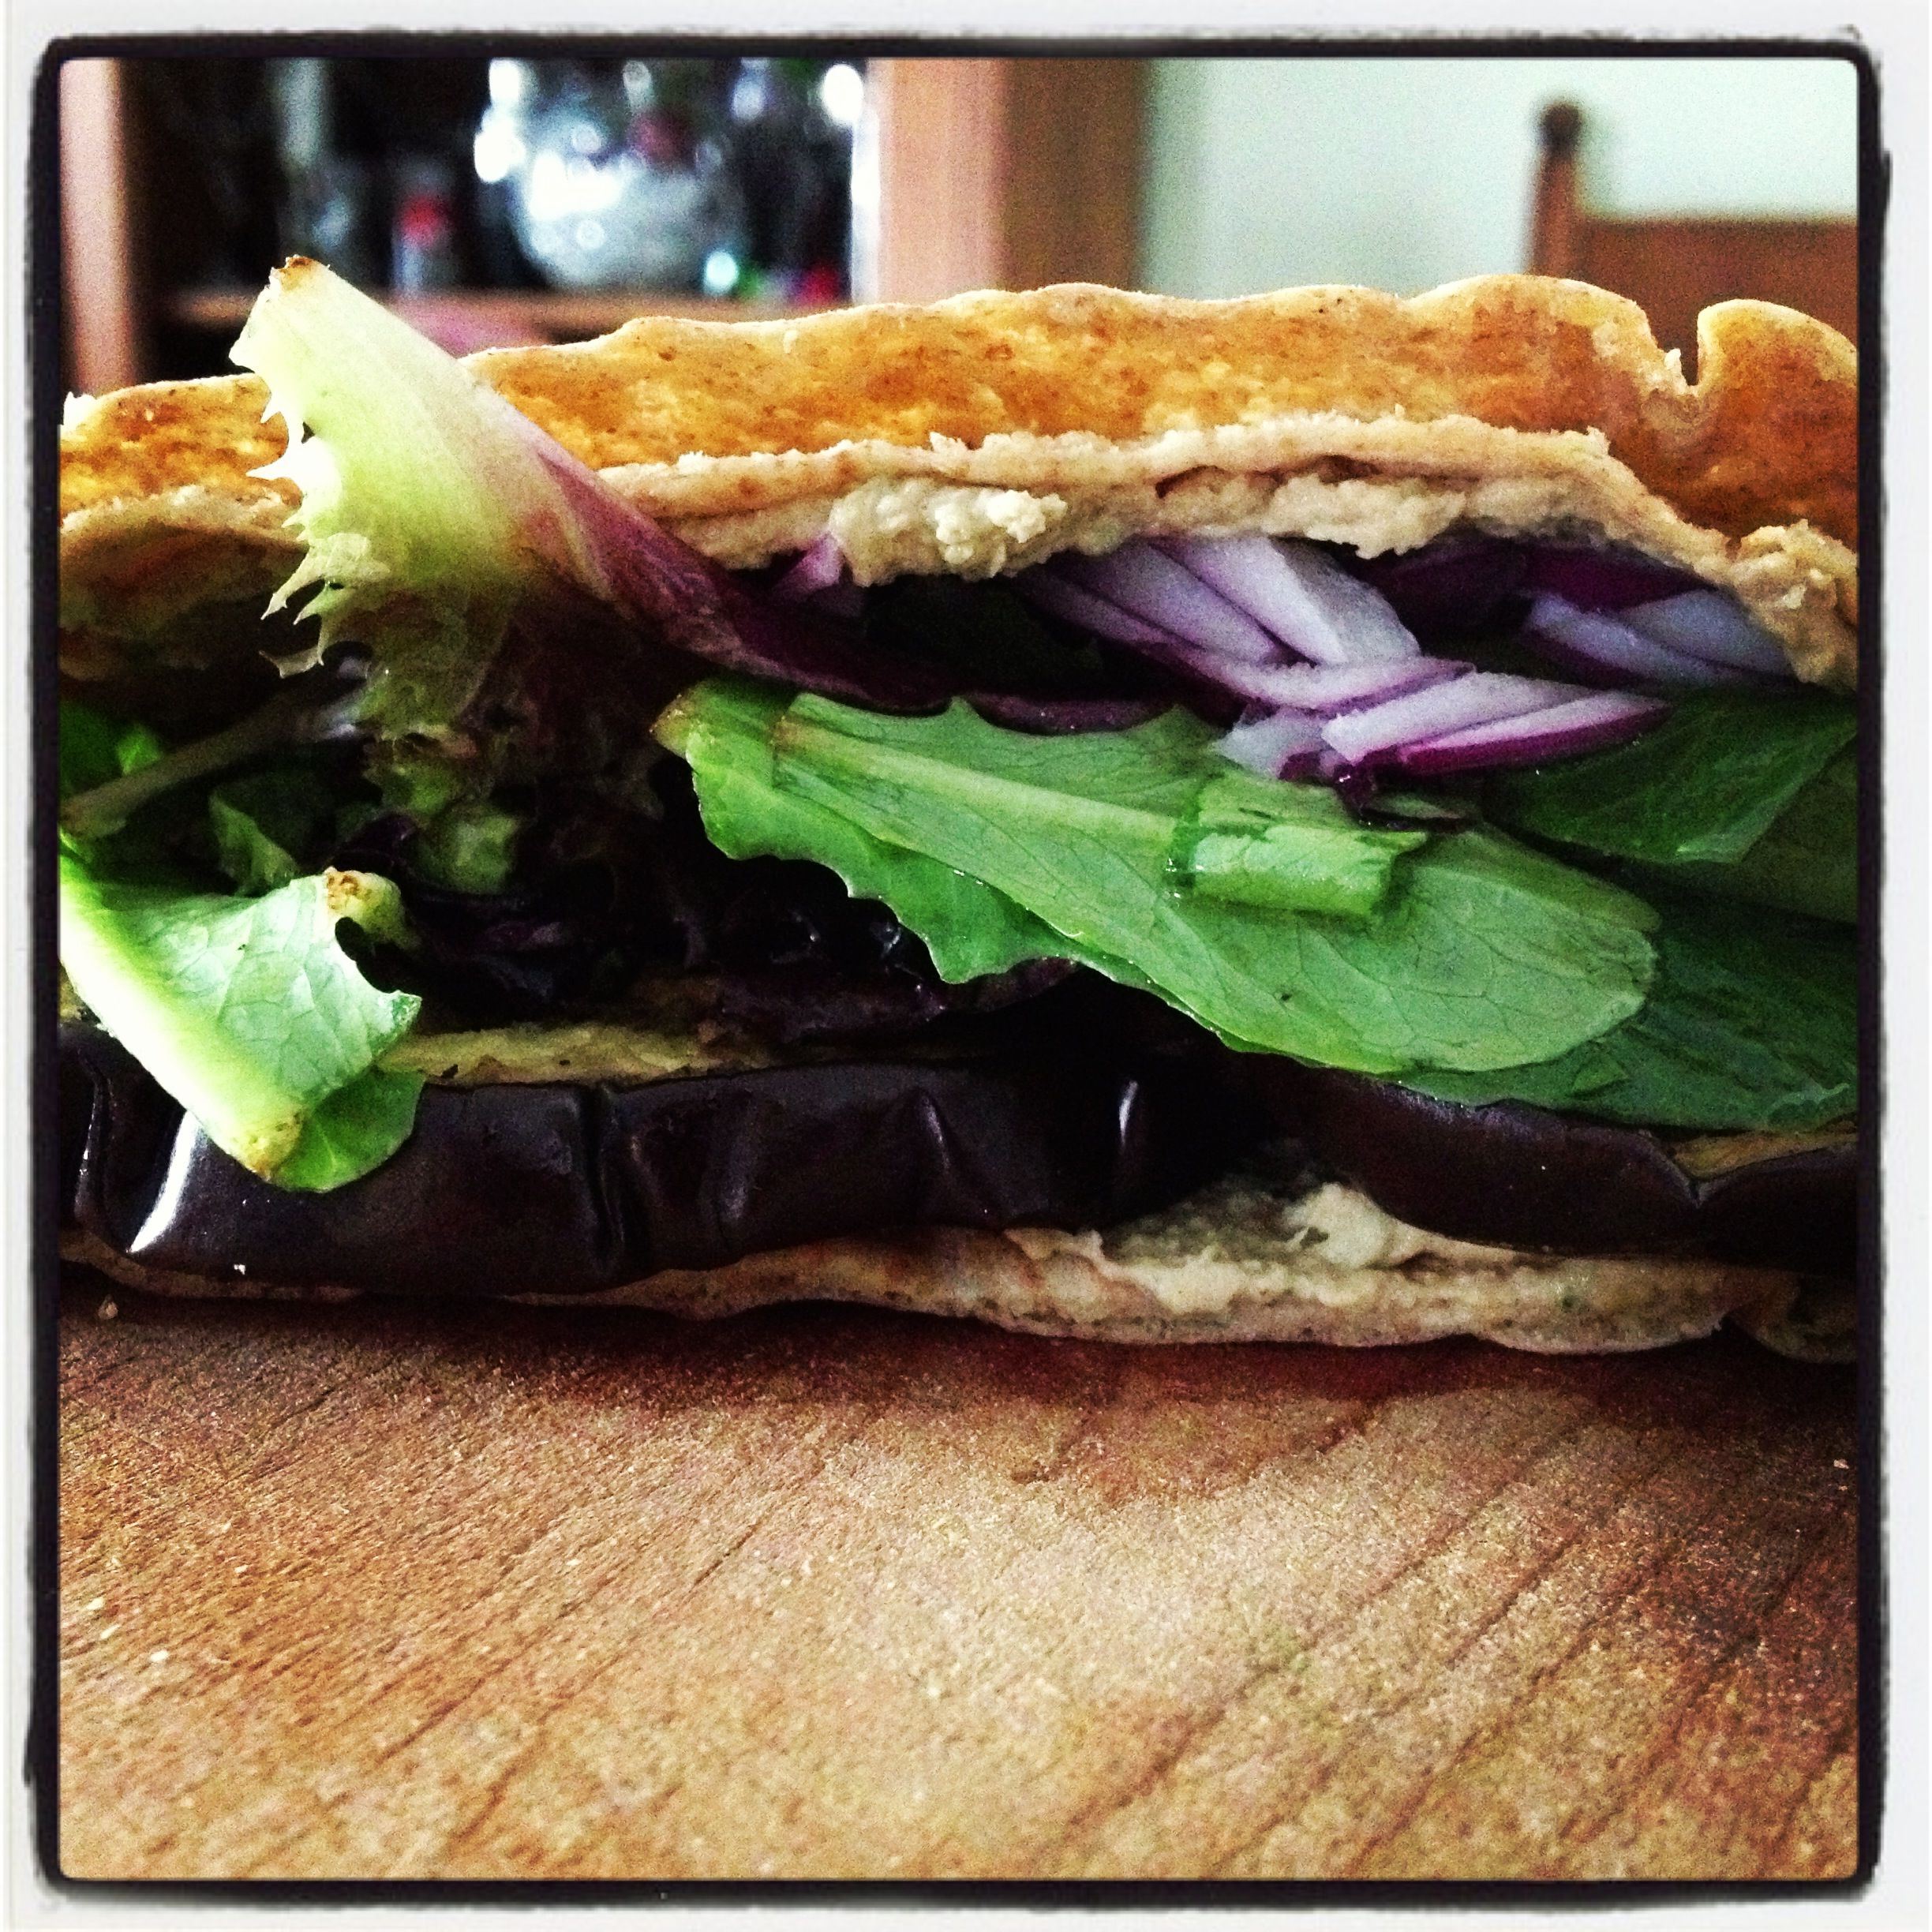
Roasted eggplant and hummus on toasted pita
That’s exactly what I did for lunch yesterday. Toasted pita cut into two half moons, each spread with Red Pepper Hummus, some roasted eggplant, and some greens lightly dressed with Lemony Vinaigrette. After chowing down, I realized the Fiery Onion Relish may have been a fun thing to have as a topping, too.
Maybe I’ll try that for today’s lunch.
Caning a Woven Chair Seat
March 21, 2013 § 2 Comments
I’m a crafty individual. I am able to craft words for a living, and I’m thankful for that. But I really do like to work with my hands. Typing on a keyboard just isn’t hands-on enough for me. Gardening and cooking are hands on, and I love those activities. But I really do enjoy working with furniture.
I have refinished a number of old family pieces myself, and have killed off many a brain cell from working with wood strippers and stains in an enclosed, non-ventilated space. My dream would be to have Norm Abrams workshop with all the woodshop gadgets—and an exhaust system. Not that I know how to use everything in Norm’s arsenal, or that I’ve ever made a dresser in my life. But I’d love to have those tools, turn some chair legs, stain some cabinets and make things that are beautiful and useful.
We don’t have room for a workshop, but in our new house we at least have room for me to work on one furniture-related project. I have one chair missing its cane seat, and I know how to weave it. I picked up the skill more than 20 years ago in an adult-ed class one summer. And it’s a good skill to have.
There are two types of woven cane seats:

Chair with pre-woven cane seat
1) The type with a groove around the seat’s opening into which you secure a pre-woven mat (see above). Easy peasy.

Seat with holes drilled around the opening’s perimeter.
2) The type with holes drilled around the seat’s opening, through which you weave individual lengths of cane (see above).
Luckily, I know how to do both.
We are having a dinner party for six people next Friday, and have six chairs—but only five seats. Time for me to start working on that sixth seat.
Funny thing about this set of chairs—antiques from way before my grandmother’s time—is that five of them have the groove, and just this one has holes drilled through the seat. If you look closely at the above photo you can still see bits of that groove. Who knows why they didn’t just replace the pre-woven mat, but it is what it is.
First step: I work with the vertical strips first. Place one cane strip in each hole, secure with a pin, and thread it through to the opposite side. You can use a really long strip and weave it under and through to the adjacent holes.
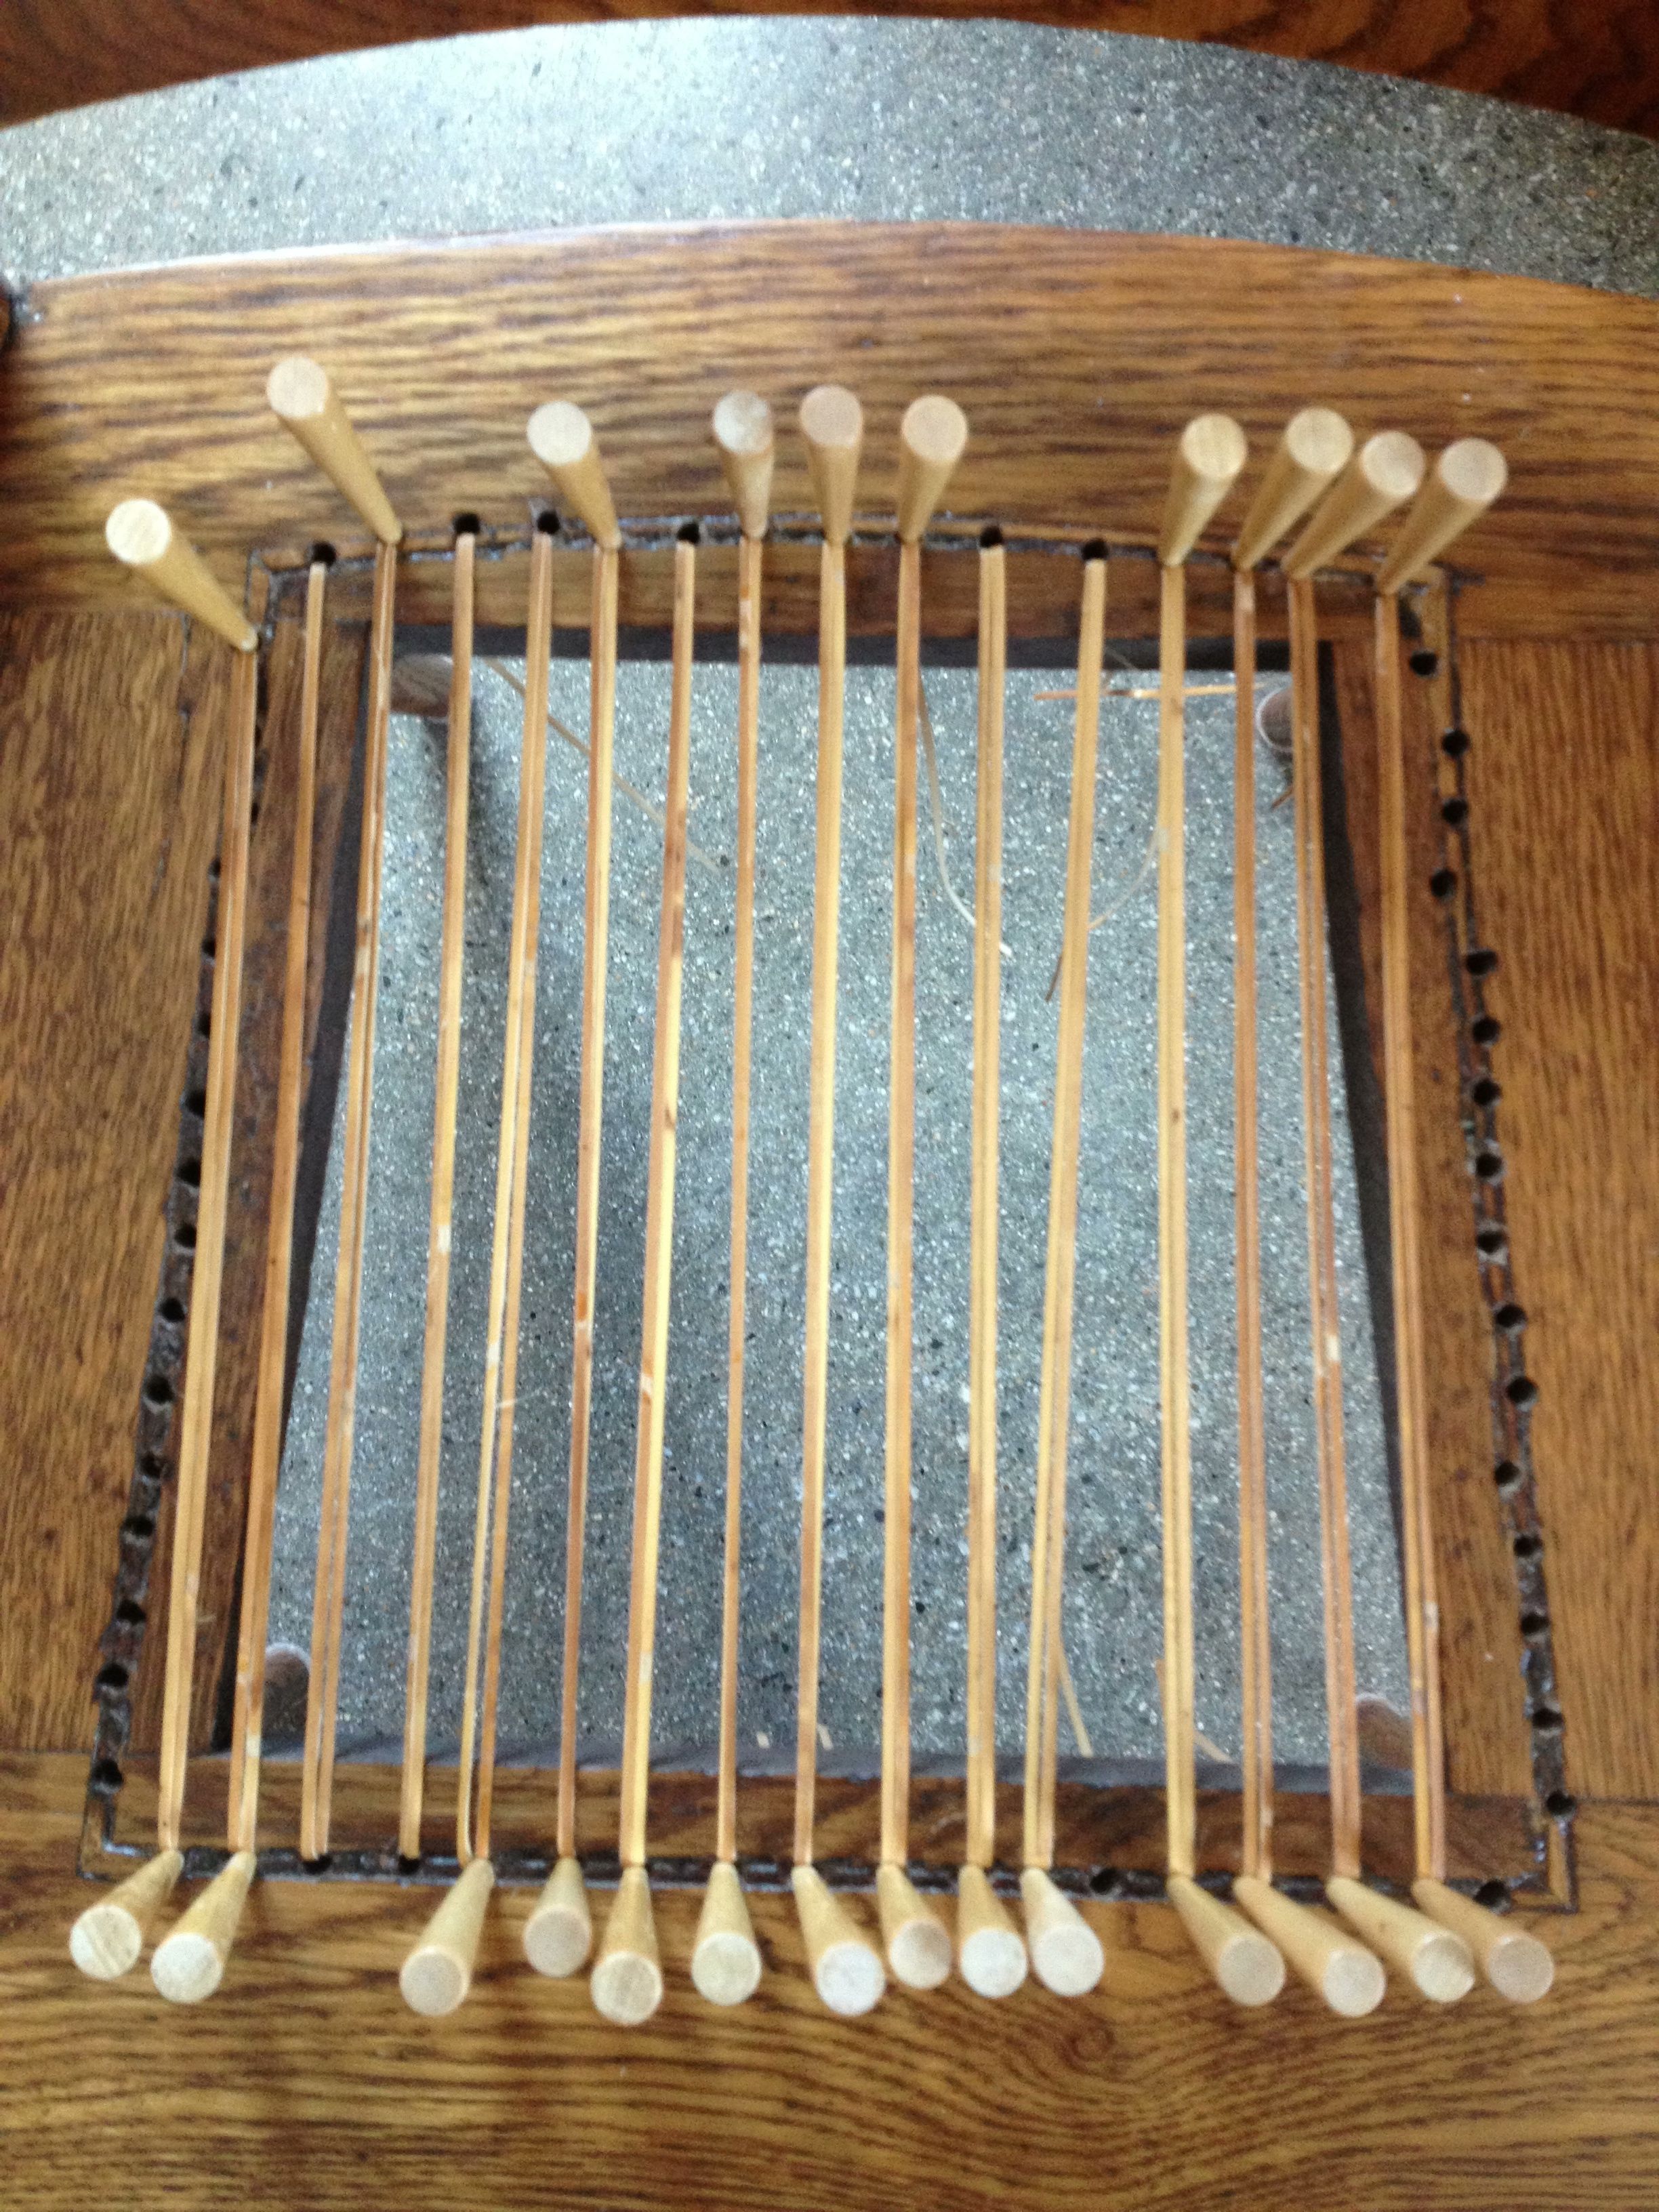
Second step: Repeat, same step so you now have two cane strips in each hole, side by side (see above). What can go wrong? Well, if someone drilled their own darn holes into the seat, sometimes you end up with holes that aren’t quite even. You can see that in the seat above. Don’t worry – it’ll work itself out. You’ll see.
Third step: Now work horizontally. In each hole you’ll insert the end of one strip. Now is where the weaving begins, over and under each of the vertical strips, ending up in the corresponding hole on the other side. To keep things simple, weave each strip the same. That way you’ll easily see if you’ve made an error, if you notice one row looks different from another.

Weaving the first horizontal strip.
Fourth step: You guessed it—you’re now going to put a second horizontal strip in each hole, adjacent to the existing strip, and weave in the OPPOSITE manner of the first weave. This is where it starts getting difficult, mainly when it comes to squeezing the cane under another cane that is flush with the wood of the seat.

Weaving the second horizontal strip, in an opposite manner from the first.
Fifth step: Haven’t gotten that far yet—but I will very soon. This is where the diagonal strips come in, weaving from upper left to lower right AND THEN upper right to lower left. This is where, fingers crossed, that extra hole on the bottom will kinda sorta disappear.
So, what can go wrong?
- The cane needs to remain moist while you weave or it will break. It’s already happened to me a dozen times. Either the cane you weave breaks, or a cane that is already in the seat breaks as you pull the working cane. Sucks.
- You can have a batch of caning that is just ready to split no matter how wet it is. Again, dealing with this RIGHT now.
- Unless you’ve got yourself a nifty work station where you can suspend the chair at chest level, there’s a lot of bending involved. Watch your lower back.
- Your cats can feel like they must be involved, chewing on the ends of the cane strips from below, stealing your pins, and hoping up onto the unfinished seat.
Once you get going, it’s not so bad. Nothing that frequent breaks and a good playlist can’t get you through. Stay tuned for Part II and pics of the finished product. If I don’t finish, someone will have to sit on a folding chair. And that just CANNOT happen at a good dinner party.
If you have a chair that needs caning and have NO idea where to begin (and don’t quite get what they are telling you in those YouTube videos), I’d be happy to explain or help. Just let me know.
Fiery Onion Relish
March 19, 2013 § 1 Comment
The best things in life aren’t necessarily free. They are unexpected. The sudden burst of sunset as the day’s snowstorm pulls away. The street fair you happen upon while heading on an errand. The new friend you meet just randomly. You didn’t mean it, plan it, expect it—and then there it is and you’re incredibly happy with an unexpected smile. Really, it’s the best.
This recipe is like that. Unexpected and happy and the best. Well, maybe not the best best, but the unexpectedness of it pushes it right up there. It’s one of those recipes you find while you are on your way to something else. In this case I was in search of something new to do with sweet potatoes (I don’t want to burn myself out on Sweet Potato Wontons with Cashew Sauce ala Garum Factory). And while flipping through the pages that Sundays at the Moosewood Restaurant’s index told me to search, I just randomly and unexpectedly happened upon this relishy goodness.
I’m a fan of Moosewood’s sauces and relishes. Their Spicy Eggplant Relish (The New Moosewood Cookbook) is a definite go-to for me, as it their savory onion marmalade (Moosewood Restaurant Low-Fat Favorites). This particular recipe was in the cookbook’s chapter on India—not a chapter I’d normally hang out in. Nor is something with the word “fiery” in the title a recipe I’d eagerly seek out. But I saw it, and I made it, using it as a condiment for today’s Roasted Eggplant on Whole Wheat Baguette. And it was unexpectedly delicious.

fiery onion relish
Fiery Onion Relish (from Sundays at the Moosewood Restaurant)
1 cup minced onion (use sweet onion if you want a mellow onion flavor)
4 tsp. lime or lemon juice (I used lime)
1/2 tsp. sweet Hungarian paprika
1/4-1/2 tsp. cayenne
salt to taste
Combine all the ingredients in a small bowl. Stir with a fork to mix well. Set aside for 30 minutes before using to blend flavors. The relish is meant to be spicy hot. The more cayenne, the spicier it is. Yields 1 cup and can be refrigerated for several days.
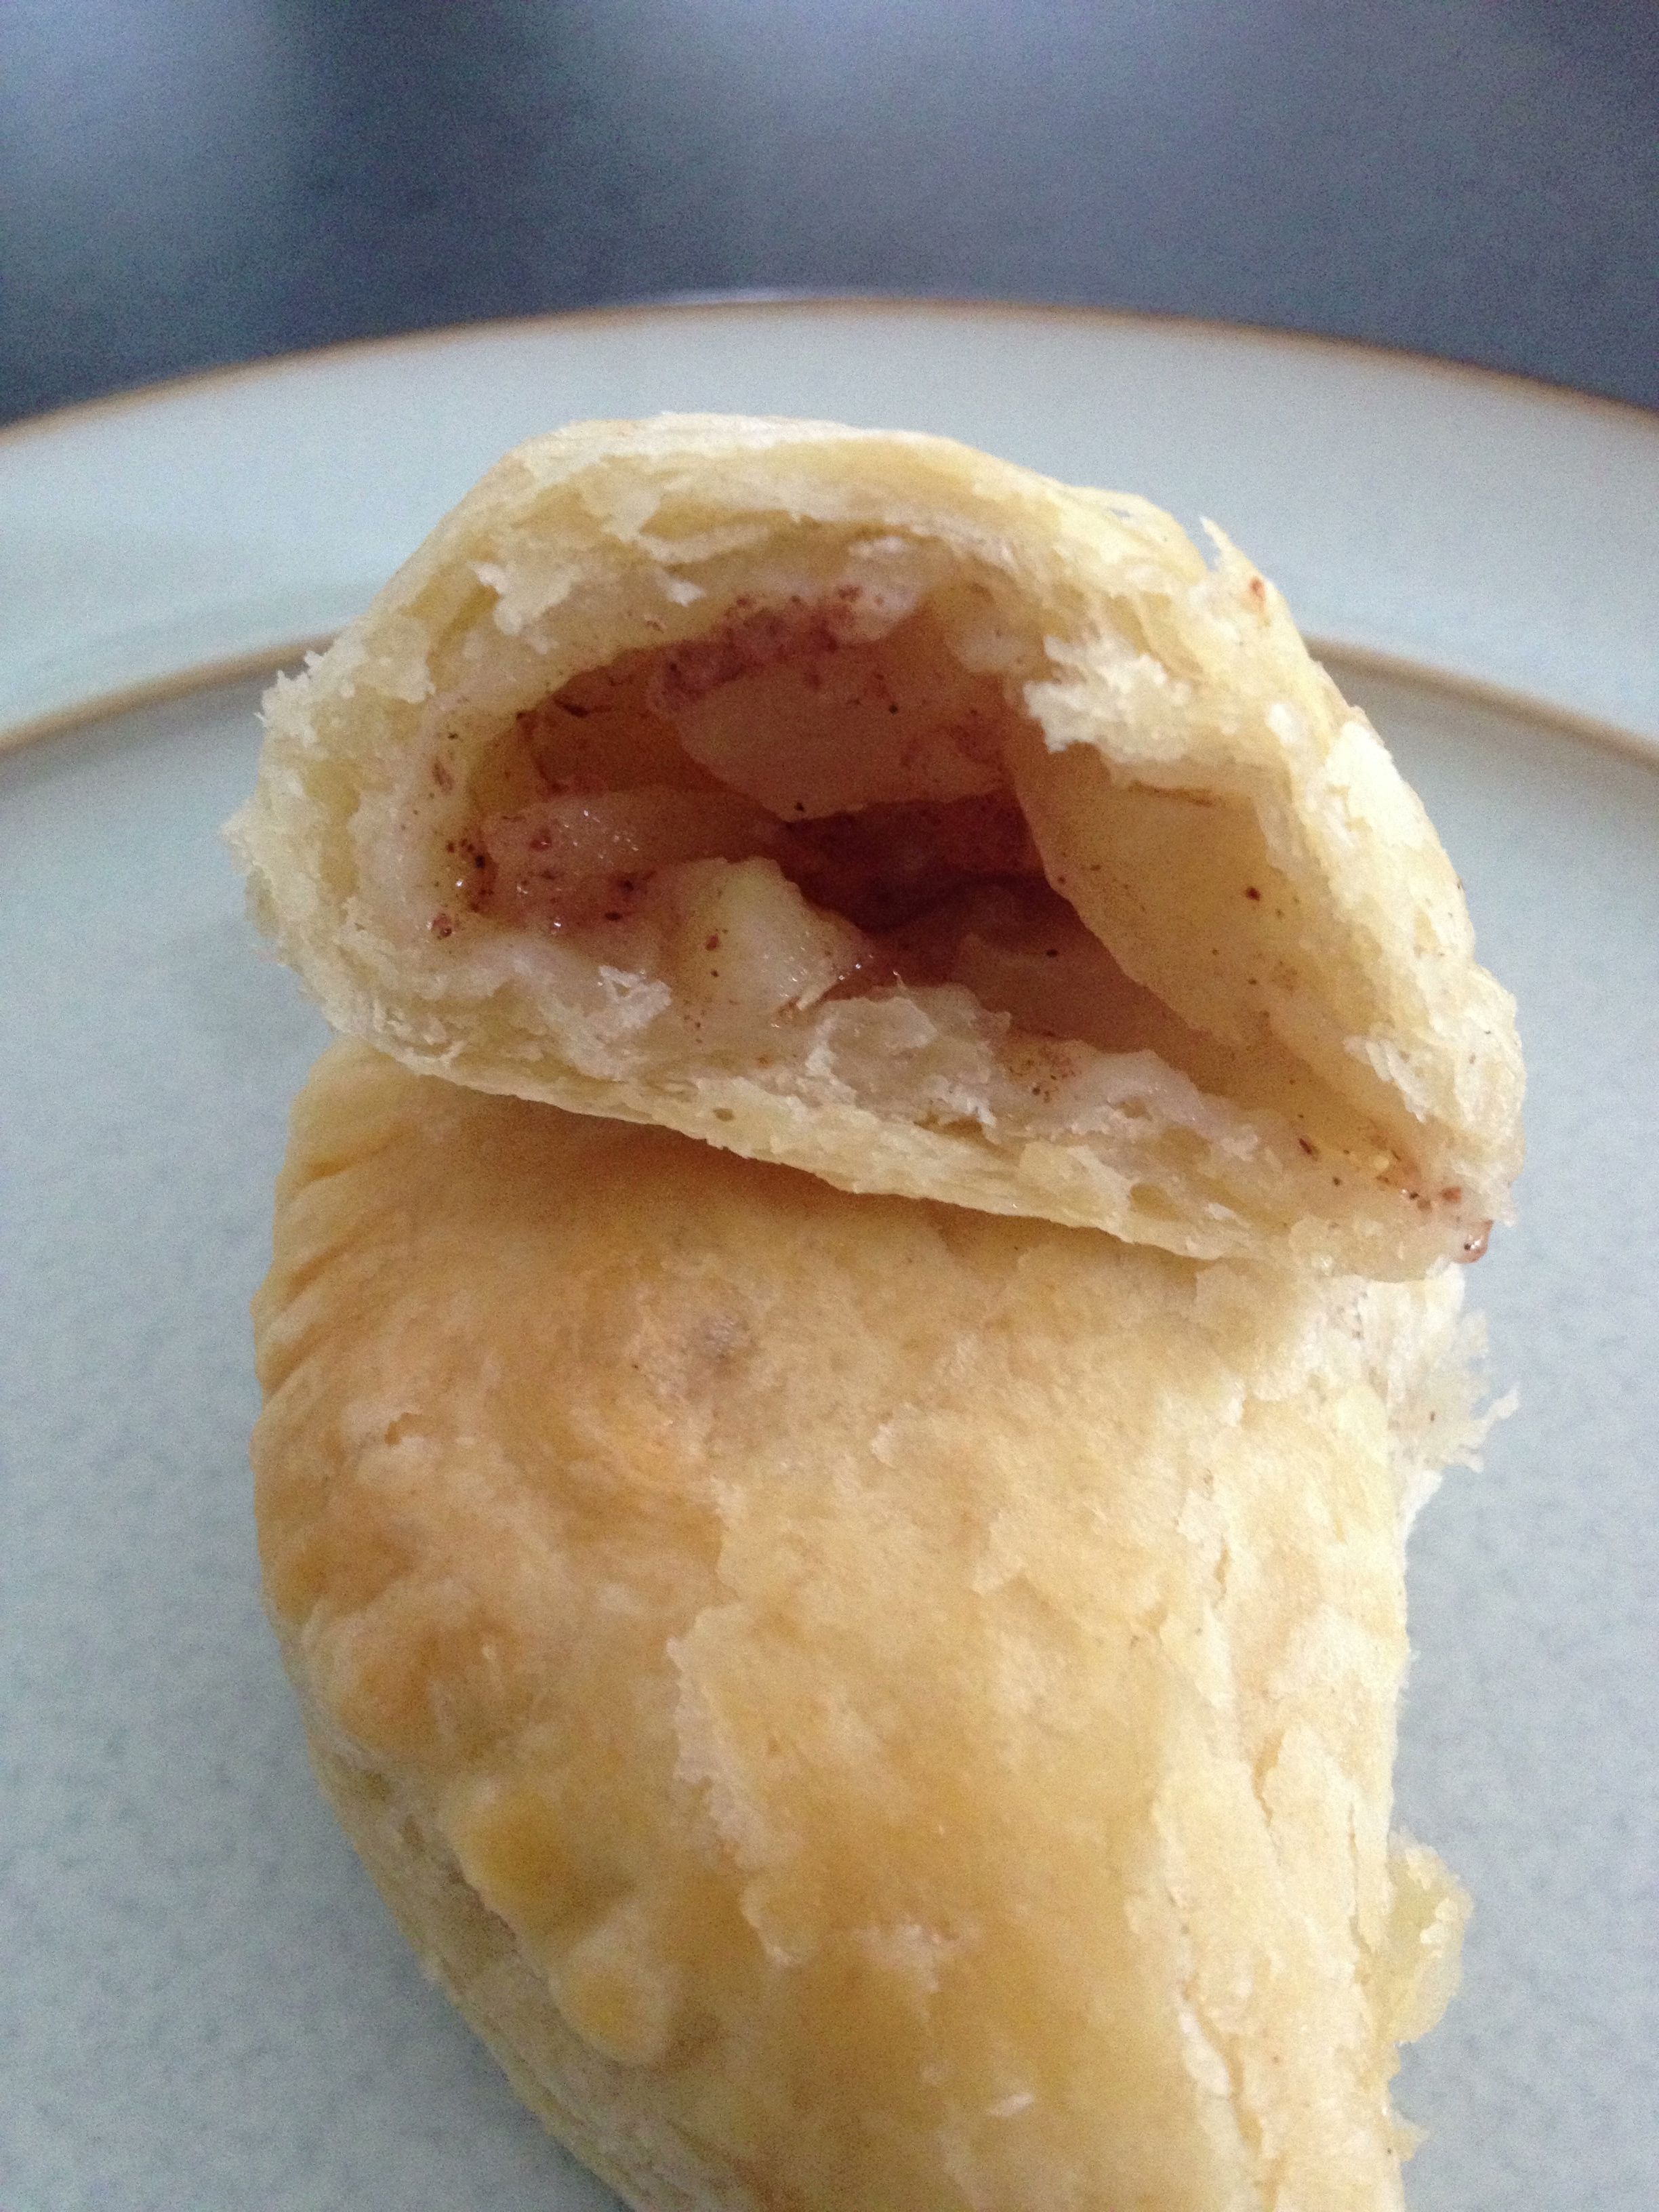
Apple Hand Pies
March 15, 2013 § 3 Comments
March 14. Or, 3.14. Known throughout the world as Pi Day in honor of that irrational number beginning with 3.14. But wait – wouldn’t they write it 14.3 in Europe?
I would rather consider it Pie Day. It’s the middle of March—we need a good pie this time of year. I’m all for it, quite honestly. Think about it—have you eaten pie since Thanksgiving? I didn’t think so.
I decided to make pie yesterday for Pie Day. But what kind? My go-to pies are those traditional fruity treats—peach, rhubarb, peach rhubarb (see a theme here?), apple, pumpkin. Nah. What about a cream pie? They get runny after a few days. The problem with any of these pies (if there can be a problem with pie) is that they are so darn big for two people (I know, I could invite you over but…). And as much as I’d like to eat an entire pie, I just can’t do it. At the last piece, all old and soggy, I begin to detest it. We must not go there. Can’t ruin pie like that.
So I decided on hand pies: Pies that fit into your hand. Individual servings of pie, all wrapped up in their individual casings. Perfect! Thing is, I’d never made hand pies before. What to do? What to make?
A little Googling got me to the Smitten Kitchen blog and her recipe for Bourbon Peach Hand Pies. Hmmm…peaches. Peaches and bourbon. And, according to the recipe, this dough holds up to the inevitable leaks that result in boiling hot fruit juicy spilling away, while also being light and flaky. Print it up—I’m in.
Alas, Trader Joe had other dessert intentions for me. Not a fresh peach to be found. So apples it was.
Before I get to the recipe, a few notes about it and the resulting pies:
- I used a food processor. When you have one, use it.
- The dough did exactly what she said it would—it held up well, didn’t leak (much) and is tasty and flaky. I’m definitely keeping it in my repertoire. BUT—it’s not really a pie dough. It’s more of a flaky morning pastry. Which is fine, just not very pie-ey.
- I used the same amount of apples as peaches the recipe called for. WAY TOO MUCH. Below is my estimation of half the recipe.
- The filling I made was tasty but 1) wasn’t juicy enough – maybe more sugar or let it sit longer? and 2) not enough of it in the pie. But that’s all I could fit in the dough rounds while still being able to close them securely. I’ll just need to experiment more, won’t I? One thought is to slice the apples (or peaches) lengthwise and layer the slices in the center of the dough rounds.
Apple Hand Pies (adapted from Smitten Kitchen’s Bourbon-Peach Hand Pies)
For the pastry dough:
2 1/2 cups all-purpose flour placed in bowl of food processor and chilled one hour in freezer
1/2 tsp. salt
2 8 oz. sticks unsalted butter, cut into pieces, placed into small bowl and chilled for 1 hour in freezer
1/2 cup sour cream
4 tsp. fresh lemon juice
1/2 cups ice water
For the filling:1 lb. apples, peeled and finely chopped
2 tbs. flour
2-4 tbs. sugar (the more sugar, the juicier it should be if you let it sit awhile)
pinch of salt
1 tsp. lemon zest
To finish:
Egg wash (One egg yolk beaten with 2 tbs. water)
Sanding sugar
1. Remove bowls from freezer. Add salt to the flour and stir. Place flour bowl onto food processor and add in chilled butter. Using 2- to 3-second pulses, whir up the flour and butter until the mixture looks like course corn meal.
2. Combine sour cream, lemon juice and ice water to a small bowl and whisk until combined. Add to flour-butter mixture one half at a time, whirring in between. You’re looking for large clumps to form. Turn clumps out onto a work surface and bring mixture together with your hands to form a big ball. WARNING: Dough will be sticky. Lightly flour your hands before touching dough. Wrap dough ball in plastic wrap and refrigerate one hour. (At this point dough can be frozen up to one month. If doing so, wrap in something a bit more freezer proof.)
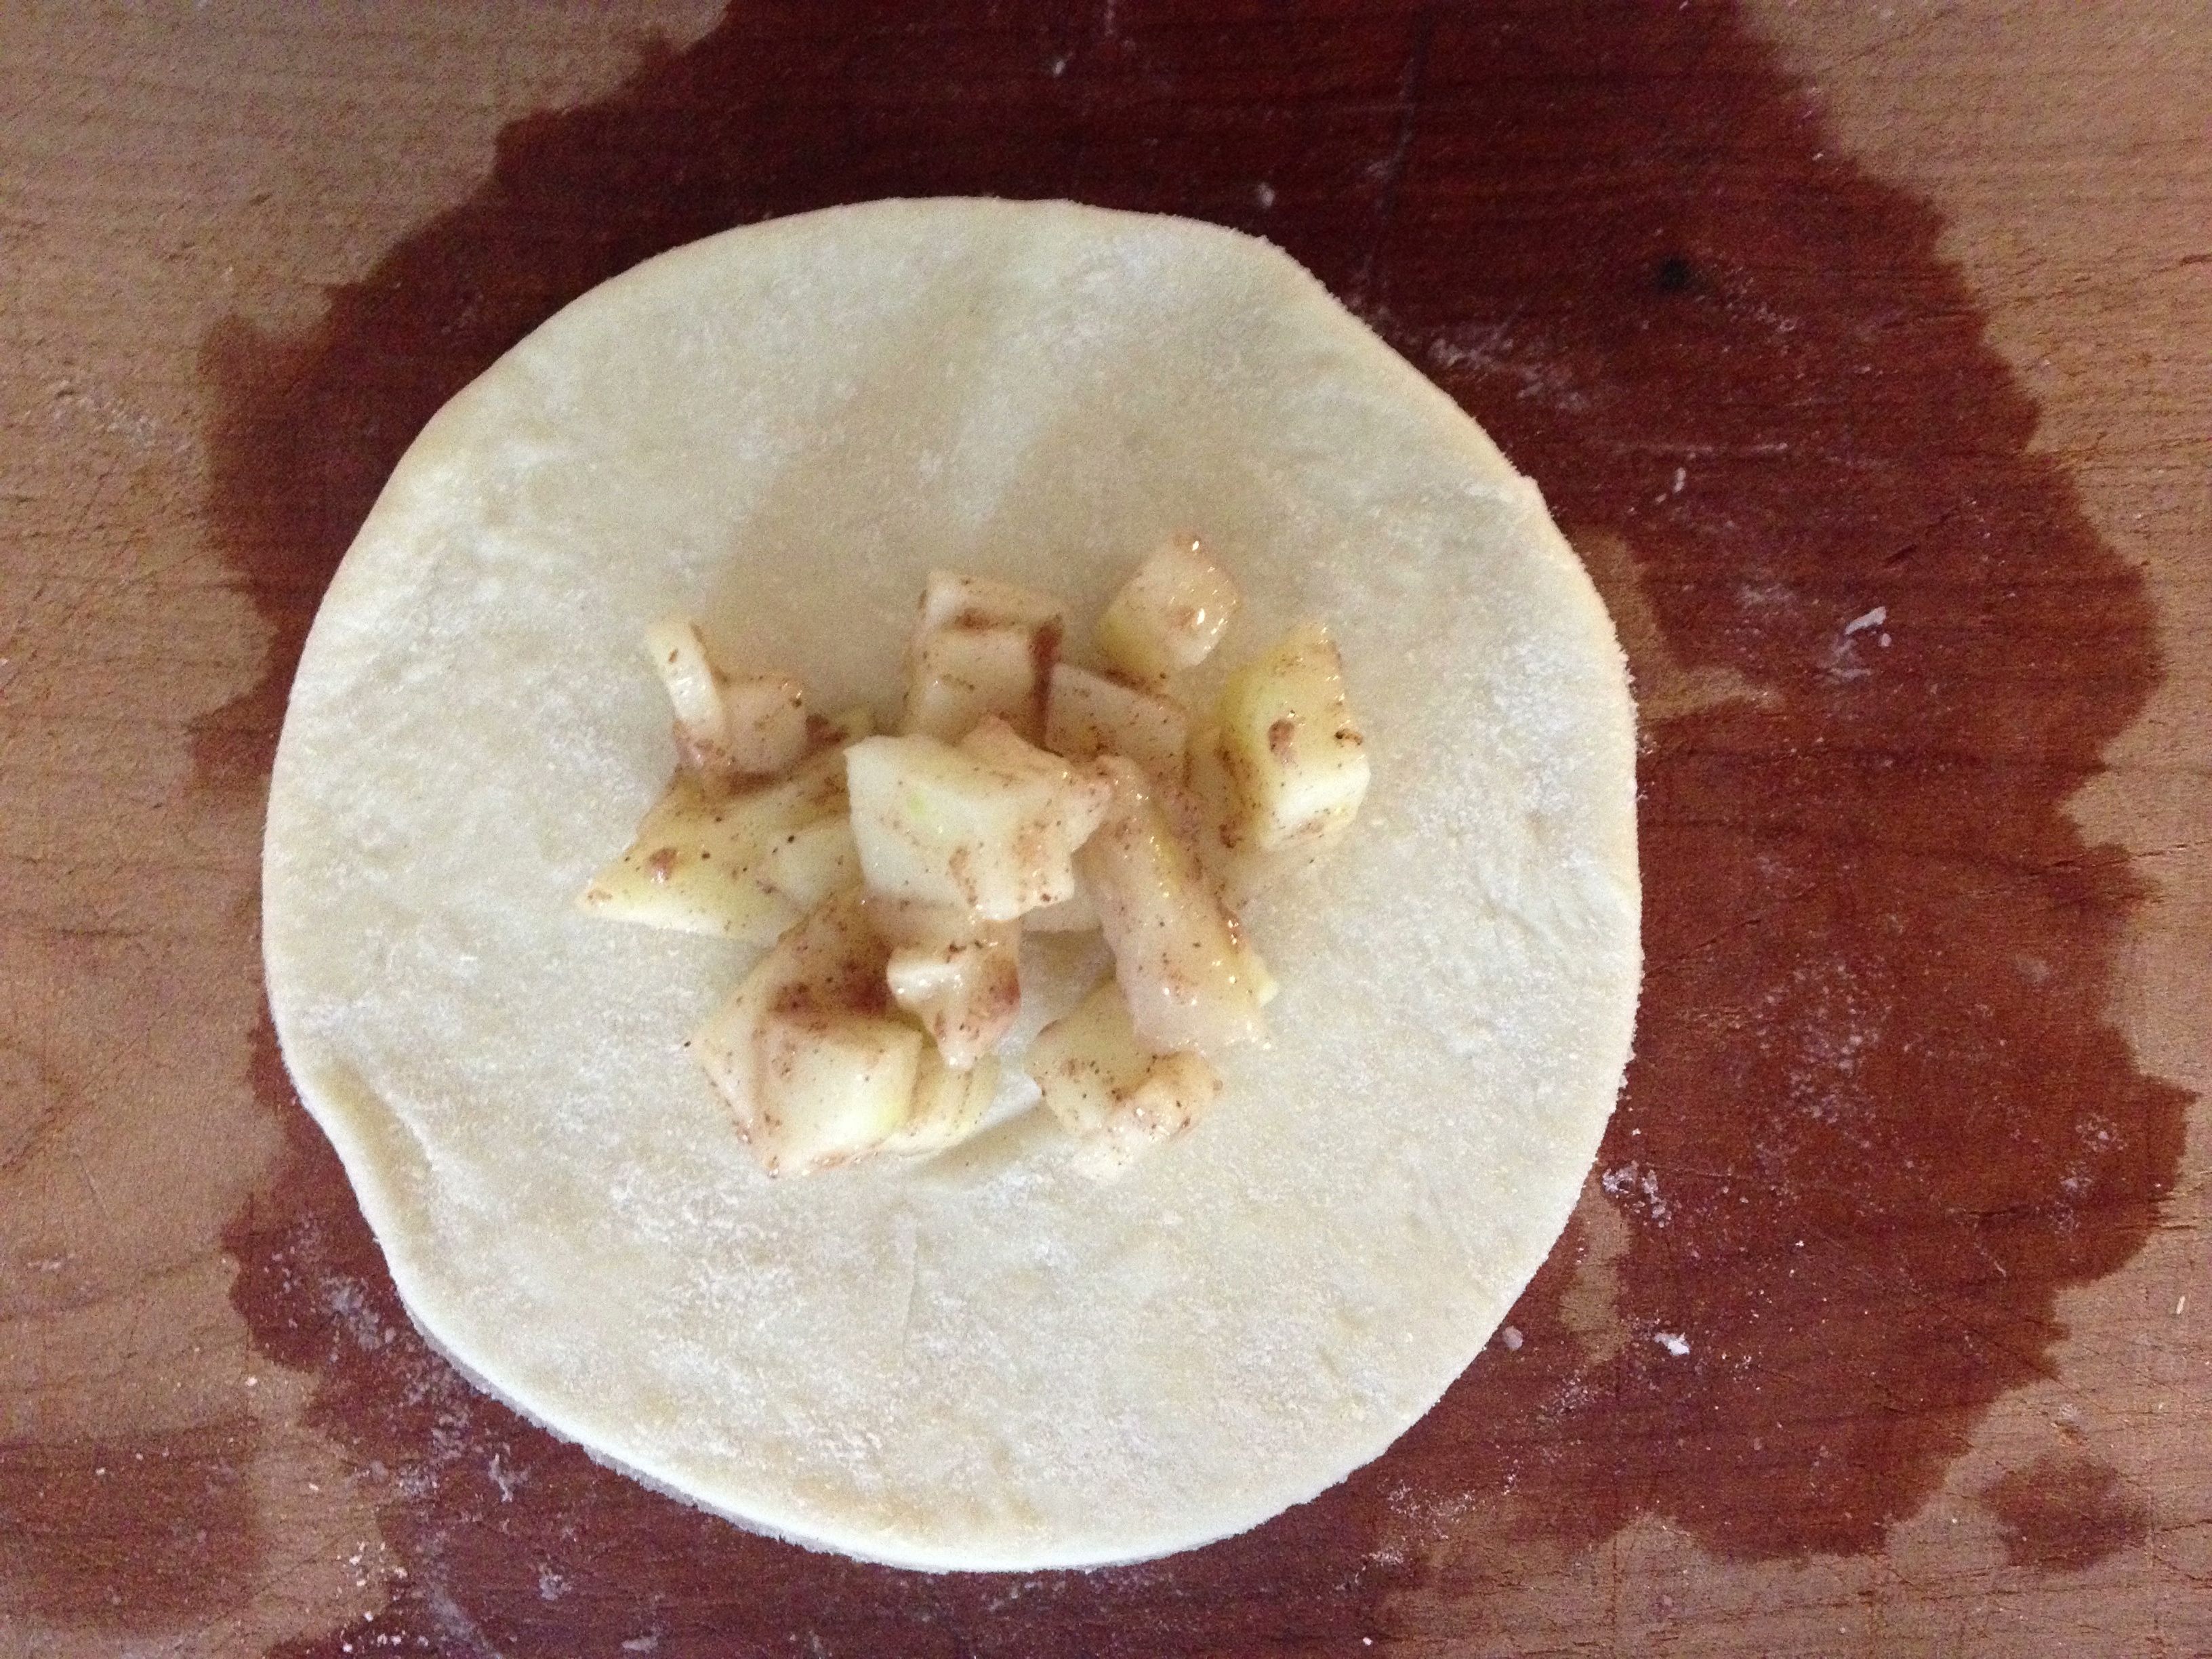
3. Divide dough ball into quarters. Work with one quarter at a time, leaving the others in the fridge while you work. Lightly flour the work surface (keep that flour handy). Roll the dough into a 1/8-in. thickness. Using something round with a 4.5-inch diameter, cut rounds out of the dough. NOTE: Only thing I had available was a 1-quart plastic container similar to the kind you’d get filled with potato salad at a deli. It’s about 4 inches, but it works. Use what you have on hand. Transfer these dough rounds onto a parchment paper-lined baking sheet and pop into the fridge. Repeat with other dough balls, filling up the parchment, and layering additional parchment on top of the previous. Keep these rounds chilled for 30 min. or more.

4. Filling: While the dough rounds chill, add the finely chopped apple to a large bowl. Add in the flour, sugar, pinch of salt and lemon zest. Let sit until the dough rounds are ready – this will let the sugars produce some juicy apple goodness—something I didn’t do this time around.
5. Assembly: Remove chilled dough from fridge and let them sit for 2-3 minutes to get a bit more workable. Spoon in about 1-2 tbs. of the apple mixture into the center of the round (more for larger circles, less for smaller). Brush the dough edges with water and fold one half over to meet the other to form a half circle. Seal it lightly with your thumb, then press closed with the back of a fork. Place each little pie back onto the parchment and return to the fridge for another 30 minutes.

ANOTHER OPTION: Place a slightly larger amount of apple mixture onto the center of one round and place another round on top, stretching the top dough a bit so it meets the bottom’s edges. Seal as before. This makes a fun UFO-shaped pie.
6. Heat oven to 375. Removing the pies from the fridge, give each one a small slice of poke with a fork (to let steam out). Lightly brush each pie with the egg wash and sprinkle with sanding sugar (optional of course but yummy). Bake until the pies are golden brown – 20 to 23 minutes. Remove and let cool.

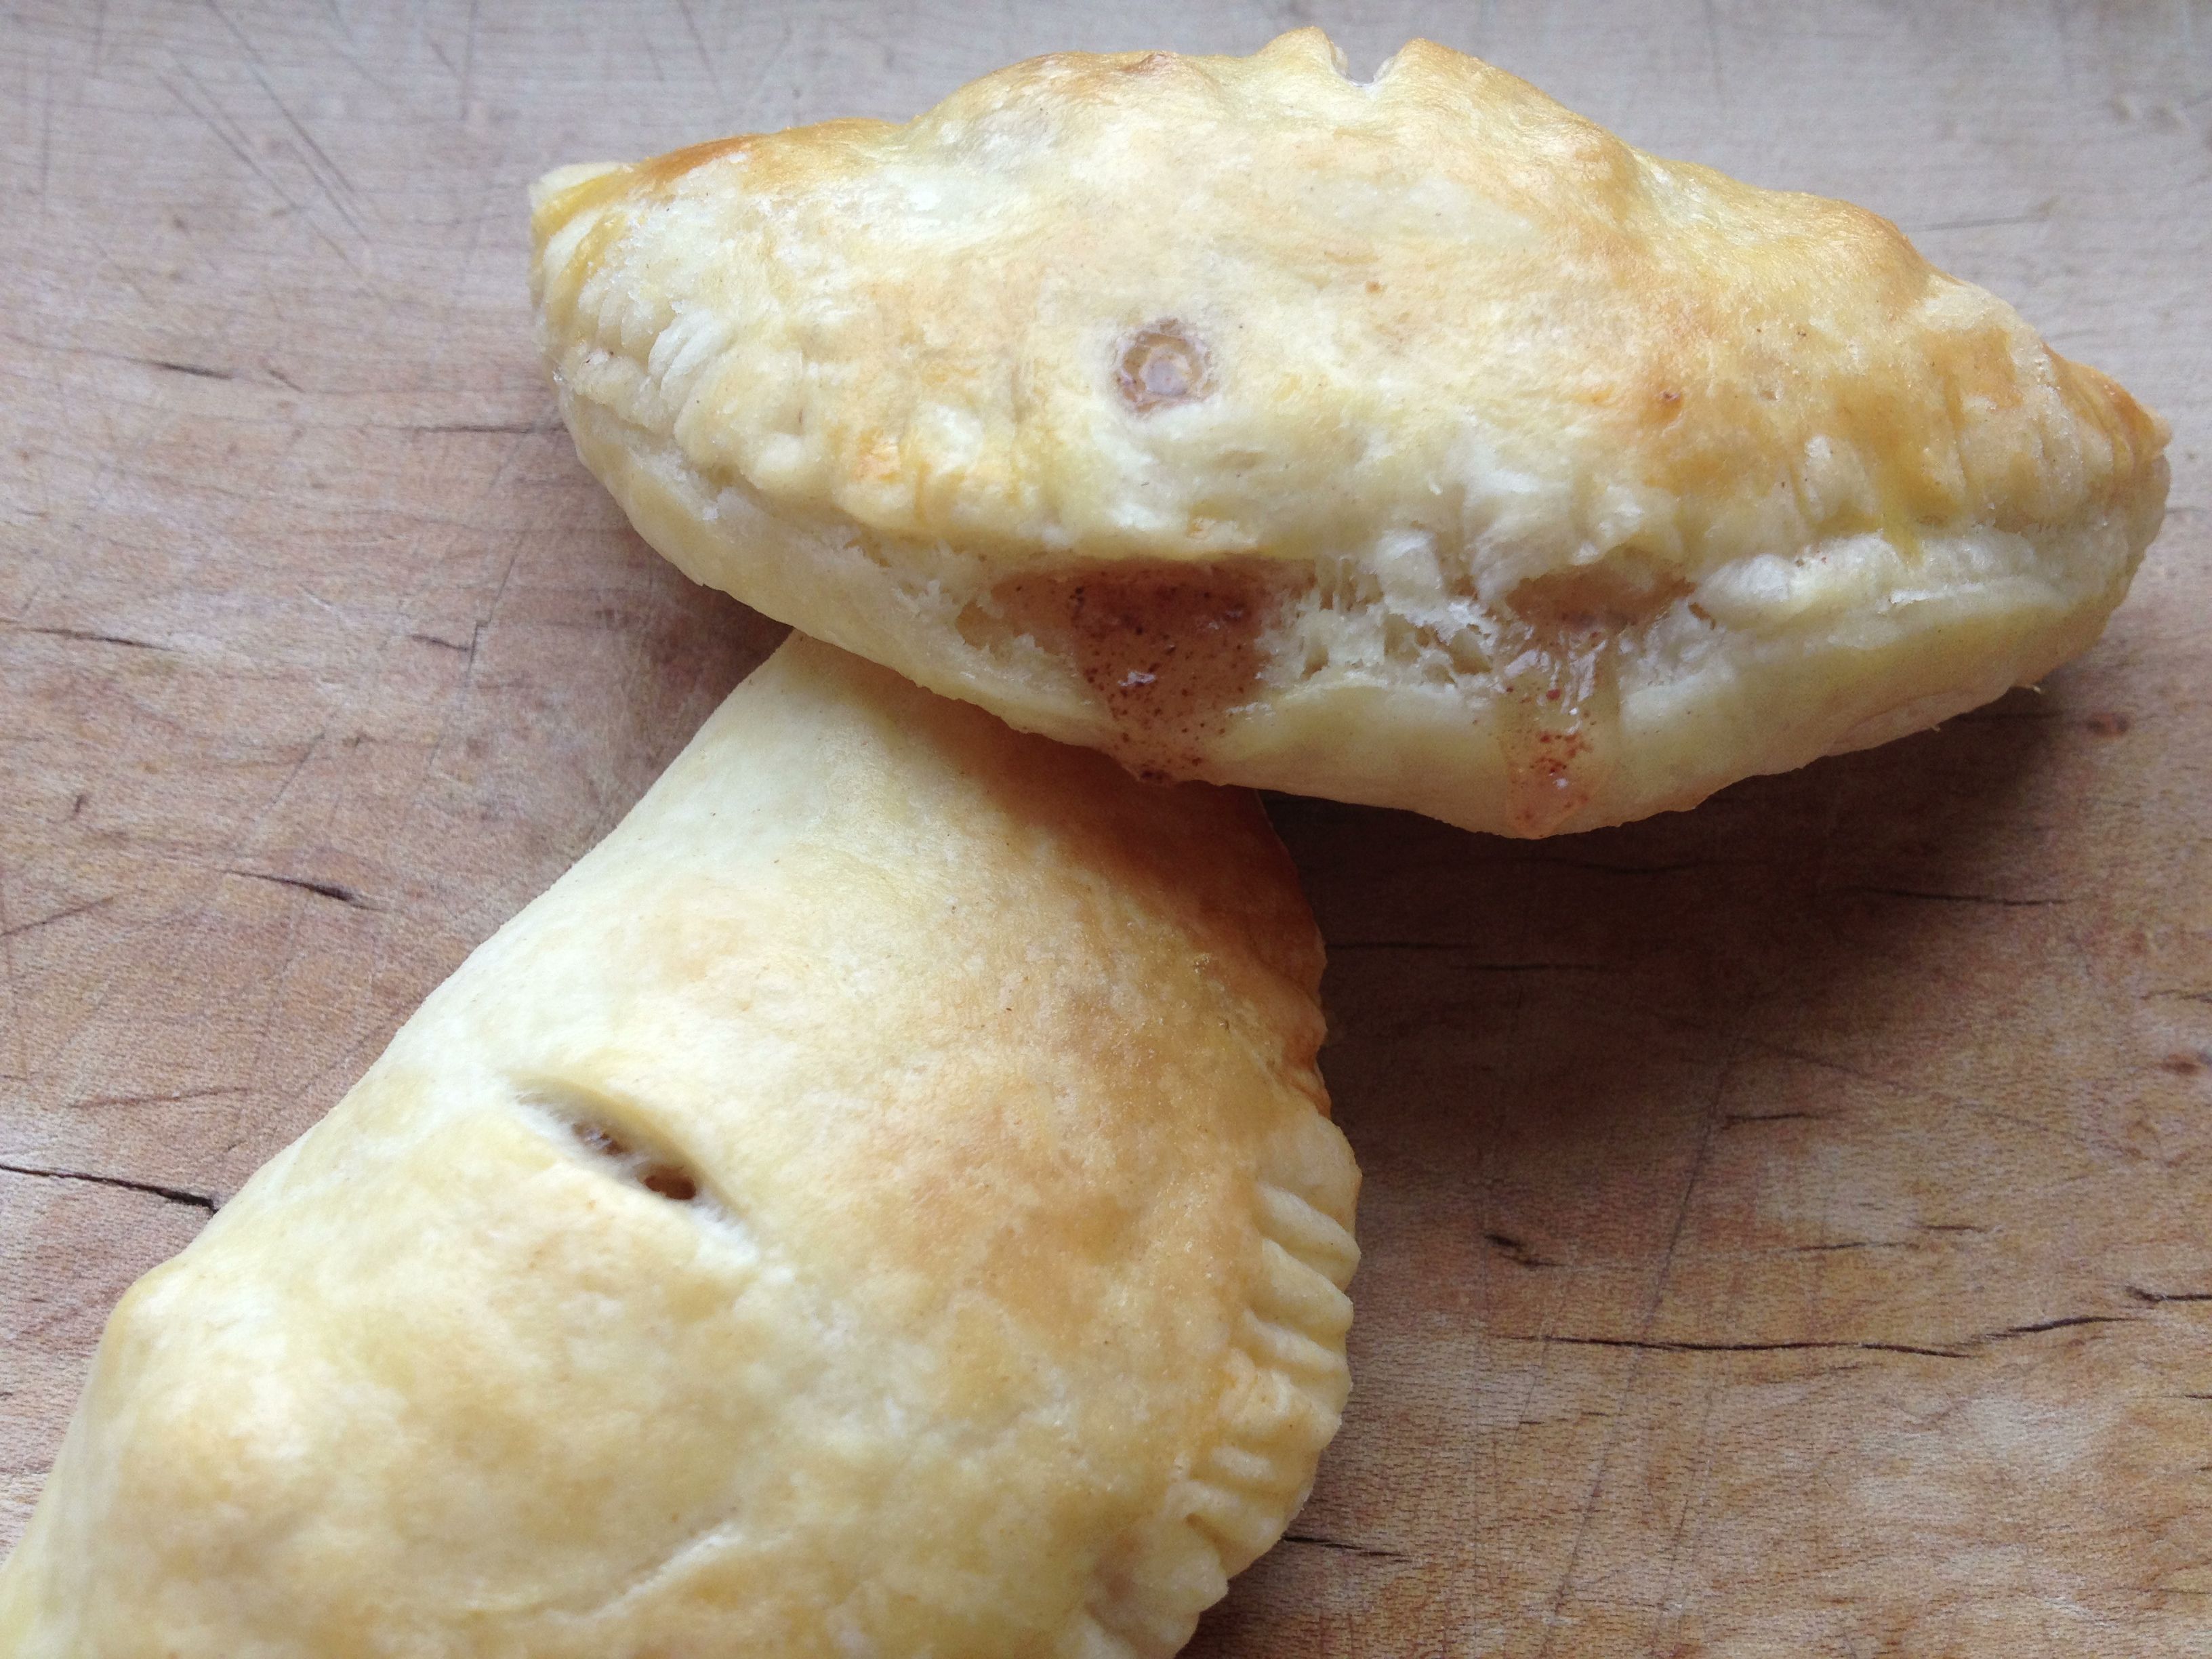
If you serve them still slightly warm, you’ll want to serve with vanilla ice cream. Otherwise, these are excellent pastries to have on hand for breakfast.
Seriously bummed that Trader Joe’s didn’t have peaches. What would you fill these with? Any suggestions for other dough that might be more like a traditional pie?
