
Fish Tacos Fast and Easy
February 25, 2011 § 2 Comments
Without a doubt, the best fish tacos in Boston can be found at La Verdad on Landsdowne. I am right, people. If you beg to differ, please speak up. But I’ve had my share of fish tacos from coast to coast (actually, only on the coasts), and Ken Oringer’s are tops.
Now, I’d love to head on down to La Verdad every single day and have a plateful of those delicacies, but that’s not possible. And we’re still trying to nail down ingredients and technique to replicate those at home. Meanwhile, to satisfy the fish taco craving, we’ve taken a turn at a Boston Globe fish taco recipe. It’s tasty and pretty darn easy.
Slaw

Fish taco with red cabbage and carrot slaw and spicy cream
- 1/4 head red cabbage, shredded
- 1 large carrot, julienned
- 1/4 red onion, thinly sliced
- 1 small lime, juiced
- handful of cilantro leaves, chopped
- salt/pepper
Combine all ingredients in a large shallow bowl. Season with salt and pepper. Let it sit for about an hour.
Spicy Cream
- 1/4-1/3 cup low-fat Greek yogurt
- zest and juice from half a lime
- hot sauce of your choice
Whisk together yogurt, zest and juice. If it’s too thin/watery, add a touch more yogurt. Add in a few dashes of hot sauce to taste.
Fish
- 1+ lb. firm white fish. We use tilapia for our fish tacos. We’ve used cod and that’s fine, too. Tilapia is less expensive. So sue me.
- evoo/salt/pepper
Cut fish into 1/2-in. pieces and place into a small bowl. Add a swig of evoo – about 1 TBS – and toss to coat. Season with salt and pepper and toss. If you want to add another level of flavor, go ahead. The original Boston Globe recipe suggests about 1 tsp of cumin. We tried that. It’s fine. Although it gives the fish an off-putting grey-brown color when prepared.
To cook the fish, we take about half of the fish, place it on the tray that comes with your toaster oven, and just broil it in the toaster oven for about 5 minutes. And that’s it – done!
To Assemble
Heat a whole-wheat fajita wrap (the 8-in. size) in a dry pan of medium heat. Fill with about a third of the broiled fish. Top with the cream sauce and slaw. The first batch of broiled fish will make about three tacos. For a dinner for two, have one each, share the other (no, there’s nothing gross about that), and have a side of something like caramelized onion and mushroom quinoa.
While you’re cleaning up the dinner dishes, pop the other half of the fish in the toaster oven for 5 min. It heats up well for a lunchtime fish taco the next day.
Bulgur with Tomatoes and Kale
February 22, 2011 § 1 Comment
Sometimes dinner is just a bowl of gussied-up bulgur. Not that bulgur is meaningless or anything. Not in the least. It’s a whole grain, high in fiber, packed with good nutrition—it’s awesome just for that. Throw in its great taste and texture, it’s a real winner.
But when I say “sometimes dinner is just a bowl of gussied-up bulgur,” I mean some days you just don’t want to put a lot of effort into the evening meal. Aside from pulling a box of frozen somethin’ out of the freezer, fancified bulgur is an easy solution.
Two weekends ago at the Somerville Winter Farmers Market, one of the vendors—she sells Middle Eastern prepared foods—shared a quick-and-easy bulgur recipe with Jennifer and I. Having just come home from a long weekend in Vermont, we decided to take mealtime easy and whip up the bulgur. Jennifer prepped the dish, I stood by and watched. Full credit goes to my favorite chef.
Ingredients
- 1 sweet onion
- 1 TBS evoo
- 1 can (28 oz) diced tomatoes
- salt & pepper
- 1 small bunch kale, washed and roughly torn
- 1 cup bulgur
- feta cheese
-Chop onion. In a medium pot, saute onion in olive oil over medium until somewhat translucent. Add tomatoes. Season with salt and pepper. Heat until bubbling, then turn down to a simmer. Let simmer gently while you prep the kale.
-Add kale to tomato onion mixture, and try to combine with tomatoes, but don’t try too hard. Cover. Let simmer away for 15 minutes.
-After 15 minutes, kale should be mostly cooked. Stir in a cup of bulgur. Cover and let stand for 15 minutes. The bulgur should soften and expand during that time.
-Dish up in bowls as a light meal or spoon alongside an entree. Top with a sprinkling of feta cheese if you wish (and I wish).
Peanut Butter Cookies a la Flour
February 19, 2011 § 4 Comments
I have a new baking strategy. About once a week I walk over to the nearby Flour Bakery, scan the luscious goodies within the glass case, and pick something. Just one thing. The intention is try my best to replicate Joanne’s tasty treats.
The first was the oatmeal raisin cookie. If you didn’t get the low-down on this oatmeal experience, look over there in the previous posts. It was an unscheduled lesson in the importance of expiration dates.
But, this is a new day. And a new cookie. Peanut butter. Mmmmm … peanut butter. Hers is a big, wide cookie. Dotted with bits of peanut. Crisp. A hint of salt and, surprisingly, a tad greasy. And a nice peanut butter flavor.
What baking lesson will I learn this time?
I’m happy to report that no catastrophes occurred with this recipe. I followed the recipe to the “t.” All the ingredients were fresh. And the cookies turned out fabulously.(Want the recipe? Buy the Flour cookbook!)

Mmmmm .... peanut butter cookies
But, did I replicate the cookie? No. My batch was lighter in appearance, a bit softer, less salty, and not as greasy. And they didn’t spread as much.

A Flour peanut butter cookie and one of my own
Why? Two reasons. First, the baking process. The recipe says to bake 18-20 minutes (as I recall, I don’t have the book nearby). But because ovens are always fickle things, I prefer to go by the look of the cookie. Joanne says to remove cookies from the oven when the just start to turn golden around the edges, with the middle remaining lighter (again, I don’t have the book with me, but I’m pretty sure that’s what she recommends). And because I prefer a slightly undercooked cookie, I took them out the millisecond I saw the edges browning up. Yes, I crouched on the floor staring through the oven’s window.
Second, and what I account as the major factor in the differences between the two cookies … the peanut butter. The recipe called for a chunky peanut butter. I happened to have smooth. And unsalted. I had a jar of Teddie natural peanut butter, which tends to be thicker and less oily than those childhood favorites Peter Pan and Jiff. Whatever is in those brands that make them smooth and creamy, Teddie doesn’t have it. And I’m kinda glad it doesn’t. Those cookies rocked.

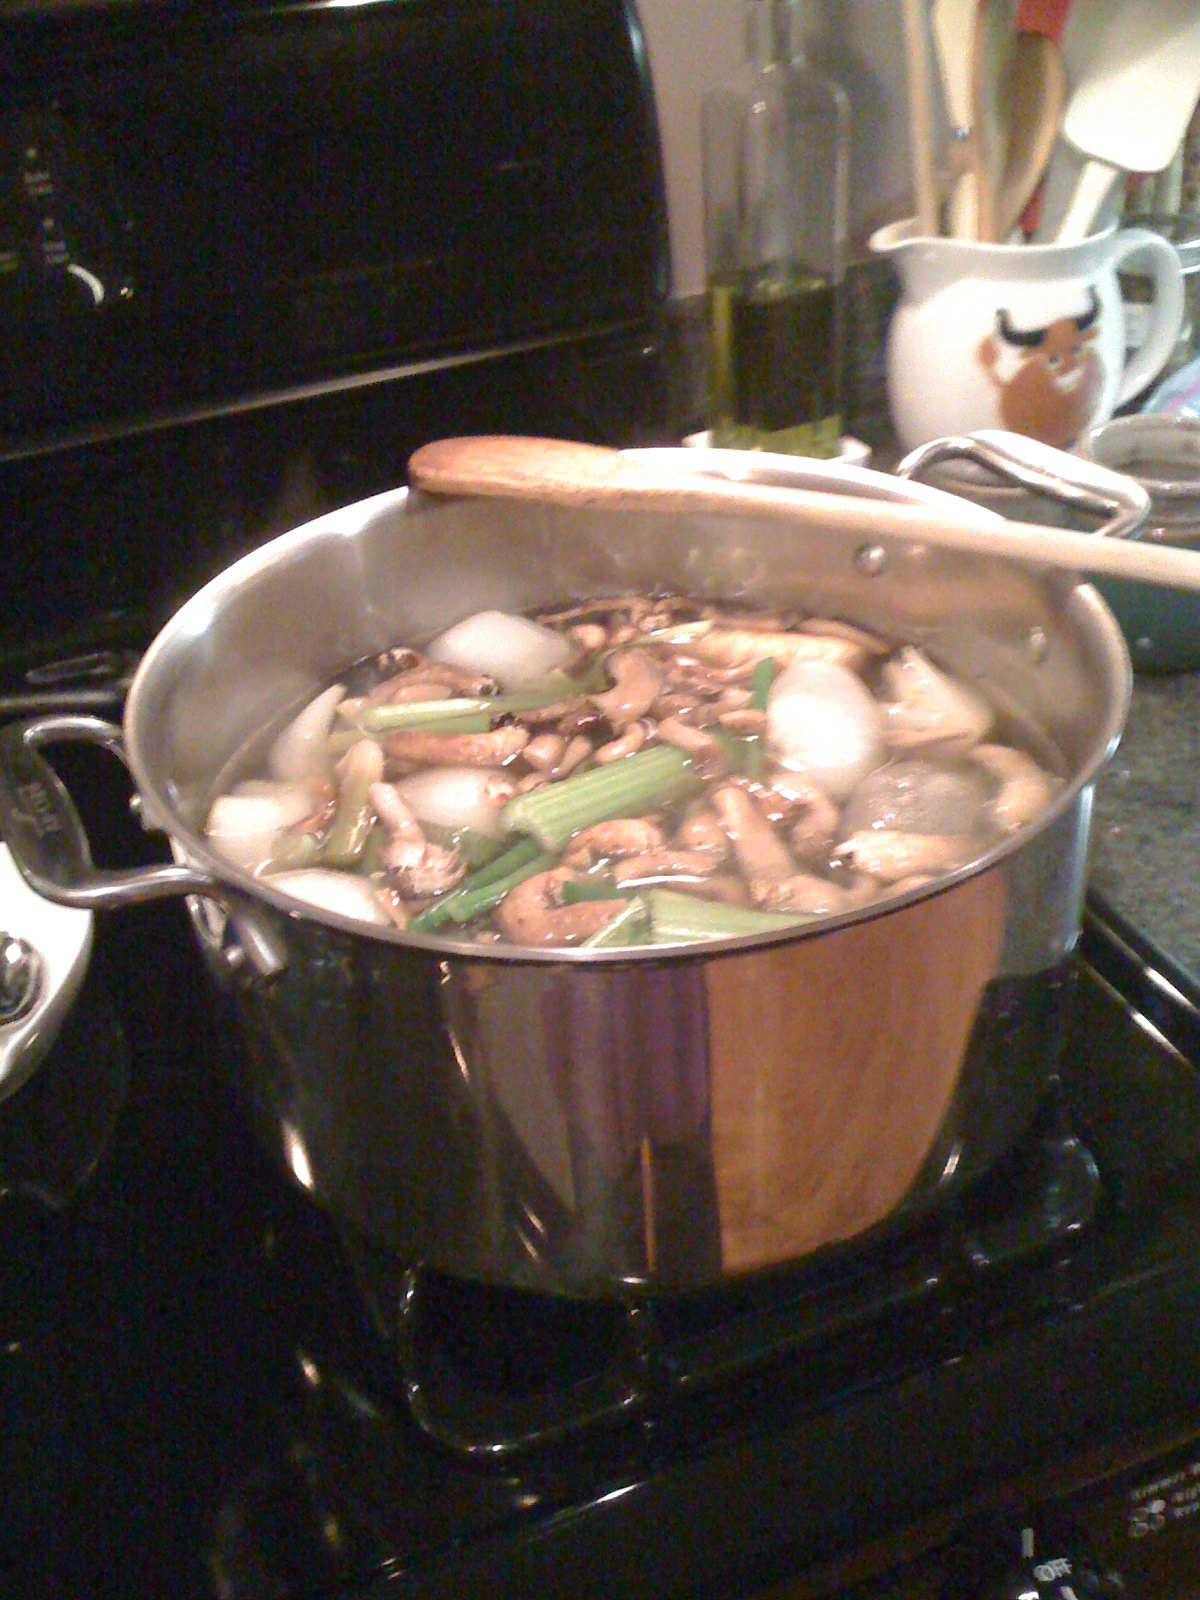
Roasted Butternut Squash Soup
February 16, 2011 § 2 Comments
I’m taking this time while getting an oil change to tell you about this AMAZING soup. This soup is so friggin’ easy and so friggin’ good, you’re gonna scream with the pain of realizing how dumb you’ve been for not making it before. That’s exactly what we did. Actually, we slapped ourselves.
Before I move on, I’m gonna give credit where credit is due. What’s that Mexican show on the Food Network? Mexican Made Easy or something? With the cute bubbly Mexican gal. She cooked up something similar one Saturday morning. In her case, it had a chipotle cream somethin’ somethin’ added at the end. Not needed, especially if you’re hoping to limit unnecessary calories.
Ingredients
- 1 medium-large butternut squash (2-3 lbs)
- olive oil
- salt/pepper
- 2 medium-large carrots
- 1 large stalk celery
- 1 small-medium sweet onion
- 4+ cups vegetable or chicken stock
-Heat oven to 400F.
-Cut squash in half lengthwise. Leave seeds and such in for now. Sprinkle a bit of olive oil over each half and rub in. Season each half with a pinch of kosher salt and a twist of fresh cracked pepper. Bake in oven for 30 minutes or until knife inserts into squash easily. Remove from oven. Let sit until it’s cool enough to handle.

Roasted butternut squash - roasted goodness
-Meanwhile, chop onion, carrot and celery into 1/2-inch pieces. In a 4-quart pot, season vegetables and saute in about 1 tbs olive oil until they start to loosen up a bit – 5 minutes or so.
-When squash is cool enough to handle, scrape the squash from the skin and add to the vegetables. Add enough veggie stock or chicken stock to cover everything. It usually takes about 4-5 cups. Bring to a boil. Turn heat down and simmer for about 30 minutes.

All the goodness cooks together.
-When time’s up, get our your trusty immersion blender and whir away until it ‘s nice and smooth.

Taste that? Good, uh? It’s sweet and savory. Rich and deep. And all that flavor from just those few ingredients. Yup, you and we have been missing out on some serious goodness. Don’t worry, we all feel really stupid about now.
Somerville Winter Farmers Market
February 14, 2011 § 1 Comment
The Somerville Winter Farmers Market has been up and active since January 8th, and why haven’t we been before this weekend?? Maybe because we’re South Enders, and making it all the way over the river and through traffic can be rough-going. Or, maybe it’s been the weather. Or … maybe we just didn’t know what we were going to find. With “farmers markets” you just never know what you’re going to get—sometimes it’s not even food-related, you know? Screen-print shirts, artwork—come on, dude. 
We’re happy to say we found lots of food-related stuff in the Armory Building, which is a great place to hold an event like this. Not too big that the vendors get lost. Just large enough to encourage a good traffic flow on the floor. And an upstairs space for overflow vendors and chillin’ and listening to the musicians (Rodriguez someoneorother? Good choice).
Considering the heavens have dumped loads of snow upon us all winter, and spring harvests just seem so far off, it was really refreshing to see farmers and their produce. One farm looks like they have a connection with an organic farm down in Florida—they were selling fresh greens and even squashes that were shipped up from there. Do I have a problem with that? Not really. One cannot live by turnips alone all winter.
The Winter Farmers Market is also way more than veggies. Our first purchases, in fact, were unpasteurized apple cider and maple syrup. And there were seafood vendors, pork/beef producers, wineries, cheese makers, bakeries, orchards and prepared foods chefs in the house, as well. Lots to choose from.
All in all, we were happy with the hour we spent shuttling from booth to booth.

Our bounty from the Somerville Winter Farmers Market
Our loot: scallops, two varieties of apples, maple syrup, unpasteurized apple cider, kale, baby spinach, Rainbow Lights Swiss chard, mussels, two kinds of soft cheese (burrata and fresh mozzarella) two kinds of semi-soft cheese (swiss and hardwick stone), and a watermelon radish. I told Jennifer there had to be at least one thing we purchased that we didn’t have experience with—that would be the watermelon radish. Spicy sweet with a gorgeous dark pink coloring inside (the “watermelon” part), we julienned it and put it on a spinach salad with apple slices and goat cheese with a shallot balsamic vinaigrette. That salad accompanied our mussels last night. Yum. Yum. Yum.

Spinach salad with apple, watermelon radish and goat cheese
We’ve also already used the rainbow chard, which accompanied Saturday night’s sea bass and mango cous cous.

Sea bass with mango cous cous and rainbow chard
The scallops are our Valentine’s Day meal. Can’t wait for that.
Steel-Cut Oats
February 11, 2011 § 3 Comments
Where have you been all my life, steel-cut oats?
Ten years ago, I don’t believe I had ever eaten oatmeal. Maybe I had had one of those wimpy packet of instant oatmeal, if you want to call that oatmeal. Mom had a container of Quaker Oast around the house, but it was for cookies only, not breakfast. So, my uneducated and untested opinion of oatmeal was that its gloppiness reflected its taste and I wanted nothing to do with it.
Then Jennifer came along and made me the world’s best oatmeal. It wasn’t the instant stuff, and it wasn’t the quick oats, I don’t think. It was rolled oats, for sure, with that familiar flattened, flake-like appearance. Boil, stir, simmer, toss in some raisins for a minute and Whammo! Five minutes later there’s a tasty breakfast. With a pour of maple syrup and a smattering of slivered almonds on top, of course. Mmmm … nice and hearty. For the most part, I leave the oatmeal making to Jennifer. She’s good at it. It’s her job.

Steel-cut oats—they actually look like oats!
One day on a visit to New York, our friend Bernadett raved about the flavor of steel-cut oats. Now that’s a whole other animal, for sure, steel-cut oats. That familiar flaky oat appearance? Not happenin’ with steel-cut oats. When you look at rolled oats, you can’t really get a good idea of what that flake was previously. Not really. It is a smushed something. But when you look at steel-cut oats, its “grain-ness” just jumps right out at you. It looks like the oats we used to grow back on the farm—just chopped crosswise into smaller pieces. Cooking time—well, let’s say it’s not a breakfast food appropriate for a gotta-get-out-the-door morning.
Thanks to my baking of Flour’s Oatmeal Raisin Cookies and the depletion of our rolled oats, we found ourselves in front of the bulk bins at Whole Foods. Steel-cut oats in a bin to the left. Rolled oats in a bin to the right. We had experience with rolled. We knew we liked rolled. But we heard great things about steel cut. Plus, they were on sale. Steel-cut, it is.
Recipe (for 2)
- Put a scant 2 cups water in a small 2-qt. pot. Add a pinch of kosher salt. Heat on high until boiling.
- Stir in a generous 1 cup of steel-cut oats. IMMEDIATELY turn heat down as low as it can go. Cover.
- Set timer for 15 minutes. And go write your morning blog post.
- When timer goes off, stir in a handful of raisins. Cover. Set timer for 5 minutes.
- Divide into two bowls. Top with your favorite stuff. Enjoy.

Mmmmm ... breakfast.
*IMPORTANT NOTE! Jennifer just told me to leave the lid slightly ajar. This way we don’t get those flair-ups that result in oatmeal goo dripping down the pot and onto the stovetop that she just cleaned.
Don’t expect your typical oatmeal experience. Like I said before, this is a whole other animal. It’s more grainy. More chewy. More nutty. Less gooey. Maybe there’s less of a viscous texture because the oat hasn’t been smushed and there is less surface area. I dunno. But I do know that I prefer it.
Nutrition? Is it better for you? More nutritious? Maybe. Or maybe it’s the same. Honestly, I don’t really care about the details so much. I do know it’s oats, and it’s a whole grain, and it’s good for you. And, it’s filling.
Now I can be like my mom and keep that container of rolled oats exclusively for the cookies.
Obsessing with Sourdough Starter
February 8, 2011 § Leave a comment
There’s a fine line between baker and mad scientist. And I’m walkin’ that line.
I hate to fail. Hate it. And when the sourdough starter recipe from the Amy’s Bread cookbook failed miserably—TWICE—I was a volcano inside. Watch out, sourdough … I’ll get you yet.
The Amy’s Bread sourdough is, as I envision it, the sourdough the pioneers relied upon. They didn’t have a packet of Fleischmann’s Active Dry tucked into their bonnets. They used yeast, baby … real yeast just floating around in the air or found on … things. Like grapes. This is where I stop envisioning – I don’t want to know what else they used as yeast sources.
The Amy’s Bread sourdough used grapes as the yeast source. Organic grapes. Well … Okay. This is where I admit I went wrong with the recipe. I used conventionally grown grapes, not organic. I went to two or three different Whole Foods! Even the HUGE one in Legacy Place – nada! According to one produce manager, organic grapes are sparse this time of year. Conventional grapes didn’t have that yeasty bloom. What else could explain my lack of bubbling?
What to do …
This is where Dainty the Mad Scientist makes her appearance. Jennifer had related to me a scene from one of Anthony Bourdain’s books. Apparently he had a mad scientist of a baker who worked under him at one point. He was a drug-addled guy, but a baking genius. All sorts of funky smells emerged from his underground yeast lab. He had to be using all sorts of … things … to source his yeast. So, in the middle of the Whole Foods produce department I thought, “What would a drug-addled baker use?”
I didn’t go too crazy in my problem solving. I just looked around and picked what I thought would harbor the most yeast. I chose an organic apple. I figured that, while the smooth part of the apple would have been wiped or polished in some way, the indentations on both ends of the apple would have something native still hangin’ out in there. Now that I think about it, I bet an organic fig would be a good bet, too.
I added 113 grams of 75F-78F water, 72 grams all-purpose flour to a quart container. I chopped the apple into about a 16 pieces and added mostly the end sections to the other ingredients. Stirred vigorously. Put the cover on. Heated some water in the microwave to create a warm environment. Put the container inside at around 3pm on Sunday.
Monday: I checked on the dough periodically throughout the day. Small bubbles started to appear around the apple chunks. Pockets of liquid appeared later on. Lines of bubbles and flour appeared through those pockets. I heated the water about three times during the day to maintain a warmish environment. Hmm … could this possibly be working?
Tuesday, 5:57 a.m. 39 hours later, there’s definitely yeast activity in the container. The bubbles are bigger with the mixture. And there’s small bubbles – like someone took a straw and blew bubbles – on the surface. And, it smells like fermenting apples. Good sign! I stick an instant-read thermometer into the mix and it reads 70.7F. Not bad. Plus, when I pull it out, the substance is a bit gooey and pulls up with it. Yay!!
I move on to the next step – my first refreshment. I add 113 grams of 76F water and 72 grams of flour. Stir vigorously. Close container. Stick in a warmed microwave. Cross fingers.

The sourdough with apples begins to bubble.

Liquid pockets and bubbles appear around the chunks of apple
Starting Starter, Again
February 5, 2011 § Leave a comment
Baby Dough is gone. Gone, Baby, gone.
On Friday morning I took Baby Dough out of his snuggly home in the microwave. No signs of life. No bubbles. Nothing. So I ditched him. My strategy of reinvigorating Baby with new yeasty grapes just didn’t work.
My main lesson here – just give the starter a bit more time I guess. See it bubbling away – and give it more time to bubble. It’s more of a fine art than I thought.
The other lesson – don’t name your starter. It makes it that much harder when you pour it down the drain.
Friday, 6:02 a.m. Wrapped 12 room temp grapes in a cheesecloth pouch – a few more than the Amy’s Bread recipe calls for. Smushed then a bit to break the skins. Put them in a 1-qt plastic container. Added 113 grams of 75F water and 72 grams all-purpose flour. Mixed it all together. The temp was about 73F. I screwed the top on the container and put it in the microwave with some boiled water. Remember, the heat dissipating from water warms the surrounding air – which, according to Amy, should be about 75F-78F. Like I said before, who’s house is that warm in February?
Friday, 4:58 p.m. Looking good. A thin thin thin layer of liquid is on top. But not bad. And it’s smelling a bit fermenty. Have boiled that cup of water throughout the day to keep the starter warmish.
Saturday, 9:16 a.m. There’s some bubbles – yay! So, there’s some yeasty activity going on. Smells more fermenty. Good sign. It’s been – let’s see – 27 hours. Recipe says to let it go 12-24 hours until it starts to bubble. I’m going to let it go a few more hours.
Saturday, 2:02 p.m. Hmm … bubbles disappeared. I’m thinking the yeast ran out of food to eat. So, I went on to the next step and added 113 grams 80-ish degree water and 72 grams flour. Gave it a stir. Pushed the grapes down in there. Fingers crossed!
Am I obsessing over my sour starter? Yes. I can’t help it – I can’t stand it when I fail. Can’t. Stand. It.

Sourdough Starter at 32 hours
Rye Bread: Do-Over
February 3, 2011 § Leave a comment
Thursday, 6:01 a.m. No signs of life in Baby Dough. Sad. So sad.
What did I do? Where did I go wrong? Tuesday morning Baby was full of life! Thick and gooey! Bubbly and giggly! Now … now it’s just some mass of water-soaked flour in a 1-quart container.
But, there’s no odor of death in there. It doesn’t smell toxic. Baby didn’t turn bad on me. There might not be a breathing and burping going on, but I don’t think there’s any rank, poisonous build-up taking place either.
So, I’m keeping Baby and attempting to do a Frankenstein-like operation here. I’m adding more grapes. Yeast – Baby has no more yeast (a good thing for a real child, but as a dough baby, it’s the stuff of life). Thinking back to Tuesday, Baby started going downhill once I removed the grapes. So, I’m adding them back in. Fingers crossed.
I saw a good idea from a YouTube video yesterday. Henrietta Homemaker put her grapes in cheesecloth for easy removal of the grapes. Brilliant idea. In those little grapes went, cheesecloth and all. It’s like Baby Dough has a diaper now.
So, Baby Dough is back in the microwave, tucked in there with some warm water. I’ll check on him tonight. Perk up, Baby.
Rye Bread: Day 3
February 2, 2011 § Leave a comment
Wednesday 7:37 a.m. Checked on Baby Dough. He’s supposed to be bubbly and active 12-24 hours after the last addition of flour, according to Amy’s Bread recipe. But he’s not so active. In fact, a layer of liquid has formed on top and he’s not gooey anymore. He’s runny. Hmm… Not quite sure what to do. Except put on my boots and shovel.
Wednesday 8:45 a.m. I gave him a good stir with a wooden spoon to see if I could incorporate that liquid. Big bubbles popped up right away then settled down a bit. It smells sourish – I guess that’s a good sign? I put him back in the microwave with some hot water. I’ll check back in around noonish.
Wednesday, 12:32 p.m. Baby Dough began to separate again with a layer of liquid on top. No bubbling means no yeasty activity. Hmmm… so I decided to take a leap of faith here and I went ahead and fed Baby Dough with 113 grams of 80F water and 72 grams of flour. I took Baby Dough’s temp around 11:30 and it was 77F, so that’s good. I don’t think he”s not warm enough. I just think he’s hungry. Or … maybe there’s no yeasty goodness left alive in there? Could that be? Let’s see what happens by evening.

Baby Dough at 68 hours
Wednesday, 5:58 p.m. I did a little YouTubing. This liquidy layer is normal. I think. It was on YouTube, so it must be right, right? And Baby Dough is supposed to be a bit runny. I think. My thought is I don’t have a whole heckuva lot of yeasties in there so it’s not bubbling tons. But it is bubbling.
So, reading over the recipe just now, I see I was supposed to have discarded half of Baby Dough and add the 113 grams water and 72 grams flour. Hmmm… I think tomorrow morning I’ll do a do-over on this step and do it right this time.
Gave Baby Dough a good stirring. Tucked him back in the microwave with some nice warm water. Sleep tight, Baby. Bubble away.

After a good stirring, Baby Dough's blowing some tiny bubbles.
