
Spicy Eggplant Relish
June 18, 2013 § 1 Comment
Funny how when I make a salad, sauce or spread for a gathering of friends, the recipe always turns out to be from the Moosewood Cookbook. Not kidding. For flavor profiles that were developed back in the crunchy ’70s, the Moosewood’s recipes really seem to be a hit with people in the 2010s. Their popularity doesn’t seem to have anything to do with being mindful of healthy eating and instead has EVERYTHING to do with the fact that this food tastes awesome. Good-tasting food is an instant classic.

Spicy Eggplant Relish on a Stacy’s Pita Chip
The most recent dish to receive the “Oh man, I seriously need this recipe” comment is Spicy Eggplant Relish. Keep it in an all-veggie-ingredients-minced form, or mash it into a chunky puree after cooking. In either state of consistency, it can be used as a topping for crackers and pita, as a sandwich spread, or even tossed onto a veggie burger (or a real burger if you’re into that kind of thing).
And don’t let the “spicy” descriptor dissuade you. You’re in control of the spice. Make it as light or spicy as you wish.
Spicy Eggplant Relish (ala The Moosewood Cookbook)
2 tbs. olive oil
1 cup minced onion
1 medium eggplant, diced (I kept the skin on, it’s fine)
1/2 tsp. kosher salt
1/2 tsp. cumin
1 medium red bell pepper, minced
1 medium clove garlic, minced
1 tbs. lemon juice
cayenne to taste (start with 1/4 tsp.)
1. Heat oil in pan. Add onions, eggplant, salt and cumin. Saute on medium for 15-20 minutes or until the eggplant is tender (but not mush). 2. Add in the pepper. Saute for about 8-10 minutes.
3. Stir in garlic and lemon juice and continue cooking another 5 minutes. Sprinkle in the cayenne, let it sit for a bit, then taste. Add more if you need more heat. Same goes for salt. Mash or not to mash, it’s up to you. Serve it straight away or let it come to room temperature. Cold is good, too, straight out of the fridge, but I prefer it room temp.
Roasted Eggplant on Toasted Pita
March 26, 2013 § Leave a comment
Ah, an over-stuffed pita sandwich…yum.
Who am I kidding!? When have I ever stuffed a pita and have it NOT break apart on me? Never. Ever. And once it breaks, it’s just all downhill from there. Your fingers get full of hummus. Whatever dressing you’ve put on the sandwich runs down your wrist into your sleeve. It’s no good, stuffing a pita.
Better to use pita like a sandwich bread.
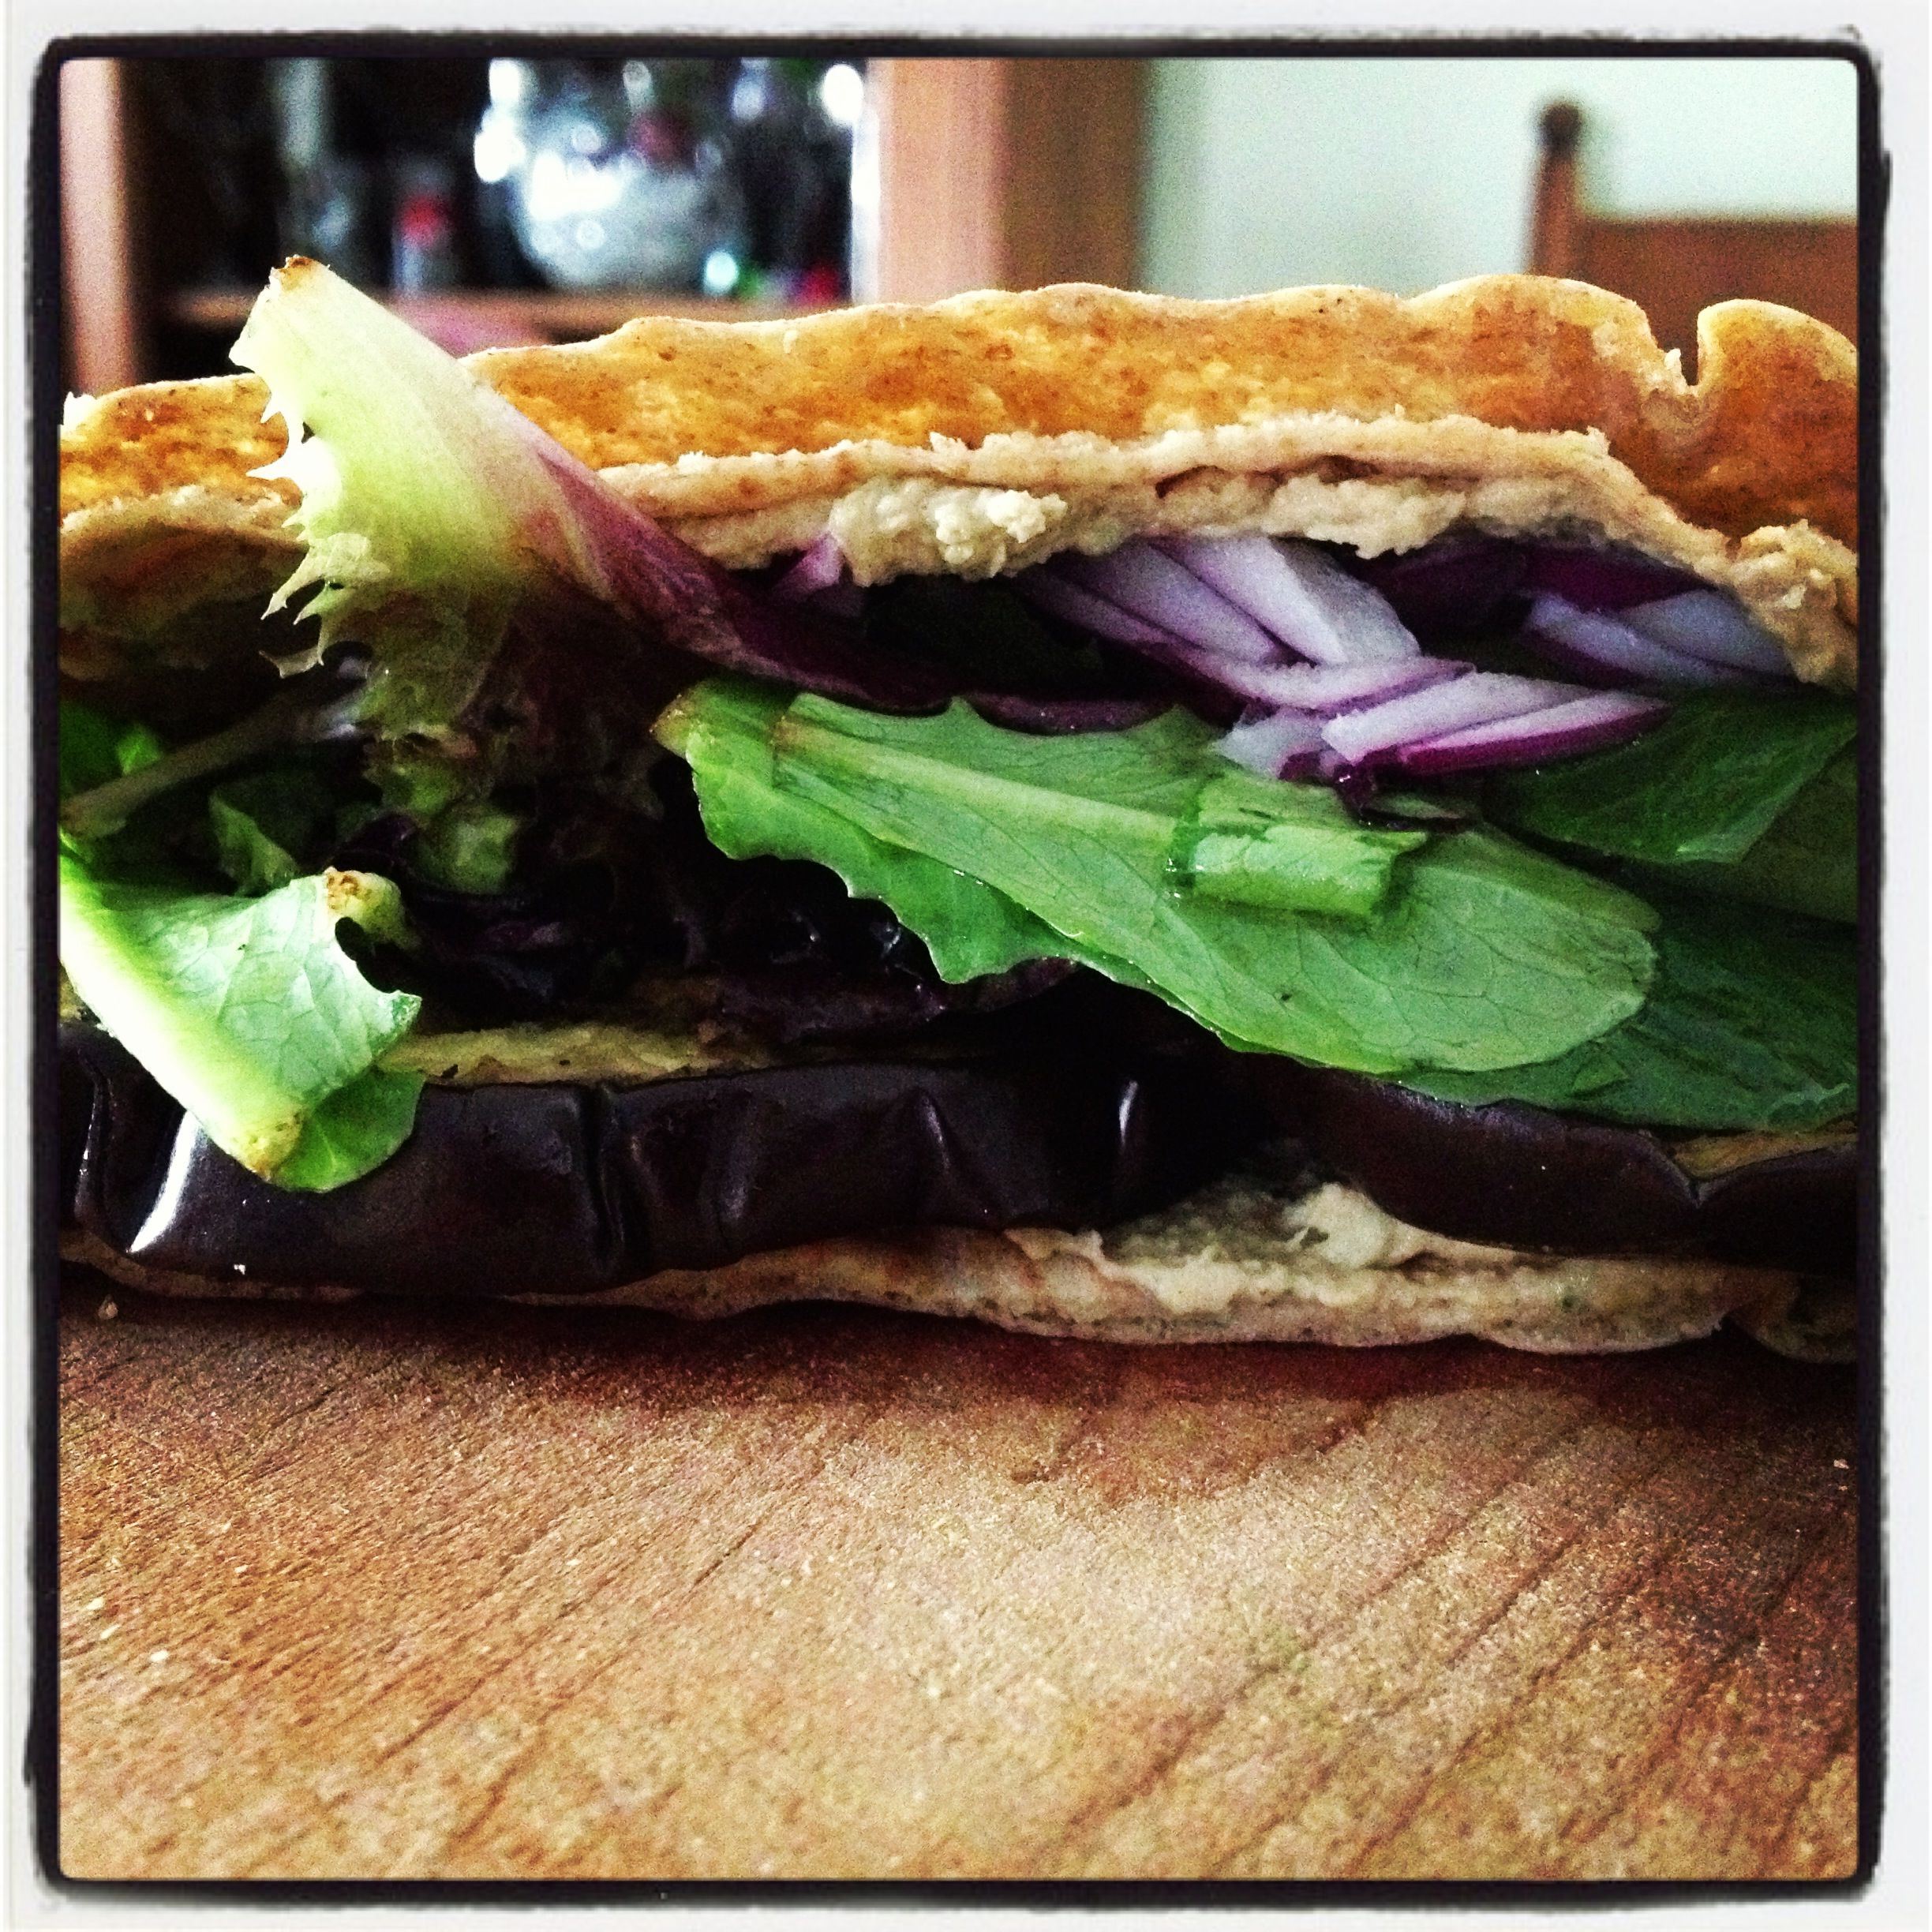
Roasted eggplant and hummus on toasted pita
That’s exactly what I did for lunch yesterday. Toasted pita cut into two half moons, each spread with Red Pepper Hummus, some roasted eggplant, and some greens lightly dressed with Lemony Vinaigrette. After chowing down, I realized the Fiery Onion Relish may have been a fun thing to have as a topping, too.
Maybe I’ll try that for today’s lunch.
Quick Crackers
February 22, 2013 § 3 Comments
Sometimes after dinner you’re just hungry all over again. It happens. And it’s understandable if, say, you’ve been on a 12-consecutive-day yoga binge.
Open the cabinets. Raisins: Nope, not substantial enough. Almonds: It’s got the crunch but they aren’t gonna cut it. Not tonight. The bag of chips (healthy chips, of course) disappeared last night. There’s a nice hunk of Jarlsberg in the fridge…where’d the crackers go? Oh, they went away as a quick pre-yoga snack the other afternoon.
Bummer. I. Am. HONGRY. Hongry, by the way, is when you are very, very hungry.
But wait. I’m a baker. I’m not going to complain. I have the power to make my own crispy-crunchy goodness. And quickly, too.
I recalled I had found a super-good and super-quick herbed flatbread recipe on the Shutterbean blog not long ago. It was within my power to make these quick crackers – quackers? – before I became HANGRY, which means to be angry due to hunger. And since I had made them once previously, I new the tricks and adaptations to get these in and out of the oven in less than 20 minutes.
So, if you suddenly have guests or are ravenously empty-stomached and have nothing in the house, don’t complain. Put your baking cap on.

Quite complaining. Make your own crackers.
Quick Herbed Crackers (adapted from a recipe on Shutterbean)
- 1 3/4 cup all-purpose flour
- 1 tsp dried rosemary
- 1 tsp baking powder
- 3/4 tsp kosher salt
- 1/2 cup water
- 1/3 cup olive oil – keep the bottle handy
- Some fancy salt if you have it
1. Preheat oven to 450F. Really, this will be the longest step in the whole process.
2. Combine dry ingredients in a bowl and give it a quick stir to mix.
3. Make a well in the middle of the dry ingredients and add in the water and oil. Fold in the flour mixture with a spoon or large fork until its nicely incorporated.
4. Turn out the dough onto a work surface. No need for additional flour—this dough will not stick! Amazing and true. It’s the olive oil. Give it a really quick knead – a 5 or 6 times maybe – to make sure the dough is all snug together. Cut the dough ball into 3 chunks.
5. Roll out one dough ball until it’s super thin. You can roll it on the work surface or on a piece of parchment. Just be sure if you roll it out on the work surface that you can get it onto parchment with no problem. Roll into into whatever shape you want – it doesn’t have to be round. Color outside the lines with this.
6. Once on the parchment, experience has shown me to use a fork to prick the dough surface. Otherwise I ended up with super-big air bubbles in the finished cracker. Looked kinda cool and rustic, but not what I was looking for. After pricking, brush a tiny bit of olive oil on the dough surface and sprinkle some fancy schmancy salt on top. I happened to have some pink Himalayan sea salt on hand. Tasty.
7. Pop it into the oven. The recipe says 8-10 minutes. For crispy, keep it in 10 min, or even more. I’d say keep an eye on it and pull it out once it looks darker than you’d like. It all depends on your oven, really.
8. Let cool on a wire rack. Or not if you can’t resist.
9. While one is cooking you can roll out the other and put on new parchment. Recipe says to hold off on the oil and salt until just before popping into the oven, but I forgot for one of them and it was fine.

A few notes:
- The recipe called for fresh rosemary. I didn’t have any on hand, but recalled that if using dried herbs in place of fresh that one should use 1/3 the amount. So, if you’re using fresh rosemary, use 1 tbs of finely chopped herb.
- Try it with other herbs, too. Sage, for instance. But use less since sage is mighty powerful.
- It’s a throw-it-together kinda recipe, but be precise with the oil and water measurements. I used too much of one of them last night and the dough came out sticky enough to actually stick to the work surface. Lesson learned—I’ll never eyeball a 1/3 cup of liquid again.
Roasted Eggplant on Whole Wheat Baguette
February 21, 2013 § 3 Comments
The way I understand it, Paula Deen’s first food-for-money venture was preparing bagged lunches for the locals, which her sons  would then deliver. What those lunches were, I do not know. I imagine a typical lunch included a sandwich (or sammy). Maybe some chips. And there had to have been a decadent, butter-loaded dessert in that bag, too.
Anyone who follows me on Instagram has seen what I concoct for my own lunches, usually from leftovers or stuff just sitting in the veggie bowl. The Sweet Potato Sandwich has become a standby. The Salad Pizza is still one of my proudest moments. Avocados and boiled eggs smeared on toast are regulars, as well.
My latest sammy, Roasted Eggplant on Whole Wheat, has got me thinking about Paula Deen and her bagged-lunch business. This sammy, I’m tellin’ you, it’s good. Real good. People would want to eat it. And they might even pay real money for it—and for me to make and deliver it. Is something like this even feasible here in Boston? And I’m sure there’s some proper and official channels to go through to make sure I’m not serving thoroughly rotten food, too. I mean, someone’s got to make sure the cats and I are wearing hair nets, right?
The thought is on my mind. Who knows, maybe I’ll even give it a try, “underground catering” style (I didn’t really say that, if anyone official is reading this). Meanwhile I’ll keep putting various spreads and veg and cheese and such onto different sorts of breads and doughs. Keep up with them on Instagram and let me know which ones appeal to you most.
Roasted Eggplant on Whole Wheat Baguette
It’s simple, really:
Slice an eggplant into 1/2-in. slices. Place on a sheet pan. Sprinkle each slice with some olive oil, using a brush to spread it over the surface. Eggplants are like sponges—they soak up a lot of oil. That’s why it’s important to brush. Then sprinkle each slice with kosher salt, and give each slice a small twist from the pepper mill. Put in a 420F oven for about 20 min. Remove from oven and let cool. You’ll have extras—always a good thing.
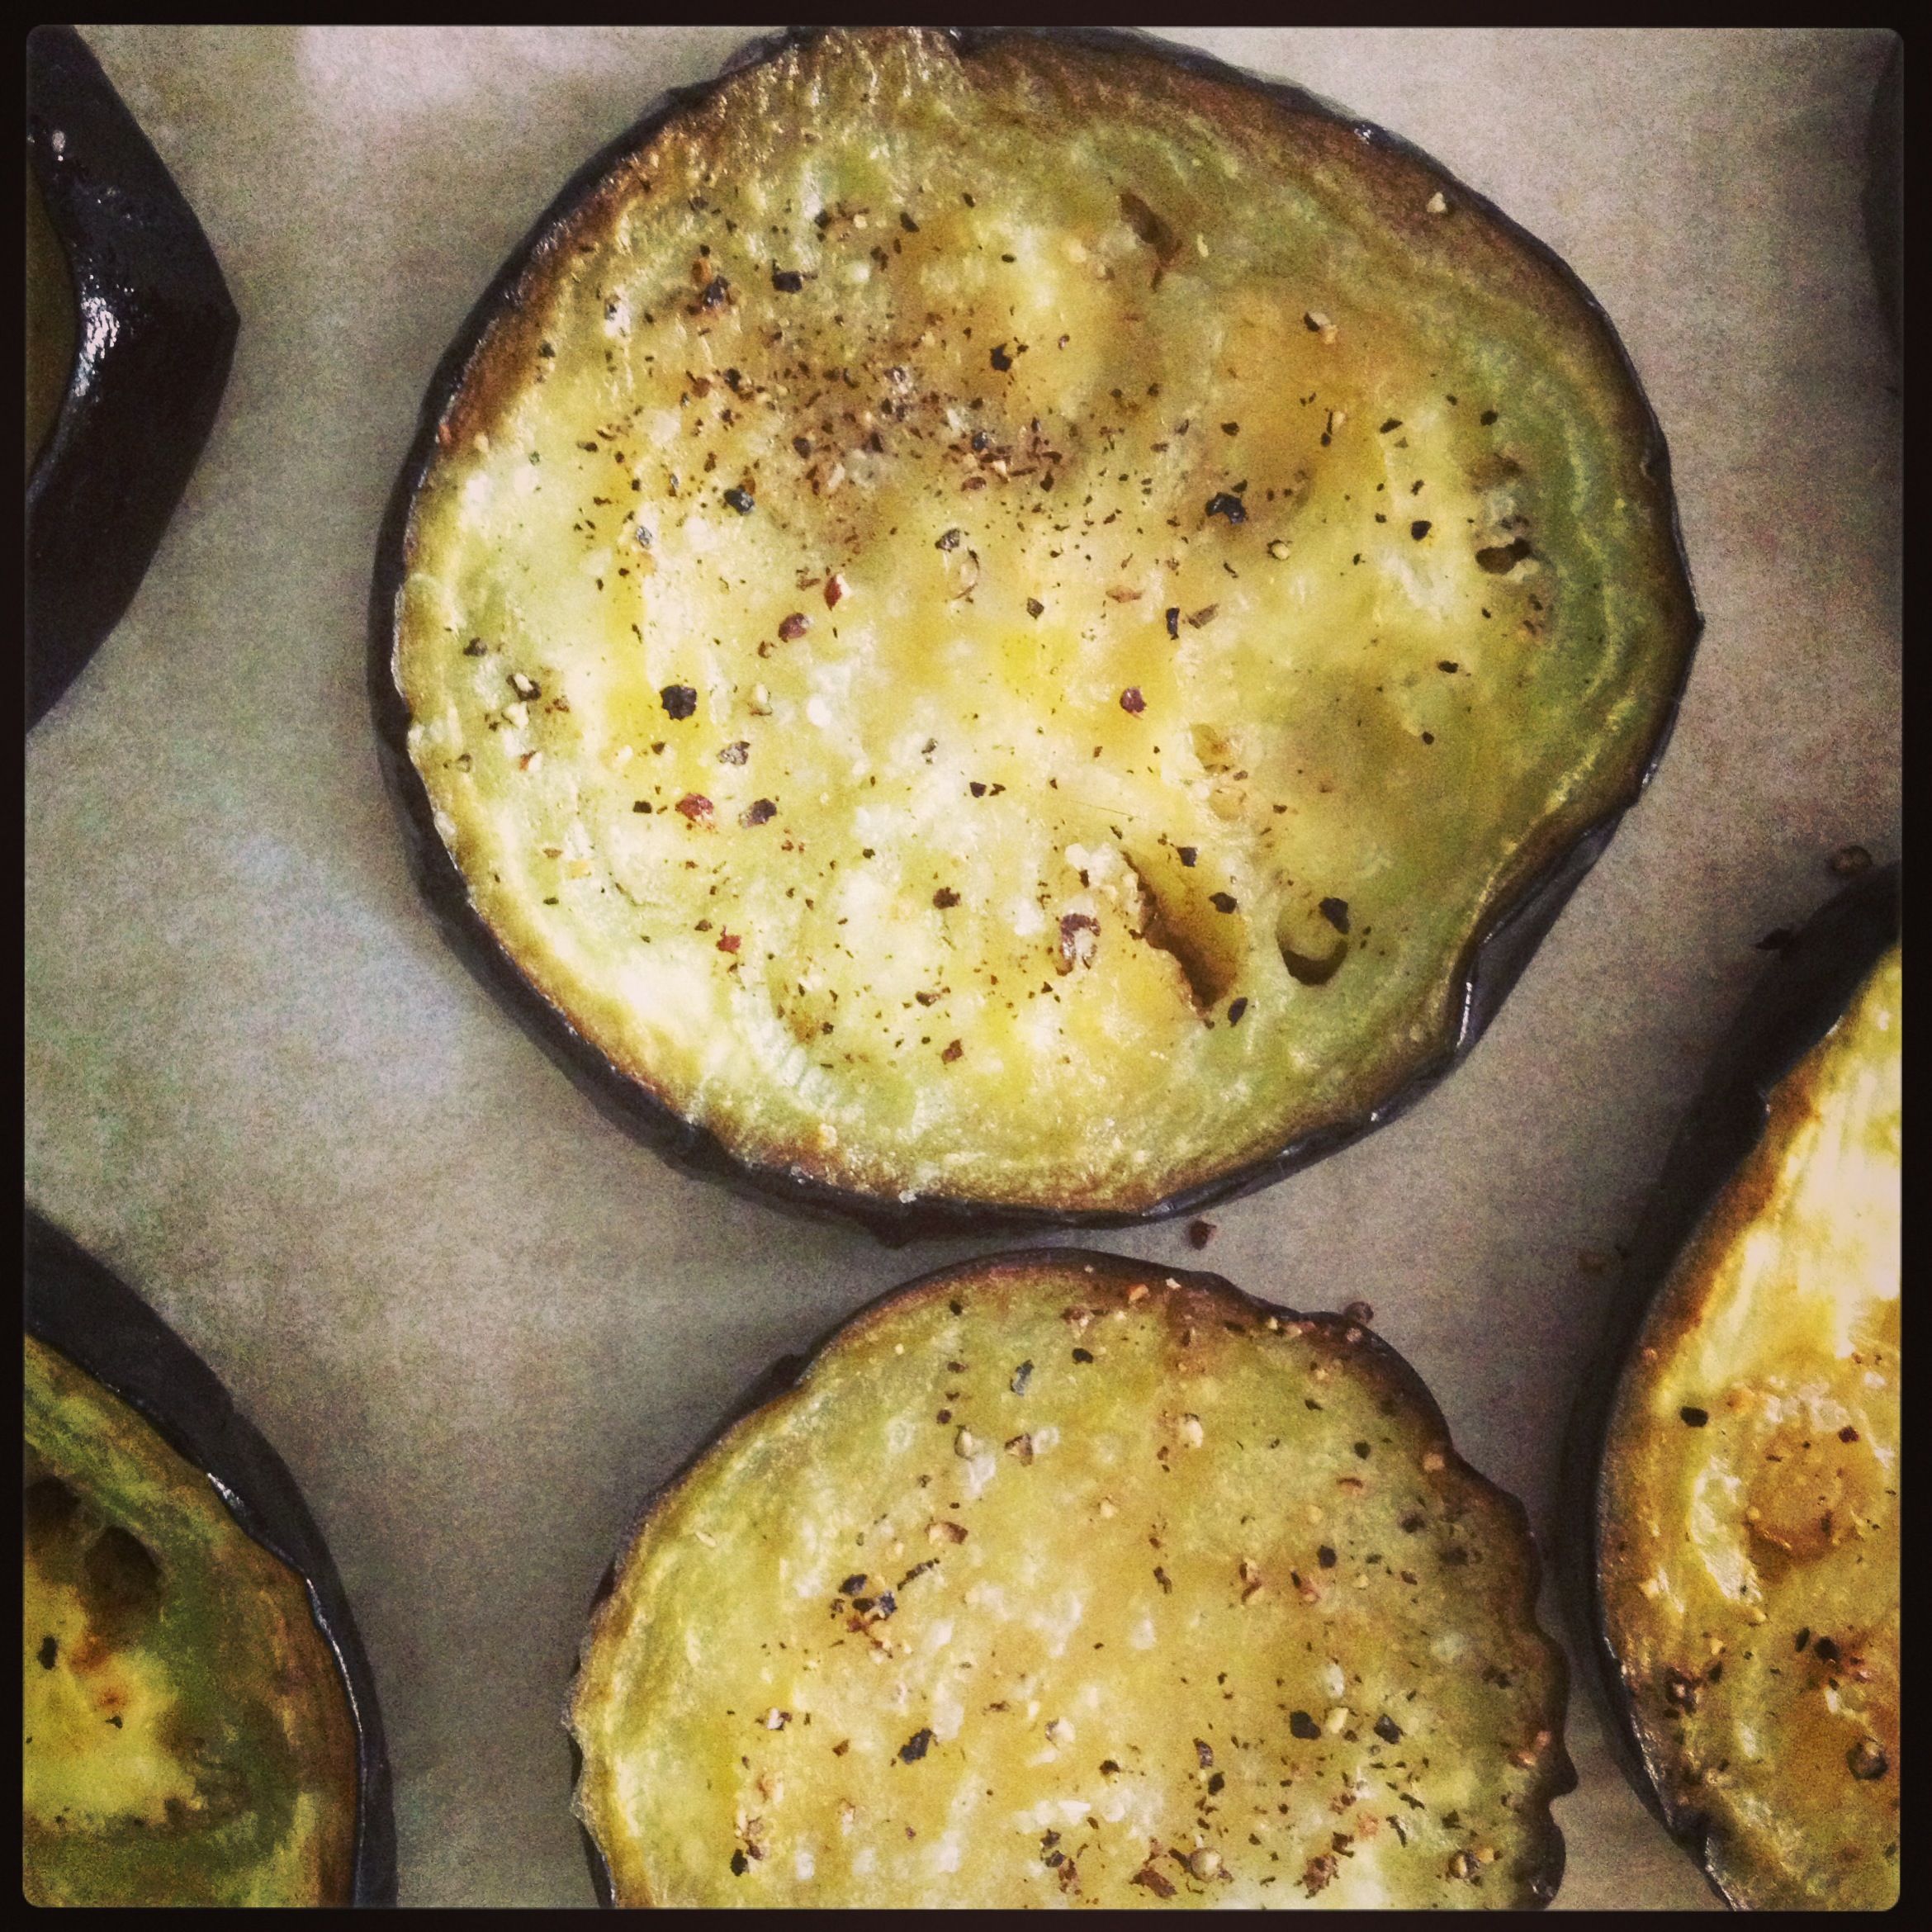
Roasted eggplant
If I’m roasting, why not throw a red pepper in there, too, right? Slice lengthwise, cutting in two, and remove seeds and pith. Flatten each half as best as possible. Find room on the sheet pan in amongst the eggplant. The peppers will take about 5-8 minutes longer than the eggplant—look for it to be dark around the edges. When done, place the halves into a small bowl and cover with plastic wrap. Remove from bowl 10 minutes later and peel off the skin.
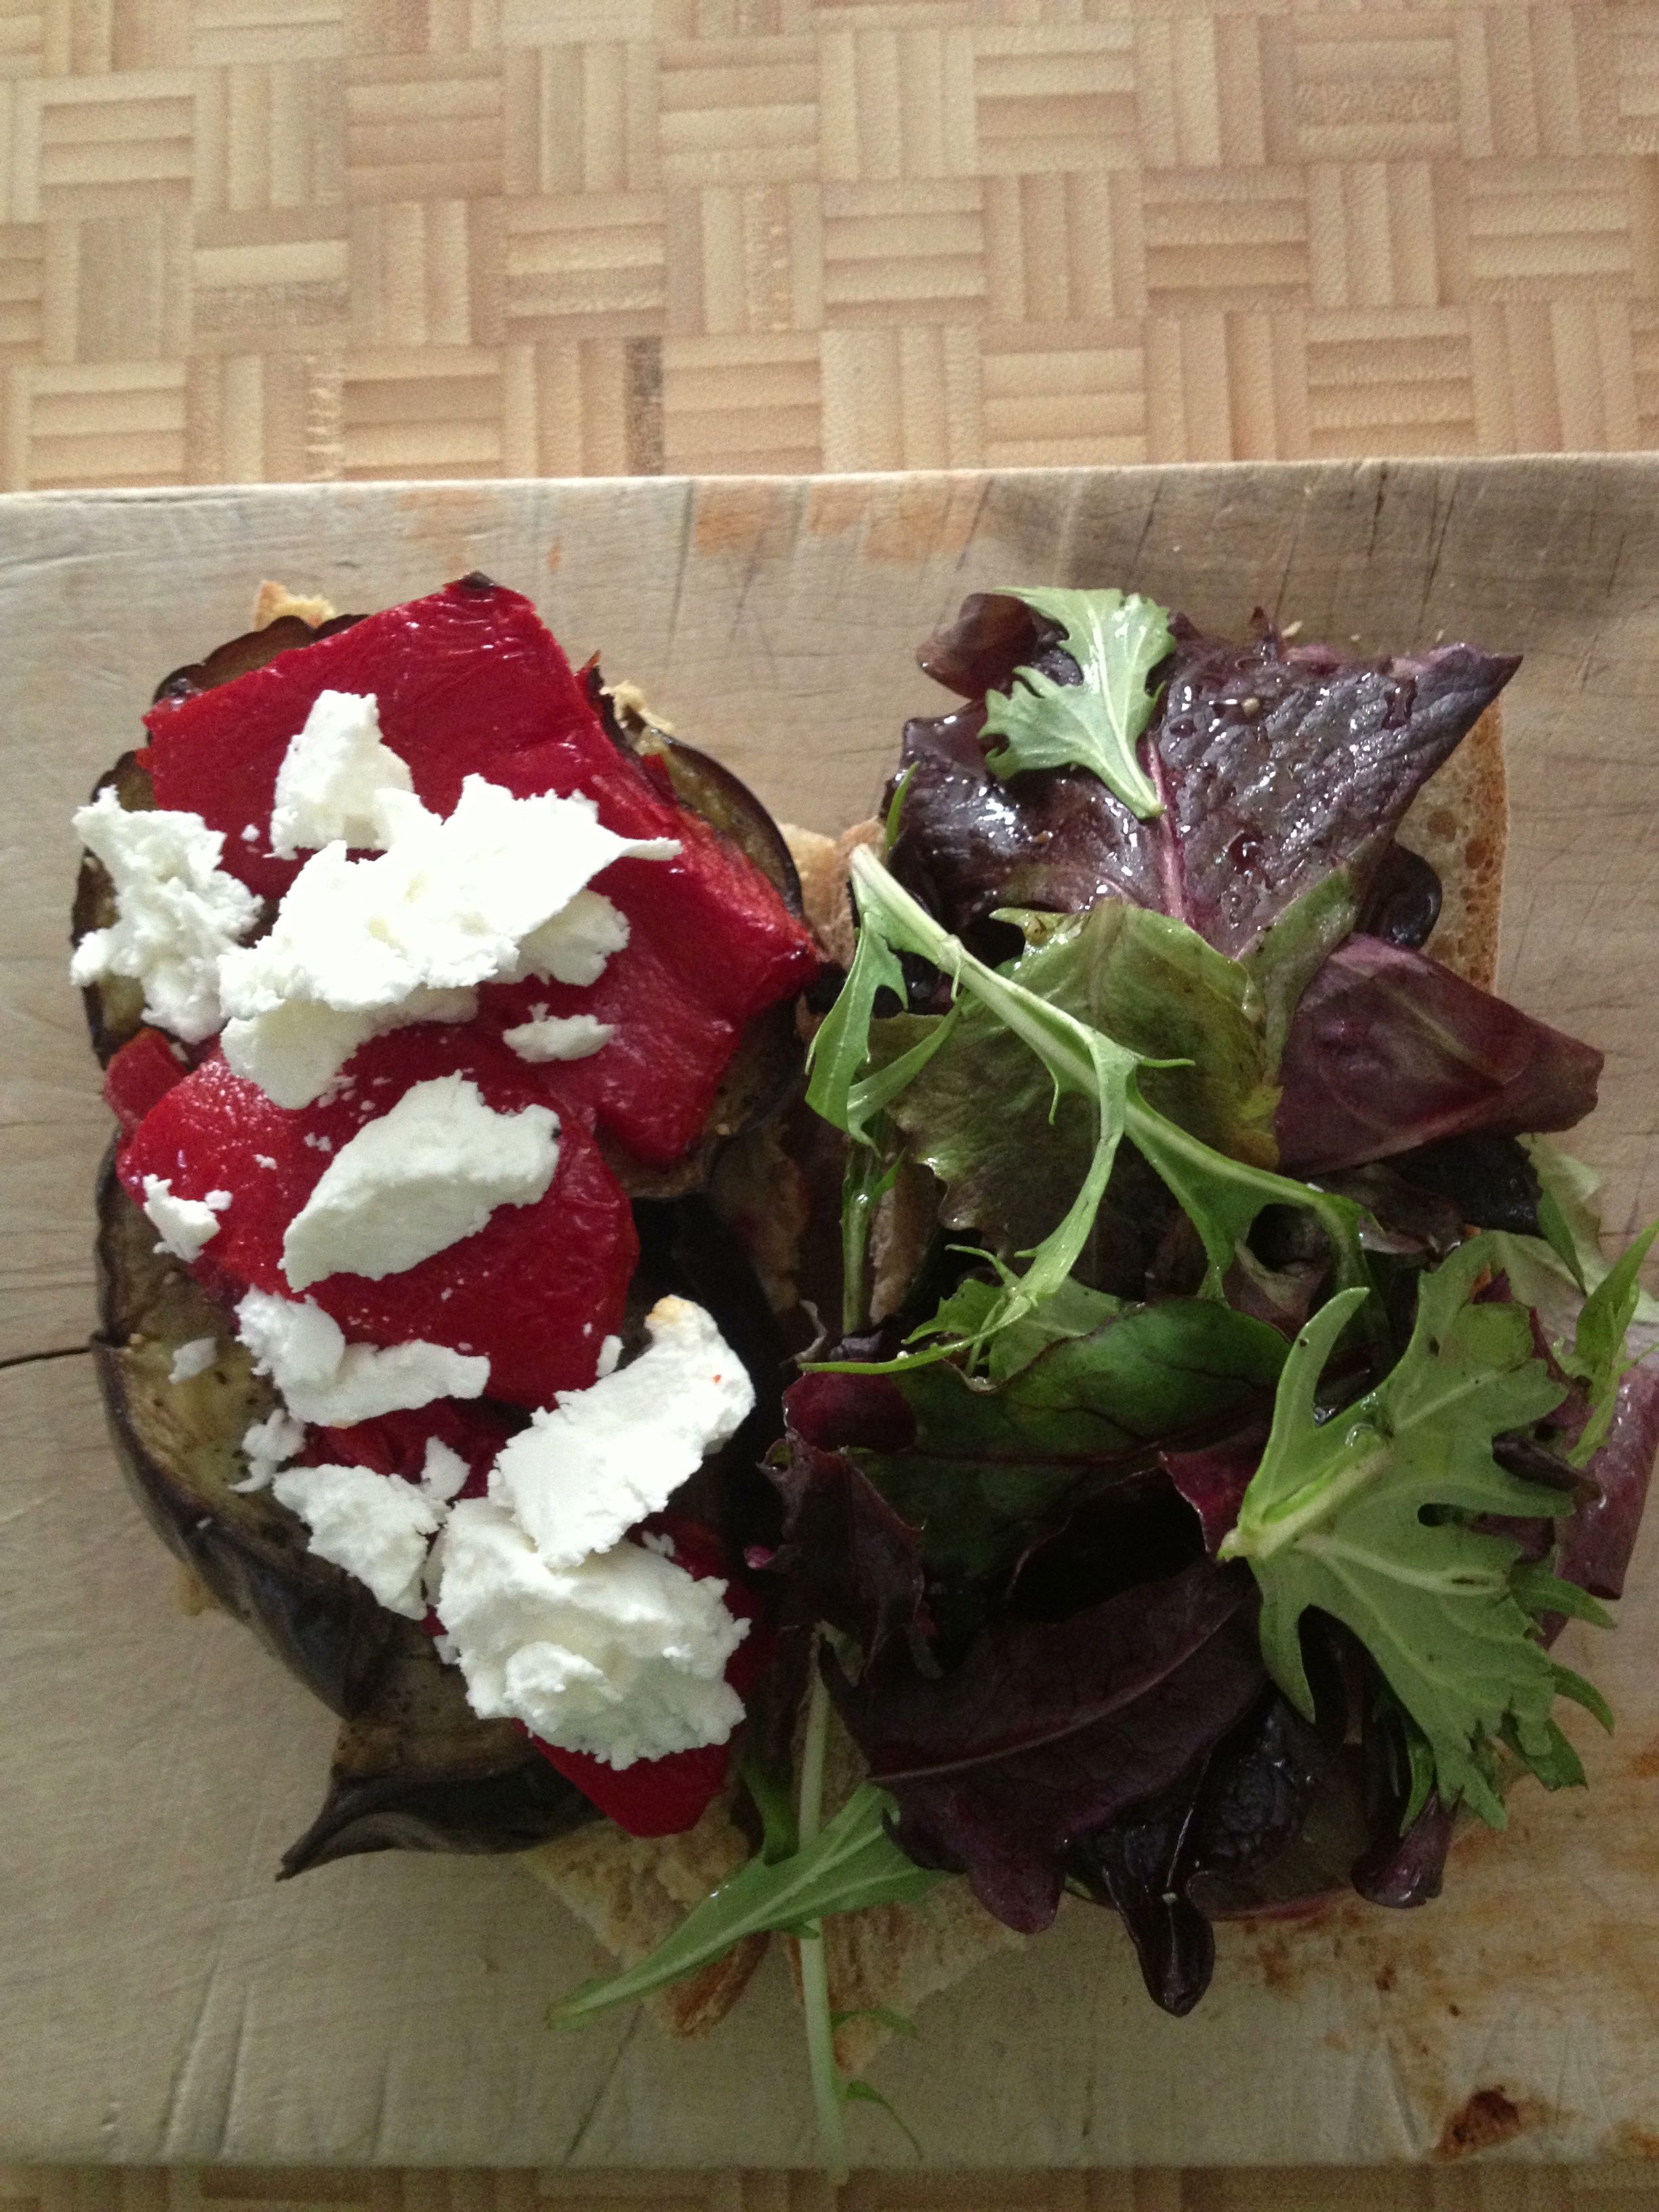
Take a segment of homemade Whole Wheat Baguette (recipe is coming, I promise) and slice lengthwise.

Smear one side with homemade red pepper hummus (courtesy of Jennifer!).
Top with however many slices of roasted eggplant you can fit on there. You may have to cut them in half and pretend it’s a puzzle.
Top the eggplant with roasted red pepper.
And top the pepper with goat cheese. What’s not good about anything I just mentioned? Really?
On the other side of the baguette, lay down some baby salad greens lightly dressed with something. I used Lemony Vinaigrette, which is always in a jar at the ready for good times.
Put one half on top of the other. Warning: Goat cheese crumbles may try to escape. That’s ok—they won’t get far.
Proceed to eat. Enjoy.
My question to you is this: Do you want to eat this? And how much would you pay to have it made for you? Add a pear and a cookie and you’ve got yourself a lunch.
Wheat Berries for Breakfast
January 15, 2013 § 3 Comments
Wheat berries. Never heard of them? Neither had I, until I came across them as an ingredient in a course-grained whole wheat bread recipe (more on that bread another day). And now, they’re a special breakfast treat.

Wheat berries with raisins, slivered almonds and apple cider.
How did they go from bread to breakfast? When I spotted them in the Amy’s Bread cookbook recipe I read up a bit on this whole grain. According to Wikipedia, “wheat berry” is just another term for the whole wheat kernel. Silly me, I thought they looked familiar. As a farm kid, I had wheat kernels end up in pant cuffs, socks and occasionally other locations on my person after a day on the wheat combine. If milled instead of left whole, the wheat berries become wheat flour. And as we know, grains left whole are good for you because none of the nutrients are processed out of the grain. Keeping it whole leaves all that good-for-you protein, fiber and iron (and I’m sure other good things) right in that wheat berry for your health and flavor enjoyment.
The whole wheat berry as an ingredient in bread gives the bread some chewy texture—something to bite into other than just the bread. They’re also a bit sweet and nutty in flavor—a great thing when used not just in breads, but also when added to salad greens or made into a grain-based dish.
My course-grained bread recipe called for just a 1/2 cup of cooked wheat berries with a half-cup of the reserved cooking liquid. Wanting to have some extra on hand, I added one cup of uncooked berries to about 2.5-3 cups boiling water, then let it simmer, mostly covered, for about 50 minutes. The result was about 2 cups of plump wheat berries and surprisingly just enough liquid.
The berries that didn’t make it into the bread made it into my breakfast bowl. Taking a cue from my typical steel-cut oats preparation, these berries received some raisins (highly recommend the jumbo raisin mix from Trader Joe’s) and slivered almonds. And to plump up the raisins while warming in the microwave, I added enough apple cider to come nearly to the surface of the wheat berries. Soul-satisfyingly delicious. And it filled my belly. I even slurped from last juices from the bowl.
I would love to try wheat berries in a savory application and have seen a recipe or two pairing them with mushrooms. If you have any recommendations—either savory or sweet—please leave me a comment below.
And now that I know my family has a barn full of these wheat berries at home, I think I’ll bring home a great big bag of them next time I visit.
Sweet Potato Sandwich
December 12, 2012 § 1 Comment
Working from home is pretty awesome. Not because I can wear the same pants two days in a row (okay, three), or because I get to wear slippers all day. Or because I fill my agenda with kitten play time (yeah, that’s pretty awesome). Having a home office rocks because it lets me get creative with lunch.
For instance?
-Salads piled high with pickled beets, bulgar, homemade awesome croutons and whatever else I have on hand.
-Lasagna filled with chard-nutmeg ricotta.
-Pizza topped with shrimp and salad.
My latest lunch: Sandwiches stuffed with sweet potatoes. Most definitely NOT my invention, of course. I’ve had the delicious honor of having sweet potato sandwiches from Ula Cafe in Jamaica Plain. Delicious. Really delicious, with sprouts, avocado, tahini spread, red onions … Yum. So, this sweet potato sammie has its roots there. But it also gets some big flavor input from the Henry’s Dinner pizza I had several months ago at Veggie Planet in Cambridge. That flavor profile would be the addition of rosemary, sage and goat cheese.
And for no other reason than to clean out the fridge, I threw in a section of Granny Smith apple. Sweet. And tart. Genius pairing, if I do say so myself.
Here’s how the sandwich-work and actual work-work happen, all at the same time:
1. Organize, outline and begin my weekly e-newsletter, all the while thinking about that on-the-edge sweet potato lurking in the fridge drawer.
2. While making my mid-morning tea, pre-heat the oven to 425F and have at that sweet potato, saving what’s left of it, and cutting it into small cubes. Catch that quarter of a Granny Smith sitting on top of the carton of eggs. Rescue what I can of that and cube that, too. Throw it all in a cast iron pan and toss it with, olive oil, two sage leaves, minced, and about a 1/3 a sprig of rosemary, minced, and add salt and freshly ground pepper. Roast it for … I dunno … 15-20 minutes? Long enough for me to finish writing the second section in my enewsletter, and long enough for the cubed potatoes to be roasted through but still firm.

What didn’t fit into my sandwich.
3. Remove from oven and toss. Let cool for about a half hour. Write the third section of the enewsletter.
4. All that’s left is sandwich assembly: Slice two thick pieces of sourdough. One one, spread some goat cheese and top with some baby salad greens that are lightly dressed with whatever vinaigrette you have lying around (in my case I have a Greek dressing, but whatever). Oh, and some thinly sliced red onions. On the other side, pile high the sweet potato mixture. Holding a chef’s knife tightly over the salad, flip that side on top of the sweet potatoes and gently pull the knife through.

Sweet potato sammie, deconstructed
5. Eat in about 53 seconds because it’s that delicious. Head back to the computer, fully nourished and ready to finish the newsletter’s fourth section. The writing will be even better with that in my stomach. I love my job.
Tomorrow’s version will have sliced sweet potatoes and sliced avocados. And I’ll lightly toast the bread. Yum.
Moqueca, or a Tasty Brazilian Fish Stew
October 31, 2011 § 1 Comment
This year was supposed to be the Year of Ellen Baking, right? Or was it the Year of Ellen Reading? I was supposed to run three  half-marathons this year, read 12 books, and start the engine on something Big and Awesome. It’s turned out to be more of the Year of Ellen Waffling, and I don’t mean those maple-dripped golden squares on your brunch plate. It’s not been an all-that-great year, and I want it to be over with. I’ve petitioned the International Calendarological Society to just end 2011 here and now, and to get a move on with 2012. Apparently only Popes and Julius Caesar can do that. Officially. You can imagine my regard for “official.”
I’m declaring an end to 2011 as of Oct. 31—which conveniently makes Halloween the equivalent of New Year’s Eve. November 1st will begin a 61-day period known as Daintydays. It’s a time when Dainty and anyone who may have a thread of Daintyness in her/himself says “I’ve had enough of this, and I’m just gonna do ______” (with the blank being nothing that harms others, of course; that’s not very Dainty). Two months. Two months to do what you think you couldn’t by the end of the year. Think on it—we start tomorrow.
What does this have to do with moqueca? Absolutely nothing. Unless “Making the freakin’ best fish stew ever” is that thing you want to do by the end of the year. I first had moqueca at Edwige at Night in Provincetown in 2010. When I heard they were closing for good at the end of the Summer 2011 season, I rushed over for one last order. Last week, we made our own moqueca with a little help from Emeril Lagasse. While it’s no Edwige, it’s still damn good.
Moqueca (Brazilian fish stew)
Ingredients
- 2 1/2 pounds white-fleshed fish cut into 1-2 in. pieces —we used a combo of bluefish (from our Cape Ann Fresh Catch share) and some shrimp
- 3 tablespoons fresh lime juice
- 1/4 cup olive oil
- 1 1/2 cups thinly sliced onions
- 1 tablespoon minced garlic
- 2 tablespoons tomato paste
- 2 cups roughly chopped tomatoes – we used a 25 oz. can of whole peeled tomatoes and gave them a rough chop
- 1/2 cup fish stock or water
- 2 teaspoons salt, divided
- up to 1/4 cup hot sauce – recipe calls for Piri Piri, which is a blender hot sauce, but we dumbed it down a bit
- 1 (14.5-ounce) can coconut milk
- 2 tablespoons chopped fresh cilantro leaves
- Steamed white rice, as an accompaniment

-Put the fish in a glass mixing bowl with the lime juice. Set aside for 20 minutes and prep the remaining ingredients.
-Heat a large saute pan over medium-high heat. Believe me, you’ll need a larger pan than you expected. Heat up the oil, and saute the onions until translucent, about 3 to 4 minutes. Add the garlic saute for about 30 seconds. Add the tomato paste, chopped tomatoes, fish stock and 1 teaspoon salt. Stir to combine everything.
-Turn up heat a tad and bring the mixture to a boil. Once boiling, add the limed fish, the hot sauce (try half the amount first then add more after afterward) and the coconut milk. Stir it up again and let it heat to boiling. Reduce heat to medium-low and until the flesh starts to flake, about 10 minutes. IF you are using shrimp, add the shrimp separately from the fish, about 5 minutes through that cooking period.
-Remove the cover and sprinkle the cilantro over the fish. Season with the remaining salt and hot sauce, if you so choose.
-Serve with the rice. A nice basmati rice is perfect. Make LOTS of it, you’ll need it.

Ahhh ... leftovers.
Homegrown Food Challenge—Days 6 & 7
October 21, 2011 § Leave a comment
No, we did not whither away and die from lack of food after Day 5 of our Homegrown Food Challenge. We survived quite nicely, thank you very much. I’ve just not been … well … in the blogging mood, I guess. If you’re a blogger, you’re pickin’ up what I’m puttin’ down. Hey, it happens. I’m back on track now, though, no worries.
Breakfast:
Day 6—it was all the way back last Saturday. I had promised we’d kick it up a bit with something for breakfast that was more interesting than yogurt. And we did—omelets! Not an omelet, per se, but more of a flat egg. That’s what my mom called them when I was growing up. It’s just two eggs, slightly beaten and NOTHING added to the eggs, as you would were you making omelets. Just a straight ol’ egg. We added in some local goat cheese and diced homegrown tomato right at the last second, folded and called it breakfast. A slice or two of toasted homemade bread made it a filling meal.

Lunch:
After, Jennifer took off for the weekend to attend to some business, leaving me to fend for myself. Lunch was … honestly, I can’t remember. Must have been the last of the grilled eggplant paninni … yum … By the way, that post was way popular. Way. Popular.
Dinner:
Dinner was when I got creative on Day 6. Earlier in the week I had cooked up some homegrown Vermont cranberry beans. Used the pressure cooker, actually, and the process yielded some terrific bean broth. Add some homegrown leeks, homegrown carrots, and a neighbor’s small bunch of homegrown celery, and it’s the beginning of soup! I added to that the leftover Vermont cranberry beans, some leftover homegrown/homemade tomato sauce, a fading homegrown zucchini and a couple of locally grown potatoes—along with salt, pepper, homegrown oregano and sage. Soup and bread for dinner—the end of a great gardening day.

Day 7
Our weeklong Homegrown Food Challenge ended not with a big banquet ala Julie and Julia, but on a much more common, everyday note. Plans for going out with a bang—lasagna of homemade pasta, homegrown broccoli, eggplant and kale—faded with the afternoon. Instead we hunkered down, ate our soup and toasted our accomplishment with the last of the local beer.
Next year … I truly wonder what that will bring.
Homegrown Food Challenge: Day 1
October 11, 2011 § 1 Comment
Yesterday began our week-long Homegrown Food Challenge (HGFC). So, right from the beginning I have to amend the title, or rather—I should clarify and lay out the rules of this Homegrown Food Challenge we’ve undertaken:
- “Homegrown” … with such a small garden plot and the fact that it’s nearly done producing, we’re amending “homegrown food” to “local food.”
- “Local” for this challenge will mean somewhere in New England. I know, it could be more local than that. Maybe for the next challenge we’ll pull in the boundaries.
- Items that are in our allowable “pantry” include oils, vinegars and flours. And I reserve the right to add in quinoa as a “cheater” grain.
- Leftovers that were in our fridge need to be eaten, right? And trust me, we did not stock the fridge with “leftovers” so we could cheat with them.
- Our “veganish” diet – two out of three meals not containing animal products – will be put on hold for the week.
Hey, that’s not so bad, right? So far, so good.
To prep for the challenge, I hit the closest local farmers market I could find, which just happens to be at Boston Medical Center on Fridays. I came back with butternut squash, two eggplant, red peppers, dinosaur kale, two heads of leaf lettuce and romanesco – it’s like a fractal-influenced head of broccoli. All produce brought to us by the good folks at Farmer Dave’s in Dracut.

Farmers market fare from Farmer Dave's
We also stopped by Whole Foods to find some local dairy products. And you know what? We did actually find some.
So, with that, let the challenge begin!
DAY 1
Breakfast: We need coffee. Coffee doesn’t grow in this climate. What to do … Well, there are local coffee roasters. That counts. And our favorite local coffee roaster is Flat Black Coffee Company with locations in Dorchester and downtown Boston. We’ve known the owner for years and can attest he and his crew produce a great and responsible bean. Into that cup we usually pour some almond or soymilk. Not happening this week, so how about some local milk? We picked up some Maine’s Own Organic Milk.

Yogurt, apple and honey - all local!
The coffee accompanied a bowl of Stonyfield plain yogurt – I’m positive all that dairy is from New England cows and if not, someone clue me in – mixed with a local chopped apple and topped with Topsfield-produced honey. Breakfast, done.
Lunch: Okay, so … It’s Columbus Day. Jennifer’s off work, and I’m working but not all that hard … A friend calls us. Hadn’t seen her in a while. “Wanna go out for lunch?” Say no? No. We said yes. And we opted to eat at a small, local Mexican restaurant two blocks away where I know they a) make a lot of their own stuff and b) could use our dining dollars. I feel completely in-line with the challenge by supporting our local small eateries.
Dinner: Gotta clean out the leftovers from the fridge, right? Pasta with shrimp, red pepper and pesto. And just the pasta and shrimp weren’t local in that dish. Plus, we had homemade bread. And, a bottle of Harpoon IPA brewed right down the street in Southie.
Day 2 should be interesting—it’s our first Cape Ann Fresh Catch share pick-up. Fish with heads!! Awesome!
Pressure Cooking Black Beans
September 20, 2011 § 3 Comments
You’re going to think I’m a bit crazy, but I actually really like this two-thirds vegan kick I’m on. Now, let me clarify:

Buy the dry - dried black beans are easy as pie to cook up and enjoy in 30 minutes.
1a. Two-thirds vegan means two meals out of three meals each day are non-dairy, non-poultry, non-animal products. Not even a boiled egg on my lunchtime salad – and I love a good boiled egg, too.
1b. What about snacks, you ask? What am I gonna do, eat a meat stick? Almonds, an apple, hummus and chips if I feel the need.
2. I first mentioned the two-thirds vegan thing back in … was it March? April? Lest you think I’m Superwoman, I need to inform you that I haven’t been two-thirds vegan all the time. Vacations don’t count. Weekends away don’t count. And sometimes that boiled egg would find its way onto of my salad. And, last week … I had a whole mess o’ Old Bay-seasoned wings on my business trip to Baltimore. The only wings I’ll eat, and the only town I eat them in. There are rules about being two-thirds vegan, and I make them up as I go along.
3. And sometimes, you go away for the weekend and someone makes you a three-egg omelet. With mozzarella. And lobster. Just be sure there’s a veggie burger in your near future.
BUT! It’s a new season. And I have a renewed interest in sticking to the vegan thing. At least two-thirds of the time.
BUT! I need more protein. That’s what a recent doctor visit and blood test suggested. So, here come the beans, which are an excellent source of protein and fiber awesomely tasty food. Rather than stocking up on cans upon cans of beans – they add salt and calcium chloride, which, by the way IS a salt! – we buy the dry. Oooo … I like the way that sounds, “buy the dry.” Plus, they are cheaper (I’m showing my frugal side).
Dry beans are NOT a pain in the ass to work with. It’s easy. If Dainty can do it, so can you. And you don’t have to wait around 24 hours while your beans soak, etc. etc. Invest in a pressure cooker and your beans will be done in 30 minutes, and that includes 5 minutes of prep time.
The recipe we use comes from Pressure Perfect by Lorna Sass. (Oooo … sassy.) Hey, meat lovers, there’s a roast chicken on the cover! That’ll assure you Lorna has added something for everyone inside. There are a bunch of bean recipes included – the one we use is for black beans with soft tortillas. We use just the first half of the recipe and add our own seasonings depending on what we’re using the beans for. Here, I’ll just go through the first process and produce a batch of pressure-cooked beans.
Ingredients
- 4-6 cups water (depending on how much bean broth you want)
- 1.5 cups dried black beans, pick over to remove icky ones, small pebbles, etc. and rinse
- 1 small onion
- 4 cloves, peeled and roughly chopped
- 1 TBS oil (apparently it prevents or controls foaming)
- 1/2 tsp salt
-Combine everything in a 4 qt. pressure cooker.
-Lock the lid in place. If you’re like me, you’ll do it three or four times, making absolutely sure the lid is on and won’t fly off. Seriously though, when it’s locked, it’s locked. No hardhat needed.
-Bring the pressure cooker to high pressure over high heat. READ YOUR PRESSURE COOKER INSTRUCTIONS! It will tell you how you can tell when it has reached high pressure. For our Fagor pressure cooker, high pressure is indicated when two red lines are visible.
-When it has reached high pressure, turn down the heat to a temp that will maintain that high pressure. For ours and on our gas stove, that means at a point between “lo” and “2”.
-Let the beans bubble away in there for 25 minutes. Then turn off the heat. Let them sit there as is – don’t open the lid! – and let the pressure come down naturally. READ your cooker instructions to find out how you can tell on your device.
-When the pressure has come down, open the lid AWAY from you. You don’t want to get a face full of super-heated steam, right? Always always always be careful.
-The beans should be tender. If not, lock it up, stick ’em back on the heat and cook for another couple of minutes. Repeat the heat coming down and all that.
What you have now are several cups of firm yet tender beans in broth. If you used 6 cups of water, you are halfway on the path to making a black bean soup. If you used 4 cups of water, you have a bit less broth. Letting it sit, the beans and broth will thicken slightly but not much.
We use 4 cups of water, and after the beans are pressure cooked, we typically add a touch more salt, some pepper, several shakes of red pepper and a diced small tomato. We then serve it over a bowl of rice. We’ve added other things, as well – roasted sweet potato, butternut squash, for example.

We add a touch of salt, pepper, red pepper flakes and diced tomatoes to our black beans.
If you have any suggestions for what to add in to the black beans, I’d love your suggestions. We need to keep up the variety. Please leave your comments below!
