
Spicy Eggplant Relish ala Moosewod
July 22, 2011 § 1 Comment
One of the things we do when we spend time in Provincetown is head over to the Saturday farmers market. This time of year the stalls offer some great fresh produce we haven’t seen locally since last summer. This time we picked up two smallish eggplants. Versatile! Yummy! Pretty! Eggplants are all of the above … And also a bit short-lived on the countertop, especially in weather like this.
What to do with them? We could grill. We could stuff. We could make lasagna. We could bread. And we did none of those. Instead, when they began getting “long in the tooth,” we turned to an old standby – spicy eggplant relish.
I pulled this recipe from my Moosewood cookbook a few years ago for a get-together and used it as a dip. It got a great response. We used the leftovers in numerous ways, such as a spread for sandwiches, and also as an eat-by-the-forkful snack. Can’t remember exactly which Moosewood cookbook it came from, possibly the original. Luckily its a popular recipe and we were able to find it online – hey, we’re on vacation, we don’t travel with old cookbooks.
Recipe
2-3 Tbs olive oil
1 medium onion
1 small red pepper, large dice
2 small-medium eggplant, small cubes, don’t bother peeling
Salt, pepper and cayenne to taste
-heat oil over medium-low. Add onions and sautée until softish, 4-5 min.
-add cubed eggplant and red pepper. The eggplant will soak up a lot of the oil. Stir really well to coat all of it. Let it cook low and slow. Add a generous pinch or two of kosher salt and several turns of fresh pepper.
-Let it cook down awhile – 5 min or so. Add in as much cayenne as is appropriate for you. Cook partially covered for another 4-5 min.
-is the eggplant soft? Take it off the heat. Season with salt/pepper if needed.
We ran into one small problem during this – there was no cayenne in the house. How is that possible? We made due with some chili powder and red pepper flakes. The chili powder gave it a smoky flavor, making it a bit more savory. It was a good addition, actually. I added a bit too much red pepper flakes. Adding a small sliver of cheese when serving on a cracker will take care of that. Looking forward to having this in a tofu wrap for lunch. Perfect beach food.

In a Pickle
July 2, 2011 § 3 Comments
I was in a sour mood the other day. So, I made pickles.
I’ve been wanting to make pickles for a year or so, ever since I had an excess of small beets produced in our garden last year. I even kept the beets in a sealed bag in the fridge for several months, thinking I’d make pickled beets at some point. I didn’t. I searched for the just-right pickling recipe for so long, my beets eventually went bad.
And it’s not like I haven’t pickled anything before. I have. Pickled green cherry tomatoes. They were delicious. But still, there was something intimidating about the thought of making pickled beets.
I had had my eye on a Moosewood recipe for pickled red onions. I kept putting it off and putting it off. Then I spotted a recipe in Martha Stewart Living for pickled onions, radishes and snap peas – cocktail pickles. It got me thinking. Finally this week I decided to bite the bullet and pickle up some red onions.
I examined the Moosewood recipe – it called for brown sugar – and I examined the Martha recipe – white sugar. And then I dug out that old pickled green cherry tomato recipe – salt. I considered them all – and decided to go with this.
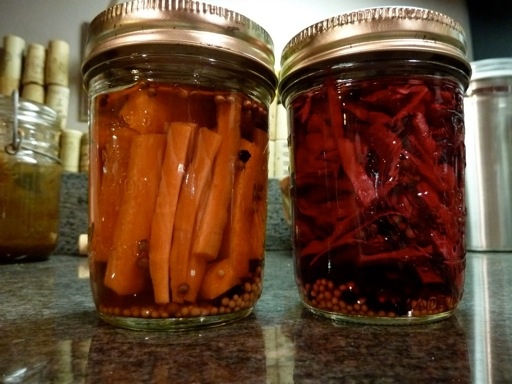
Jars:
Two jars of the one-pint jelly variety.
Ingredients:
1 cups cider vinegar
1/4 cup water
2 tbs packed brown sugar
-Boil the above and let cool.
-In each jar place
– 1/2 tsp coriander seeds
-1/2 tsp black peppercorns
-1/2 tsp mustard seeds
-1 bay leaf
-1 garlic clove
-1 sneaky dried chili pepper optional
While I was boiling the liquid, I realized I didn’t have red onions. Digging through the hydrator drawers, I found an older head of red cabbage and a carrot. I shredded enough cabbage to lightly pack one jar, and julienned a carrot to fit into the other jar. I divided the vinegar liquid between the two jars, and it was enough to cover the veggies. I covered the jars with lids and tightened with the rings, and popped them into the fridge. A day later, I had a taste of the results. And I have to say, not bad.
The Ever-Versatile Roasted Vegetables
May 11, 2011 § 7 Comments
I don’t share Dainty with my real-world colleagues as a rule. Not sure most would approve of Dainty’s exploits. But my super-awesome colleague Chris T.—the designer of the Dainty Dot logo up at the top of the page—is definitely Dainty worthy.
So when Chris T. told me yesterday that I use a lot of—too many?—ingredients, I considered it. Do I really? Salt, pepper, oils and vinegars not withstanding, I’m mentally going over my recipes and counting up. The Steel-Cut Oatmeal I’m currently eating definitely doesn’t have that many ingredients—oats, raisins, slivered almonds, maple syrup. Okay, yeah, that’s a lot for a simple breakfast. Plus, it takes 20-plus minutes to prepare. But at least you can shower while it’s cooking—that’s something.
Chris T., to show that Dainty can prepare a flavorful dish with simple ingredients and instructions, I humbly present this for your consideration: Roasted Vegetables.
It doesn’t matter what it is—beets, leeks, broccoli, and old tennis shoe—you add EVOO, salt and pepper, put it on a baking sheet or cast-iron pan in a 42F oven and you’re going to end up with something tasty. You can skip the oil maybe, but why? If anything, it helps prevent the veggie from sticking to pan. The salt and pepper add flavor, yes, but the salt also helps to draw out the vegetable’s own juices. The high heat caramelizes those juices, so you end up with a tasty savory sweetness. Want to get your children in the habit of eating veggies? Don’t serve them bland boiled bleck—lightly roast some carrots or cauliflower and let them have at it. I don’t have children and I’ve never tested this theory so it might be bunk, but you never know. Give it a try.
Roasting vegetables is my go-to method when it seems there is absolutely nothing left to cook with in the house. There’s always something—a sweet potato, an onion or leek, a pepper, something—laying around that, with a little high heat, salt, pepper and EVOO, can be incorporated into a meal. If anything, they can be tossed with penne for a simple pasta supper.
Do you need instructions? Really? Okay, here they are.
Roasted Vegetables
-Firm vegetables work best. Sweet potatoes, potatoes, cauliflower, broccoli, winter squashes, onions, leeks work really well. Summer squashes such as yellow and zucchini, are good, too. Tomatoes … I typically use cherry tomatoes and put them in a medium-sized cast iron. They’ll burst, beware. But the flavor is phenomenal. Be forewarned—the acid will mess up your cast iron’s patina a bit. Clean immediately.
-Set your oven to 425F. I never rely on the temp gauge—your 425 may be hotter than my 425. So keep an eye on the veggies the first time you roast them to get a good idea of how your oven works.
-Veggie prep: The secret is to cut the veggies into uniform pieces for even cooking. All the sweet potatoes should be about the same size. Easily enough to do. When chopping the onion, leave them in relatively big chunks. No dicing. Broccoli and cauliflower can be kinda tricky to get into even sizes. But if some get more crispy than others, hey, that’s ok—it’s all tasty.
-Put your veg in a medium to big bowl, depending on how much you have. Add olive oil—I tip the bottle down and go once around the bowl for a small amount of veg, two to three times for more veg. Add one to two large pinches of kosher salt and several turns of a pepper mill. Toss to coat. Your hands are fine, or a wooden spoon or tongs work too. I prefer hands. Spread out evenly into a single layer in a cast-iron pan or rimmed baking sheet. Single layer! You want each veg to get in contact with the hot metal. Put in the oven and close ‘er up.
Note: What’s a large pinch? It’s a pinch that uses your thumb and your index, middle and ring fingers. It’s one finger away from a small grab. Go ahead, try it.
-Roasting time: Well, now, that all depends on what you’re roasting. Broccoli—2o minutes. Cauliflower—20-25 minutes. Beets, same thing. Sweet potatoes—up to 40 minutes. Butternut squash—35-40 minutes. Onions, leeks—15 maybe? Same with summer squashes. Asparagus, maybe 10 minutes. The softer the vegetable, the less time it takes. For softies, I check them at 12 minutes and then gauge from there. The harder the veg—like sweet potatoes—the longer it takes. For broccoli and cauliflower, I check them at 10 and give them a shaky toss. If you’re roasting a two or more different veggies—like broccoli and onions—on the same pan, I separate them so it’s easier to remove one if it’s done ahead of the other.
-When’s it done? When they turn a nice golden color, especially around the edges. Broccoli’s florets will begin to get a bit dark. That’s ok. Are the stem parts firm yet edible? You don’t want them to be floppy, but you want to be able to chew them without an awful crunch as if they are raw. Squashes—you should be able to stick a toothpick or fork into it easily but it shouldn’t be mush. Get the idea?
This weekend we made a simple pasta meal with roasted broccoli and onions and sun-dried tomatoes. We took a small handful

Roasted broccoli and onions with sun-dried tomatoes over pasta
of the tomatoes and put them in a bowl of maybe 1.5 cups of boiling water. Let them sit there while the broccoli and onions roasted and the pasta water boiled. Just before the roasting was done, we took out the tomatoes and gave them a rough chop, then threw them in with the drained pasta, a 1/2 cup of reserved pasta water and the roasted veggies. We served with a bit of Parmesan cheese. Delicious. Want some meat with that, you meat-eaters? We’ve had similar dishes where we’ve added a link or two of Al Fresco chicken apple sausage cut into bite-sized pieces.
Pasta, quinoa, bulgar, rice … whatever you have, as long as you have a veggie or two around and know how to roast it, you’ve got yourself a meal. And one with not that many ingredients.
Dainty’s Concocted Curry
April 28, 2011 § Leave a comment
Several weeks ago I attempted my first-ever Indian-spiced meal. Cauliflower masala. Turned out pretty well—read about it HERE. That was then followed by a chana bateta from the Brooklyn Eats blogger, not blogged about here but really tasty. That one includes potatoes in a homemade tomato-based curry. From those two recipes I figured if you have some mustard seeds, cumin, coriander and a touch of heat—and a whole bunch of other stuff—you can whip up a curry.
Last night’s meal is what I’m calling Dainty’s Concocted Curry. I had 2/3 cup of coconut milk I needed to finish off, and I didn’t have all the ingredients for either of the above recipes, so I kinda/sorta combined the two. Believe me, it can be tweaked here and there, especially in the heat department. But I’m pretty proud that I even attempted getting jiggy with these East Asian flavors.
Dainty’s Concocted Curry

Dainty's Concocted Curry over roasted broccoli, marinated baked tofu and brown rice
2 shallots, thinly sliced
3-ish garlic cloves, minced
0.5-1.0 TBS grated ginger
1-2 TBS oil (I always use olive but you can use canola)
1 tsp mustard seed
1.5-2 tsp cumin
2 tsp coriander
0.5-0.75 tsp cayenne (Would have added a touch more if we had it.)
1 tsp tumeric
couple pinches fenugreek
1 28 oz. can whole tomatoes
2 big dollops of tomato paste
2/3 cup coconut milk
salt and pepper
-Heat oil in a fairly deep fry pan, medium heat. Add shallots and garlic. Move ’em about in the pan now and then and you’re looking for them to be a bit translucent or, better yet, wilted. At this point I just grate the ginger right on top of that, guesstimating a tablespoon’s worth.
-While this is happening, put the mustard seeds in a small skillet with a slight amount of oil and heat on med-high. Cover! These seeds will start popping when they are ready – not long, about 3 minutes.
-When shallots/onions/ginger are done, add mustard seeds and all the spices to the mix. Stir about – it’ll be kinda pasty. You just want to get some heat on them to begin releasing their aromas. Doesn’t take long – a minute or two.
-Now, this can of whole tomatoes—one recipe called for one diced tomato, the other for a 14 oz can diced tomatoes. Other than a handful of cherry tomatoes, all I had was this 28 oz can of whole tomatoes. Open the can, reach on in there and grab one or two tomatoes, hold it over the pan and squeeze—carefully, otherwise it’ll squish tomato juice all over you. Do this for the entire can, then add the juice. And also add the tomato paste‚—that’ll help thicken it. Add coconut milk and stir. Give it a taste and see if you need to add salt or anything extra. Since I added way more tomatoes than I needed, I gave the mix a few extra shakes of all the spices except the cayenne (no more left) and the mustard seeds. Bring to just about boiling, then turn down to simmer and thicken. We had this on low while our brown rice was cooking for 45 minutes. Stir now and then and check up on it.
We’re pretty much done at this point. We did a take-out sorta thing with this when it came to assembling the meal. I roasted some broccoli and also baked some marinated sliced tofu. We put a big spoonful of brown rice in a salad-sized bowl, added some of the broccoli and a few tofu slabs, and then spooned the curry on top. Not too bad, I have to say.
You? You can add some cubed potatoes (as in one of the original recipes) and let those cook away while the curry is simmering. Or, maybe add some mushrooms. Maybe some stir-fried chicken. Steamed veggies. It’s a curry, and you can use it to add a little East Asian flair to your Wednesday evenings without leaving the house.
Double Mushroom Barley Soup
April 26, 2011 § 3 Comments
Will spring ever get here? Until it does, one of the ways to deal with cold and damp weather is with hot soup. Hot, hearty soup. This is one of our favorites in the hot and hearty category. It’s “double” mushroom because it uses both fresh and dried mushrooms. Adding the dried gives the soup its earthy heartiness.
This is another recipe Jennifer acquired from a soup class several years ago. Note on the bottom says it’s from the Great Vegetarian Cooking Under Pressure book. Ah, yes, “under pressure.” This is made in a pressure cooker! Have no fear, people—pressure cookers won’t explode on your stove top. And if you don’t have a pressure cooker, just cover and simmer for … well, I’m not sure. Just keep checking to see if the barley is toothy.
As before, the recipe below is with our adjustments

Double mushroom barley soup
Double Mushroom Barley Soup
- 2-3 tsp olive oil
- 2-3 medium cloves garlic, finely minced
- 2 cups chopped onions or 2 thinly sliced leeks (I use onions here)
- 6 cups boiling stock (see note in recipe)
- 1/2 cup pearl barley
- 1/2 lb sliced fresh mushrooms, white buttons are fine
- 1/2 oz. sliced dried mushrooms
- 2 large carrots, sliced
- 2 celery ribs, diced
- 2 large bay leaves
- 1.5 tbs dill weed
- salt and pepper to taste
-Put dried mushrooms in a medium bowl. Add about 2 cups boiling water. Cover with plastic wrap and let steep for 15 minutes.
-Now, for the “6 cups boiling stock” – set a pot of about 4 cups stock (veggie is good, chicken is okay if you don’t have veggie) to boil. You’re going to add the mushroom liquid to it when those are done steeping.
-While the mushrooms are steeping is a good time chop your veg.
-When mushrooms have steeped, drain the liquid into a measuring cup. You should have a bit less than 2 cups. Just add water to fill up to 2 cups. Add to the pot of stock. Reserve mushrooms.
-Heat oil in the bottom of the pressure cooker (or soup pot if not using a pressure cooker) to medium-high. Add garlic and onions. Cook for 1 minute, stirring so they don’t stick. Add the stock and then invite everyone else into the pool!
-Lock the top onto the pressure cooker. Bring it up to high pressure, then lower heat to maintain that pressure. Let it cook away for 18 minutes. Then, remove pressure cooker from the heat and place it under cool running water to bring the pressure down quickly. Remove the lid, being sure to face it away from you. You don’t wanna get hit with a cloud of steam!
-IF you’re not using a pressure cooker, bring the soup to boil, cover the pot but leave a little crack, and then turn it down a bit to simmer. Let it bubble along for … let’s say 35 minutes and then check every 5 minutes or so until you feel the barley is cooked.
-Discard the bay leaves. Add a bit more salt and pepper. In my opinion it needs more salt than you’d think.
-With barley in there, it’s going to thicken up, especially after being in the fridge for a day or two. Just be aware. If you want, add some stock or water to thin it out a bit. I kinda like the soups that turn into stews the next days.
It’s one of those soups that is dinner-worthy if you pair it with a salad or suitable for lunch with some toast. In fact, it’ll be my vegan lunch in about 3 hours.
Seriously Good Protein Bars—Homemade!
April 23, 2011 § 1 Comment
I was making my Half-Whole Wheat Bread this morning, and since I had the Kitchen-Aid mixer out I thought, why not make some protein bars? We’re exercising a bit more and have cut down on our meat eating, so it’s a good idea to have additional sources of protein for those oh-my-god-I-wanna-eat-a-horse moments.
Yeah, I like those packaged protein bars – especially those Odwalla bars (mmmm….LOVE the carrot cake ones!). But a) they get kinda expensive and b) they aren’t as healthy as you think. full of sugar and all that.
So, when I saw Alton Brown make protein bars on Good Eats, I was all over it. Here’s the recipe with my minor alterations:
Alton Brown’s Protein Bars
4 oz soy protein powder – about a cup
2.25 oz oat bran – about 1/2 cup
2.75 oz whole wheat flour – about 1/2 cup
0.75 oz wheat germ – about 1/4 cup
1/2 tsp kosher salt
dried fruit – his recipe calls for 1/2 cup each of raisins, cherries, blueberries, apricots. I just use 2 cups of any dried fruit.
1 package silken tofu
1/2 cup unfiltered apple juice (do your best to find something along these lines)
4 oz brown sugar, about 1/2 cup packed
2 large whole eggs
2/3 cup natural peanut butter
-Line bottom of 13 b 9 inch glass baking dish with parchment paper. Or, just spray with Pam-like substance.
-Heat to 350F. I turn mine up to 375F.
-In large mixing bowl, combine protein powder, oat bran, wheat flour, wheat germ and salt. Set aside.
-In the bowl of a Kitchen-Aid mixer, whisk the tofu with the whisk attachment. Add apple juice, brown sugar, eggs and peanut butter, each one separately. Make sure everything’s incorporated. Change to the paddle attachment and add in the flour.
-Take bowl off mixer. Add dried fruit and mix in with a wooden spoon. Pour into glass dish. Spread around evenly.
-Bake about 35 minutes, until internal temp is 205F. Remove and let cool. Cut into squares. Store in airtight container. Best to keep in fridge because these can get a bit moldy otherwise.
-Chop up your dried fruit so it’s all about the size of raisins. Set aside.
Eggplant Asparagus Napoleons
April 21, 2011 § 4 Comments
Why these are called Napoleons, I’m not sure. Maybe because they are short squat layered stacks. I’m almost positive it wasn’t because the guy had a tasty complexity of flavors. In my book, these take the victory.
Here’s the idea: Layers of eggplant, ricotta and asparagus. Simple. Delightful. And they do have a mysteriously complex flavor, thanks to grilling.
Giada DeLaurentis, aka food porn queen, made these in a recent show. The recipe is easy enough to recreate. Just a warning, these require some grilling. We have one of those indoor grills that you plug in AND a 16-in. All-Clad grill pan. We used both at the same time for these.
Eggplant Asparagus Napoleons

Eggplant asparagus napoleon
(gives you 4 short stacks)
- 1 medium eggplant, sliced into 1/2-in. slices, at least 12
- asparagus – about 12 stalks
- 3-4 tbs freshly chopped thyme
- evoo
- salt/pepper to taste
- ricotta cheese, about 2 cups
- 1/2 lemon
-Set oven to 200F-250F
-Put about two cups of ricotta in a medium bowl. Add about half of the chopped thyme and squeeze in the juice of half a lemon. Stir to incorporate. Set aside.
-Put eggplant slices in a big bowl. Dowse with olive oil, sprinkle with two big pinches of kosher salt, a couple of twists of pepper, and the remaining chopped thyme. Get your hands in there (or use tongs) and make sure it is all evenly coated. The eggplant will suck up the oil – that’s okay, don’t overdo it.
-Set indoor grill or grill pan or maybe even your outdoor grill to medium and let it heat up. Place 12 eggplant slices on the grill – reserve the bowl they were in. If it looks like some of the slices missed a bit of oil, take some olive oil and a brush and brush them up a bit. Let them grill up on that side for a few minutes.
-Meanwhile, chop the woody parts off your asparagus. Place in that bowl, add a touch of olive oil, salt and pepper. You can grill these up in a separately as I did, or you can wait until your eggplant is done.
-Speaking of eggplant, check to see how the undersides are coming along. When they get golden grill marks on the bottom, flip ’em over. Maybe some of the ones you just turned over need another wash of oil. Your decision. Give them another couple of minutes to grill up – just take them off before they get limp and burned.
-Grill up the asparagus on medium. It won’t take as long as the eggplant. Move them to get all sides as best you can. 4-5 minutes max. You don’t want them wimpy; pick one up and hold it sideways – it shouldn’t sag. Place them on cutting board when done and chop them in half.
-Here’s the assembly part: On a baking sheet place four slices of eggplant. Spoon on a dollop of the ricotta – not too much, just enough to cover the slice but don’t spread it thinly either like butter on toast. Now add three asparagus sections on top of the ricotta. Add another layer of eggplant. More ricotta. Another three sections of asparagus. Now top it off with eggplant. You should have yourself a nice short stack.
-Pop the baking sheet in the warm oven for about 10 minutes or so – enough time to bring everything up to temperature.
Use one napoleon as a side dish or use two as a meal and serve with some sort of protein. I made a side of quinoa with roasted cherry tomatoes and shallots.
Clover Food Lab
March 24, 2011 § 3 Comments
Guys, I’d love for today’s post to be more of a discussion. I don’t know much about Clover and I’d love for you to chime in.
I met friends at the Clover Food Lab in Harvard Square for lunch yesterday. Like I said, I don’t know much about it—except these two things:
- This particular brick-and-mortar location developed from a wheels-and-engine business. Am I right about that? Clover was originally a food truck, I take it, and there are a herd of them now in the Cambridge/Boston area.
- They serve all (or mainly?) vegetarian food.
Food trucks are on fire right now. And to see that a nomadic business can settle in and put down roots seems pretty cool. I mean, that’s how “civilization” started. (Hey, I used air quotes, and I’m not saying that today’s nomadic societies aren’t civilized.) I would have loved to try the Clover food truck experience first.
My friend Deb, on the other hand, had tried the food truck first. Raved about it. Loved the food. And when she saw that I’m eating “veganish” she suggested we meet up with friend Sonya to try out the steady digs.
What did we think? Here are my quick impressions as a first-timer, and an observation from Deb as a food truck customer:
The electronic “sandwich boards” as you walk in: Interesting technology there. It’s a vertical flat screen. Rather than erasing and re-writing a sign, they erase and rewrite something on their computer in the back (?) and reload or whatever. What’s the point? Not sure, except when you don’t need two “menus,” you can switch one of the screens to whatever it is you want. When we walked in both boards were menus. When we walked out, one was a menu, one was Clover’s website/blog.

Clover's Chickpea Fritter with a side of Brothy Barley & Spinach Soup. (See the indentation where my falafel ball once sat?)
I ordered the Chickpea Fritter – aka, falafel – in a pita. It came highly recommended by Deb. It was awesome. The slaw was tasty, as was whatever Mediterranean-esque sauce that was in it. The falafel was nicely done, still moist inside. There were a lot of things inside my pita I couldn’t quite pinpoint, but that was okay because I loved it all. Especially the pickle slices. BUT, folks, DO NOT put a falafel ball right on top of the stuffed pita. Mine did an “On Top of Old Smokey” thing and rolled onto the floor. Sad face.
Deb ordered the Egg & Eggplant pita. She loved that, too. Looked good. Can you get that without the egg? Next time.
We all ordered the Brothy Barley and Spinach Soup. Do you know what the word “brothy” brings to mind? Broth. A clear, flavorful liquid. No broth in this soup. If you want to be alliterative, try Burly Barley. Because it was a burly soup—any soup in which a spoon can stand straight up in (without assistance) is burly. As for taste … I’m a barley lover, and I did enjoy it. Add a touch of salt. My companions weren’t very fond of it. Oh, and where was that spinach? (Add more.)
Rosemary fries for the three of us. Yum. Dude, they were awesome.
I love that “city water” was on the menu and listed as $0.
Deb was a bit disappointed that the restaurant menu was the same as the food truck. I think she was expecting a few other choices.
If you’re going to serve pitas that are hefty and stuffed, maybe provide “holding docks” at each table—things like the U-shaped diner napkin holders. So, when you’re settling down into your seat, taking off your coat, etc., this thing can hold your pita without the food falling out (and rolling onto the floor). Just a thought.
The space needs a living wall either in the front windows above, or on that back wall. I know there’s those supports on the back wall and it looks like there’s grape ivy being training on them. Long, slow process. Clover may be looking into this—but, I do know a little something about living walls and know people in the biz. It doesn’t have to be complicated. AND, how cool would it be if they grew their own herbs and salad greens right there on location? It’s possible. Plus, as you may not know, plants “clean” the air, provide oxygen, and also help regulate temperature. Like I said, I know a little somethin’ somethin’ ’bout the topic.
Dainty Rates: 3 out of 5 Dots.
