
Wheat Berry and Bean Salad
March 6, 2013 § 2 Comments
The only on-the-package-recipe you should ever make is Nestle Toll House Chocolate Chip Cookies. Truly. It’s a proven recipe and makes a darned-good cookie, a cookie you will experience from the first years of your life to your last. It’ll even be served at your wake. Every other recipe found on a package—whether it’s a box of Velveeta or a fancy grain—should be embarked upon with hesitation and doubt. A dingy full of doubt.
I love what wheat berries do for me for breakfast. I’ve also included them in bread recipes and sprinkled them on a green salad. So when I grabbed my bag of Bob’s Red Mill Wheat Berries and noticed the Wheat Berry & White Been Salad recipe on the back I thought, “Why not try something new today?” “New,” I am reminded now, means a learning experience and not necessarily a guarantee of something awesome.
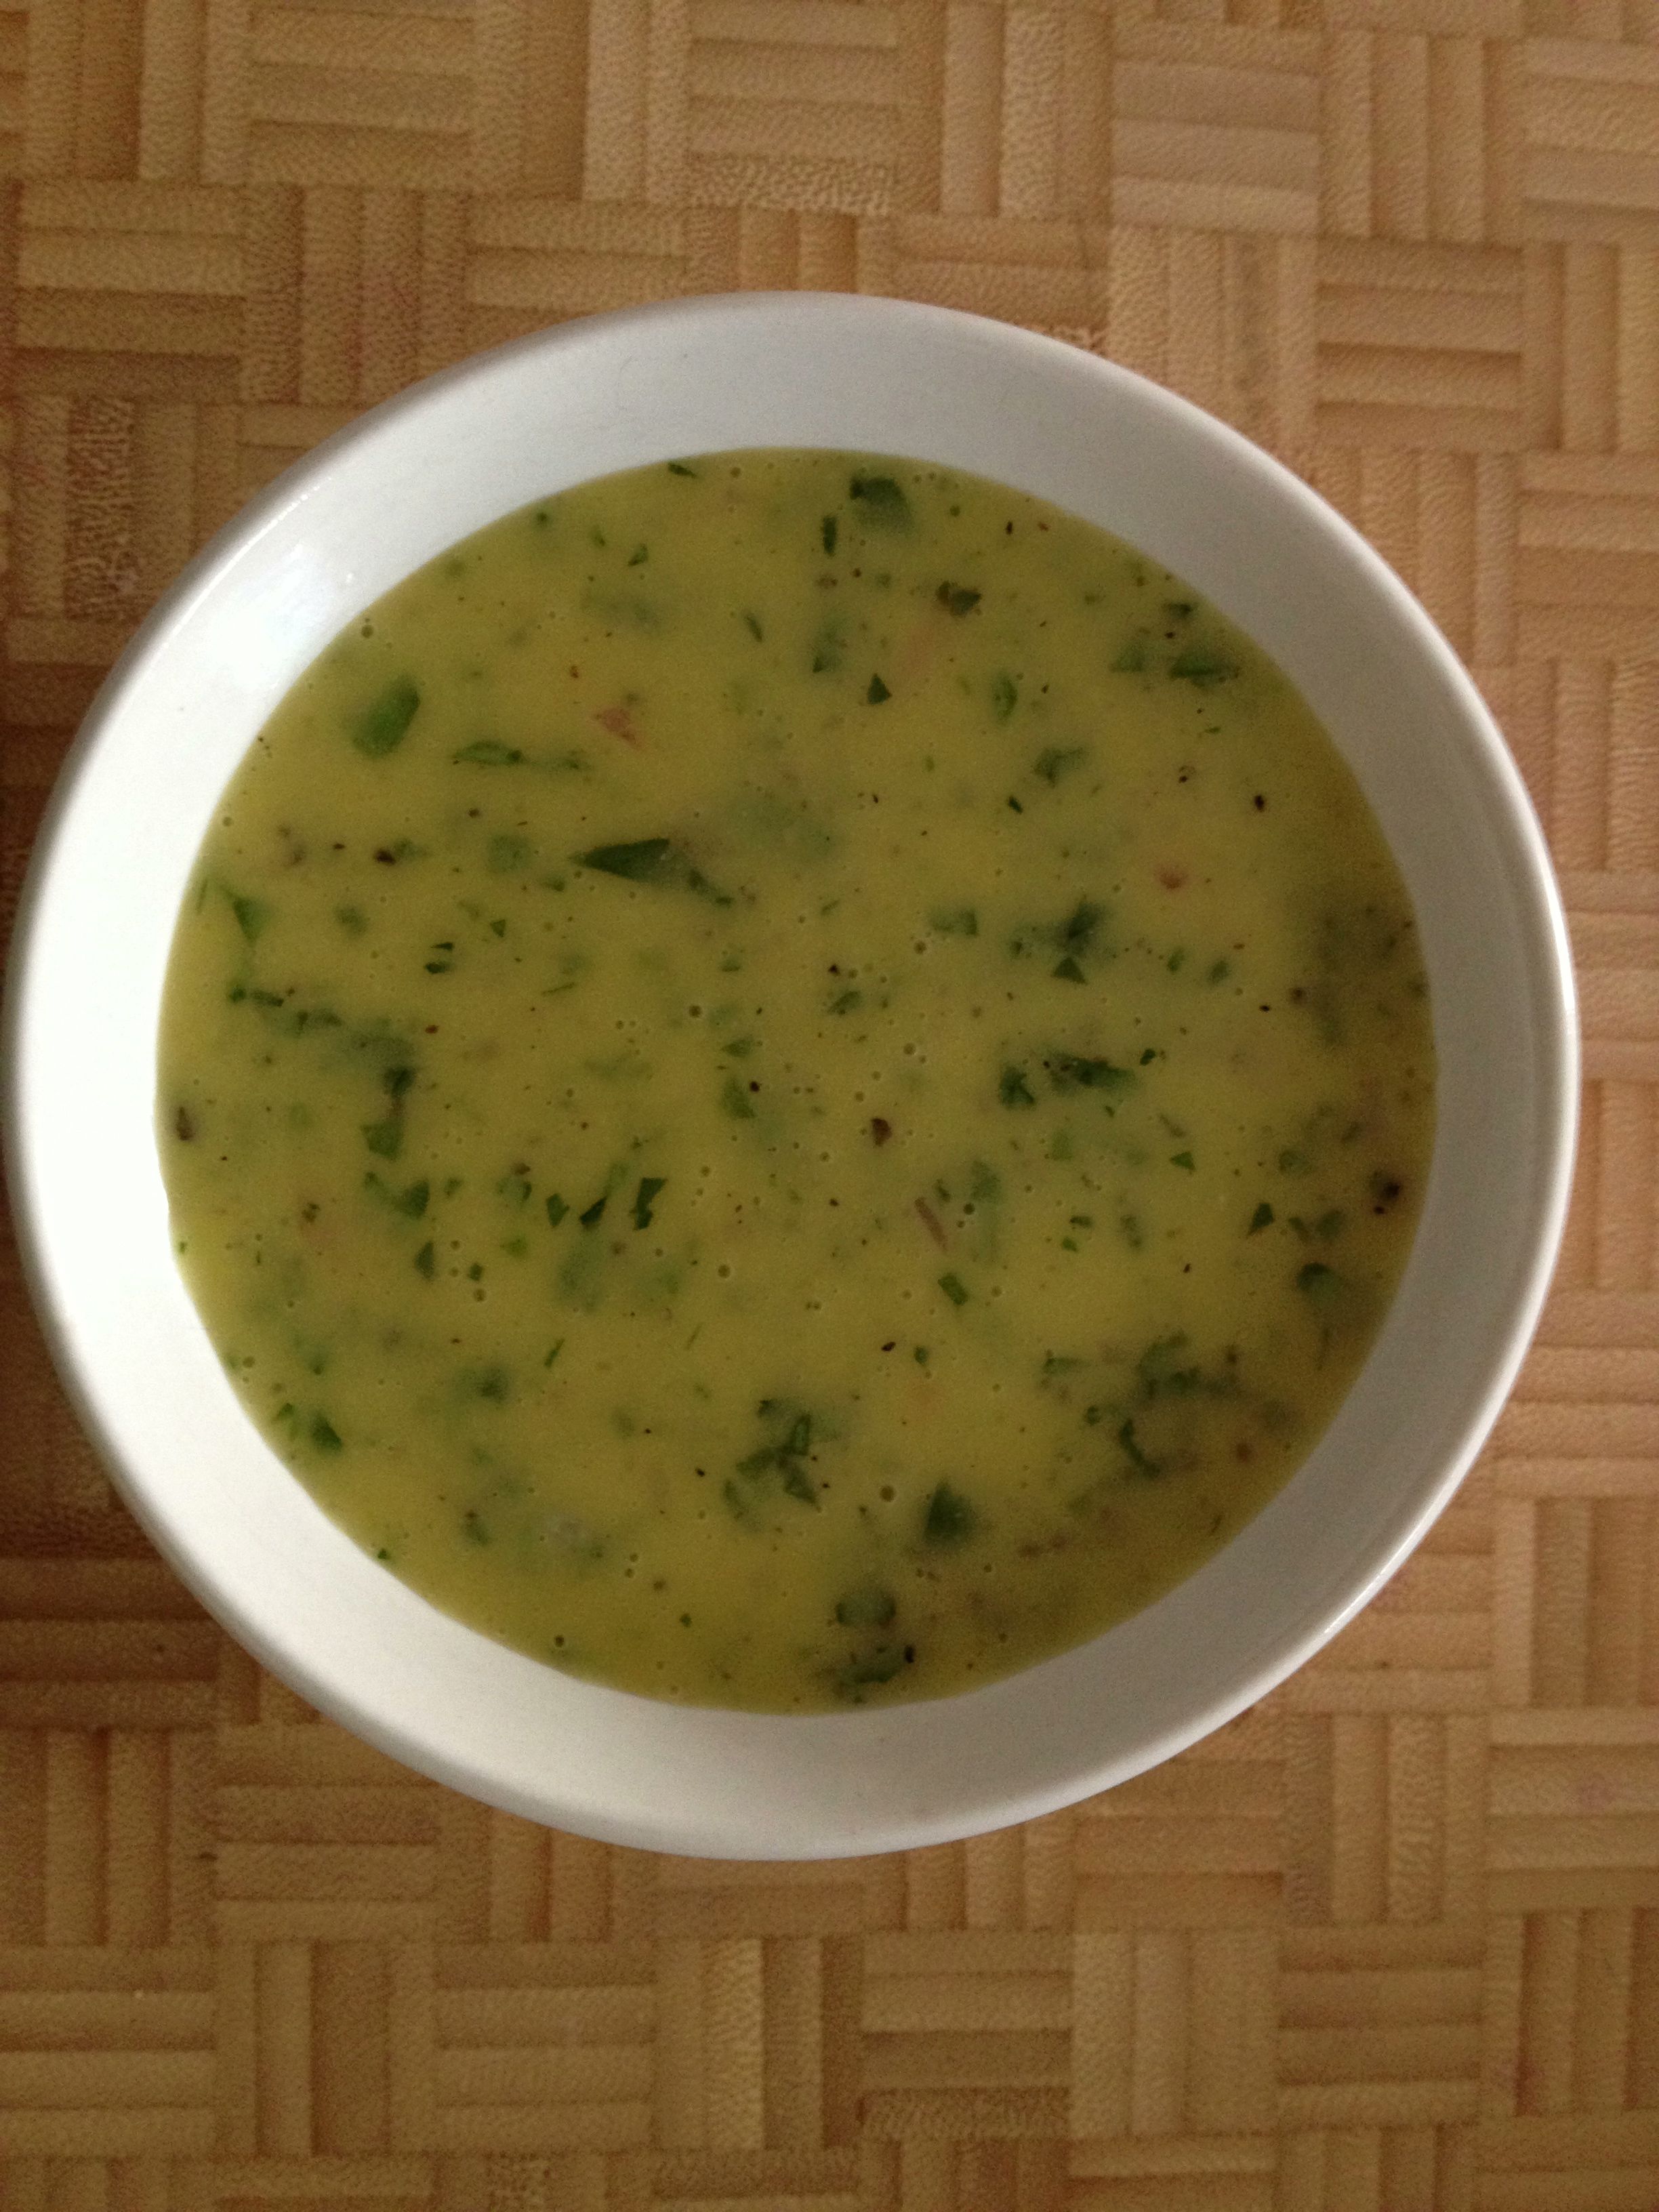
The salad is simple—wheat berries, white beans (I used chickpeas I had on hand), scallions, celery and tomato with a vinaigrette. The vinaigrette is what I regret here. Following the recipe as I did, the ratio of vinaigrette to salad ingredients was way too much. It was more of a thick soup than a salad because it was so heavily dressed. I had to fill out the salad somehow.

A little too overdressed for my liking.
Reconstructive salad making ensued. Wheat berries went from 1 cup to about 1 3/4 cup (all of what I had just cooked). I had no more chick peas, and no more lentils, which are my usual go-to filler for salads like this. Bulgar would have been too fine of a texture to add into the salad. In the end I cooked up a batch of black beans and added to the soupy salad until it was soupy no more. I must have added close to 2 cups, no kidding.
Wheat Berry and Bean Salad (adapted from Bob’s Red Mill) 
Salad:
1 cup cooked wheat berries
1 cup chick peas
2 cups black beans (or some sort of bean or lentil)
1/2 cup scallions, chopped
1/2 cup celery, diced (makes for a nice crunch)
1/2 cup cherry tomatoes, quartered
Vinaigrette:1/2 cup olive oil
2 tbs. lemon juice (about 1/2 lemon)
2 tbs. white wine vinegar
2 tbs. chopped parsley
1 tbs. honey mustard
2 tbs. minced shallot
1/4 tsp. kosher salt
1/4. tsp. black pepper (or 5-6 grinds from a pepper mill)
1. Mix the vinaigrette ingredients together. I chose to emulsify with an immersion blender. I then added the vinaigrette to the bottom of a large bowl.
wheat berry salad vinaigrette
2. Add the salad ingredients to the vinaigrette and combine. If it looks overdressed to you, add something to it! Soggy salad is not something you should put up with, really and truly.
3. The recipe says to chill overnight to blend the flavors. Perhaps over that period the beans and berries are supposed to soak up some of the vinaigrette? I didn’t want to leave it to chance. Serving suggestion is to serve on a bed of leaf lettuce. Again, I didn’t want my greens to be soaked, so the additional beans were necessary.
Eat and enjoy—and let me know what you think about the amount of vinaigrette here, please! Too much? Not enough? Just right in a Mamma Bear sort of way? Comments are not just appreciated—they’re anxiously awaited!
Wheat Berries for Breakfast
January 15, 2013 § 3 Comments
Wheat berries. Never heard of them? Neither had I, until I came across them as an ingredient in a course-grained whole wheat bread recipe (more on that bread another day). And now, they’re a special breakfast treat.

Wheat berries with raisins, slivered almonds and apple cider.
How did they go from bread to breakfast? When I spotted them in the Amy’s Bread cookbook recipe I read up a bit on this whole grain. According to Wikipedia, “wheat berry” is just another term for the whole wheat kernel. Silly me, I thought they looked familiar. As a farm kid, I had wheat kernels end up in pant cuffs, socks and occasionally other locations on my person after a day on the wheat combine. If milled instead of left whole, the wheat berries become wheat flour. And as we know, grains left whole are good for you because none of the nutrients are processed out of the grain. Keeping it whole leaves all that good-for-you protein, fiber and iron (and I’m sure other good things) right in that wheat berry for your health and flavor enjoyment.
The whole wheat berry as an ingredient in bread gives the bread some chewy texture—something to bite into other than just the bread. They’re also a bit sweet and nutty in flavor—a great thing when used not just in breads, but also when added to salad greens or made into a grain-based dish.
My course-grained bread recipe called for just a 1/2 cup of cooked wheat berries with a half-cup of the reserved cooking liquid. Wanting to have some extra on hand, I added one cup of uncooked berries to about 2.5-3 cups boiling water, then let it simmer, mostly covered, for about 50 minutes. The result was about 2 cups of plump wheat berries and surprisingly just enough liquid.
The berries that didn’t make it into the bread made it into my breakfast bowl. Taking a cue from my typical steel-cut oats preparation, these berries received some raisins (highly recommend the jumbo raisin mix from Trader Joe’s) and slivered almonds. And to plump up the raisins while warming in the microwave, I added enough apple cider to come nearly to the surface of the wheat berries. Soul-satisfyingly delicious. And it filled my belly. I even slurped from last juices from the bowl.
I would love to try wheat berries in a savory application and have seen a recipe or two pairing them with mushrooms. If you have any recommendations—either savory or sweet—please leave me a comment below.
And now that I know my family has a barn full of these wheat berries at home, I think I’ll bring home a great big bag of them next time I visit.
Savory Steel-Cut Oats
March 5, 2012 § 7 Comments
I’m a fan of Steel-Cut Oats. We’ve established that before. I relegated the Quaker Oats man to just a few cookie recipes. Never shall a rolled oat appear in my breakfast bowl.
A quick recap of my steel-cut oatmeal recipe has me throwing in a handful of raisins when the oats are just about done and letting them plump up with steam. In the bowl they recipe a sprinkling of slivered almonds and a sometimes-generous pour of maple syrup. Five out of seven days that’s what I’m eating for breakfast. The other two days? I’ve skipped breakfast altogether.
Thanks to Jody and Ken over at The Garum Factory, I now have a new side of steel-cut oats to explore: the savory side. Their last post shined the light on how versatile steel-cut oats can be once you move beyond the sweet expectations. Exhibit A: Their Steel-Cut Oats with Eggs, Preserved Lemon and Olives.
For my first time exploring of the savory side, I tread a simpler path. I topped my Steel-Cut Oats with a poached egg, black pepper and parsley. Yeah, delicious. Really delicious.

Steel-cut oats with poached egg
I poached the egg separately, but a friend had a super suggestion: As the steel-cut oats are finishing—let’s say for the last three minutes—make a divot in the oats and crack the egg right into that puddle. Cover, and the egg “poaches” right in them there oats. And you only have to dirty one pot, she said.
Oh, to be as smart as she.
Have you explored steel-cut oats’ savory side? What yumminess have you found there? Do tell! Share your savory suggestion—I so want to give it a try.
Salad from a City Garden
July 29, 2011 § Leave a comment
Remember yesterday?
Remember that haul of produce I brought home from my city community garden plot? All of it—the lettuce, the chard, the beets, the tomatoes and whatever else I gathered—is washed/bagged/roasted/drying/sitting in a hydrator.
Are you interested in how I saved the lettuce/chard/etc? There’s a way to do it. I can tell you about that later if you want …
But for now, let me tell you about my lunch. 
-Lettuce from the garden.
-A half of a beet from the garden, roasted.
-Cherry tomatoes from the garden.
-A half of a zucchini from the garden, roasted.
–Greek Salad Dressing, made with oregano from the garden.
-Boiled eggs, from our backyard hens (Oh, please. Who do I think I am? Jayme Jenkins?).
–Pickled red onions, pickled myself!
-Green lentils and bulgur – okay, I didn’t grow them but at least I boiled them myself.
-A slice of bread I made using my wild yeast sourdough starter.
I’m full. I need a nap.
Biga-Based Pizza Dough
June 1, 2011 § 5 Comments
Pizza is one of our fallback meals in the Dainty domicile. And it’s not delivery; not even DiGiorno. It’s made with good ol’ homemade, hand-thrown dough. With a special addition. Let’s call it Dainty Dough.
There are two things that make the Dainty Dough a bit different. First, it’s made with biga, one of many types of dough starters. It’s a yeast-based starter, not a natural sourdough starter—meaning it contains commercial yeast and not yeast found naturally in the environment (have I lost you yet? Hang on for a minute.). The biga ferments—i.e. sits on your counter bubbling away—for 8 to 24 hours or so, all the while developing a richer, chewier flavor. Pizza crust with flavor, not just used as a platform for toppings, imagine that.
The second thing I do is add a dollop or two of my Sourdough Starter, aka Milo the Baby Dough, during the dough-making process. A few months back you may recall I was experimenting with natural yeast and tried creating a real sourdough. Well, after a month or so, Milo is alive and well. I feel like I created a golem, it’s so incredibly cool. It’s totally not necessary to add this sourdough starter, but I’ll explain in a minute why I do it.
Dainty Dough: Step 1
Biga Recipe (from my Basic Baking class at the Cambridge School of Culinary Arts)
- 1/4 oz. yeast
- 1/4 cup warm water (warm=dip in a finger and it should feel the same temp as your body)
- pinch of sugar
- 1 1/2 cups warm water
- 3 3/4 cups flour (I suggest all-purpose flour here. If you want wheat dough you can add wheat flour later)
-Add yeast and 1/4 cup warm water with sugar in a bowl and stir together. Let it sit for 10 minutes. Add remaining water and the flour and mix thoroughly. You’ll end up with a creamy mixture. Cover and either let sit on the counter 8 hours or place in the fridge for 24 hours. It will become creamy and bubbly. The biga will remain
-At this point you can proceed with the next step and make the pizza dough. Or, I suggest weighing out your biga into 4 oz. pieces, reserving one piece for your current pizza and placing the remaining into individual freezer baggies and popping them in the freezer. Label and date your baggies! Otherwise a year from now you’ll excavate your freezer and wonder what the heck that thing is. From this one batch of biga you will get up to 8 4 oz. pieces. And each 4 oz. biga gives you four pizza stone-sized pizzas. Do the math—that’s a lot of pizza!
Dainty Dough: Step 2
Pizza Dough Recipe
- 4 oz. biga
- 1/4 tsp. salt (kosher preferred)
- 2 Tbs. olive oil
- A dollop or two of Milo the Baby Dough sourdough starter (optional)
- 4 1/2 cup flour (for wheat dough use 2 1/2 cups all-purpose and 2 cups whole wheat)
- 1 1/2 cup water
-Add biga, salt, oil, sourdough starter and flour to the bowl of a stand mixer fitted with a dough hook. Turn on slow speed, let it mix together for up to a minute then add water slowly. Because I’ve added a bit of the sourdough starter, there is more moisture in the dough and depending on your weather conditions, you may not need all of that water. Yes, baking depends on weather conditions, believe it or not.
-If you’ve added all the water and the dough seems wet and watery, add a tablespoon of all-purpose flour and let it mix in. Keep adding flour one tablespoon at a time until the dough is no longer wet but not bone dry! You’ll likely need no more than four or five tablespoons of flour.
-Keep mixing on medium speed for about five minutes. The dough has a tendency to ride up the dough hook. Stop the mixer when the dough makes it above the hook’s collar and push the dough back down into the bowl. Keep mixing until the dough feels smooth and it’s started to relax a bit; i.e., it shouldn’t feel like a hard tight wad of flour.
-Oil a medium bowl. Roll the dough around in the oil so it’s slightly oily all over. Cover with plastic wrap and let it sit for an hour. The dough won’t have risen all that much—it’s not rising like bread, we just want it to become elastic.
-Cut the dough into four equally sized pieces—they’ll likely have a triangular shape. Want an oddly shaped pizza? Then place these dough pieces as they are on a baking sheet or on the counter and cover with oiled plastic wrap. Want a perfectly round pizza? Then do this: Holding the dough piece in your hands, pull all the dough from around the piece into a central point. Go around the outside a couple times pulling it all into the center. Now, do your best to pinch that central point closed, then place the dough with that point facing downward. What you will have is a little ball with a perfectly round top, no seams showing anywhere except on the bottom. Cover these with oiled plastic wrap and let sit for about 20 minutes.
So, about adding that dollop or two of sourdough starter to the dough … here’s why I did it. I did, in fact, excavate my freezer recently and found two baggies of 13 month-old biga. Doing a little research I found that the recommended time for biga in the freezer is a max of four months. Oops. I added the sourdough starter as a way to give the dough a kick of fresh yeast. I think it worked. Plus, I noticed the crust did have telltale sourdough bread-like air bubbles. Tasty!
Hmm … turns out I have absolutely no photos of any of this. Bummer. Guess I’ll have to make some biga and dough later today.
By the way, biga can be used for more than just pizza dough. So instead of making 4 oz. balls of biga for the freezer, you can use what you have left for bread baking.
Wait, what? Am I leaving you without actually making a pizza? You bet. That’s for another day, when Jennifer can chime in on her favorite toppings. I make the dough, but she’s the pizza master.
Lentil-Bulgur Salad ala Moosewood
March 22, 2011 § 4 Comments
Bulgar? Bulgur? Bulghur? However you spell it, society at large has been hiding this absolutely spectacular whole-grain from me. If you are to believe movies such as The Adjustment Bureau, the men behind the curtains controlling my life have seen to it that bulgur shall never be placed in front of me. Ever. Never had it. Never saw it. Was never even tempted.
That is, until one Sunday morning a few months ago. I was tidying up the house with Food Network on in the background and Ba-Da-Boom Nigella Lawson made a bulgur dish to accompany a Moroccan meal. And if Nigella likes it, well … I gotta give this stuff a try.
Forget for a moment it’s a whole grain and nutritious and etc. It tastes good! It’s got a great consistency! And it plays well with others. In today’s recipe—and yesterday’s, too, actually—bulgur plays really well with lentils. So well, it’s like they are playing doctor, if you know what I mean.
This recipe is from the Moosewood Cookbook. I’ve eaten at the Moosewood, by the way, back in the mid 90s. And it’s true what they say—terrific food, the service coulda been better (they didn’t place my order. At. All. And that was just one of many examples). But, seriously good food. And if you can chop, you can make this stuff.
I made this for the first time Sunday. And my first reaction after tasting was, “ARE YOU KIDDING ME?? I just made this from that stuff??” I’m not kidding you, this stuff is taste on a plate.
A coupla notes: 1) Omit the feta and it’ll be vegan. 2) Serve at room temp – it has better flavor. 3) Stuff it in pita … yum. 4) I didn’t add the olives. I don’t think I had any and I forgot in general. 5) It’s a perfect protein. Oh yeah.
Lentil-Bulgur Salad

Lentil-Bulgur Salad
- 1 cup dry lentils (use green!)
- 2 cups water
Put lentils in small saucepan. Add water (and a pinch of salt). Bring to just boiling. Turn heat to low and simmer, partially covered, for 20-25 minutes until tender but not mushy. Drain well and place in a large bowl.
- 1 cup dry bulgur wheat
- 1 cup boiling water
Place bulgur in a small bowl. Boil a cup of water (microwave is fine) then add it to the bulgur. Give it a swirl. Cover the bowl with a plate. Let it sit for at least 15 minutes. That’s it.
Now comes choppin’ time. Add all of this to the lentils:
- 1/4 cup olive oil
- 1/4 cup lemon juice (I used juice of one lemon)
- 2 medium cloves garlic, crushed
- 1 tsp salt
- 1/2 tsp oregano
- 2 tbsp freshly minced (or 2 tsp dried) mint (do not skip this!)
- 2-3 tbsp freshly minced (or 2-3 tsp dried) dill
- fresh black pepper to taste
- 1/4 cup freshly minced parsley (I broke off a hunk of my frozen parsley)
- 1/3 cup minced red onion
- 1 small bell pepper
- 1/2 stalk celery, minced
- 1/2 cup crumbled feta
- 1/2 cup nicoise olives (oops, forgot those)
Stir those around and add the bulgur, too. Now add:
- 1 medium tomato, diced
- 1/2 cup chopped toasted walnuts
Fold that around. Give it a taste.
Right? I TOLD you. That’s flavor that’ll make your Greek grandmother weep.
