
Homemade Pita Bread
April 25, 2013 § Leave a comment
I had a horrible experience, an embarrassing experience, a humility-inducing experience with homemade bread about 20 years ago. It was a “loaf” of rye bread that more accurately could be called an anvil. It defied some law of physics in how something so small could become so dense.
I swore off baking yeast breads for … oh, I’d say 15 years. And then, I let the embarrassment go. I’m a different person, I said. I can make different bread. I can make bread and be successful at it.
I’ve made a bunch of different bread overs the last five years or so. Various takes on wheat, white, whole grain, pizza, focaccia, sourdough—made with my very own sourdough starter! And it’s all turned out pretty tasty, too. I admit I need to work on my loaf shaping, but that will come with practice.
There’s one recipe for which I don’t need to shape up my boule-making skills, and that’s for pita bread. It’s flat and round, slightly puffy in the middle. I thought I could handle that pretty well. And it turns out it’s as easy as it seems. Why everyone everywhere isn’t making pita bread everyday, I have no idea. Get after it, people.
Pita Bread, adapted from The Moosewood Cookbook
1 cup wrist-temp water (about 95-100F)
1.5 tsp. active dry yeast
1 tbs. sugar or honey (I used raw sugar)
1 tsp. salt
3 to 3.5 cups flour (1 cup can be whole wheat)
a bit of oil
extra flour
1. Combine yeast and water in the bowl of a stand mixer and let it get foamy over the next 5 minutes.
2. Add sugar/honey and salt and stir until dissolved.
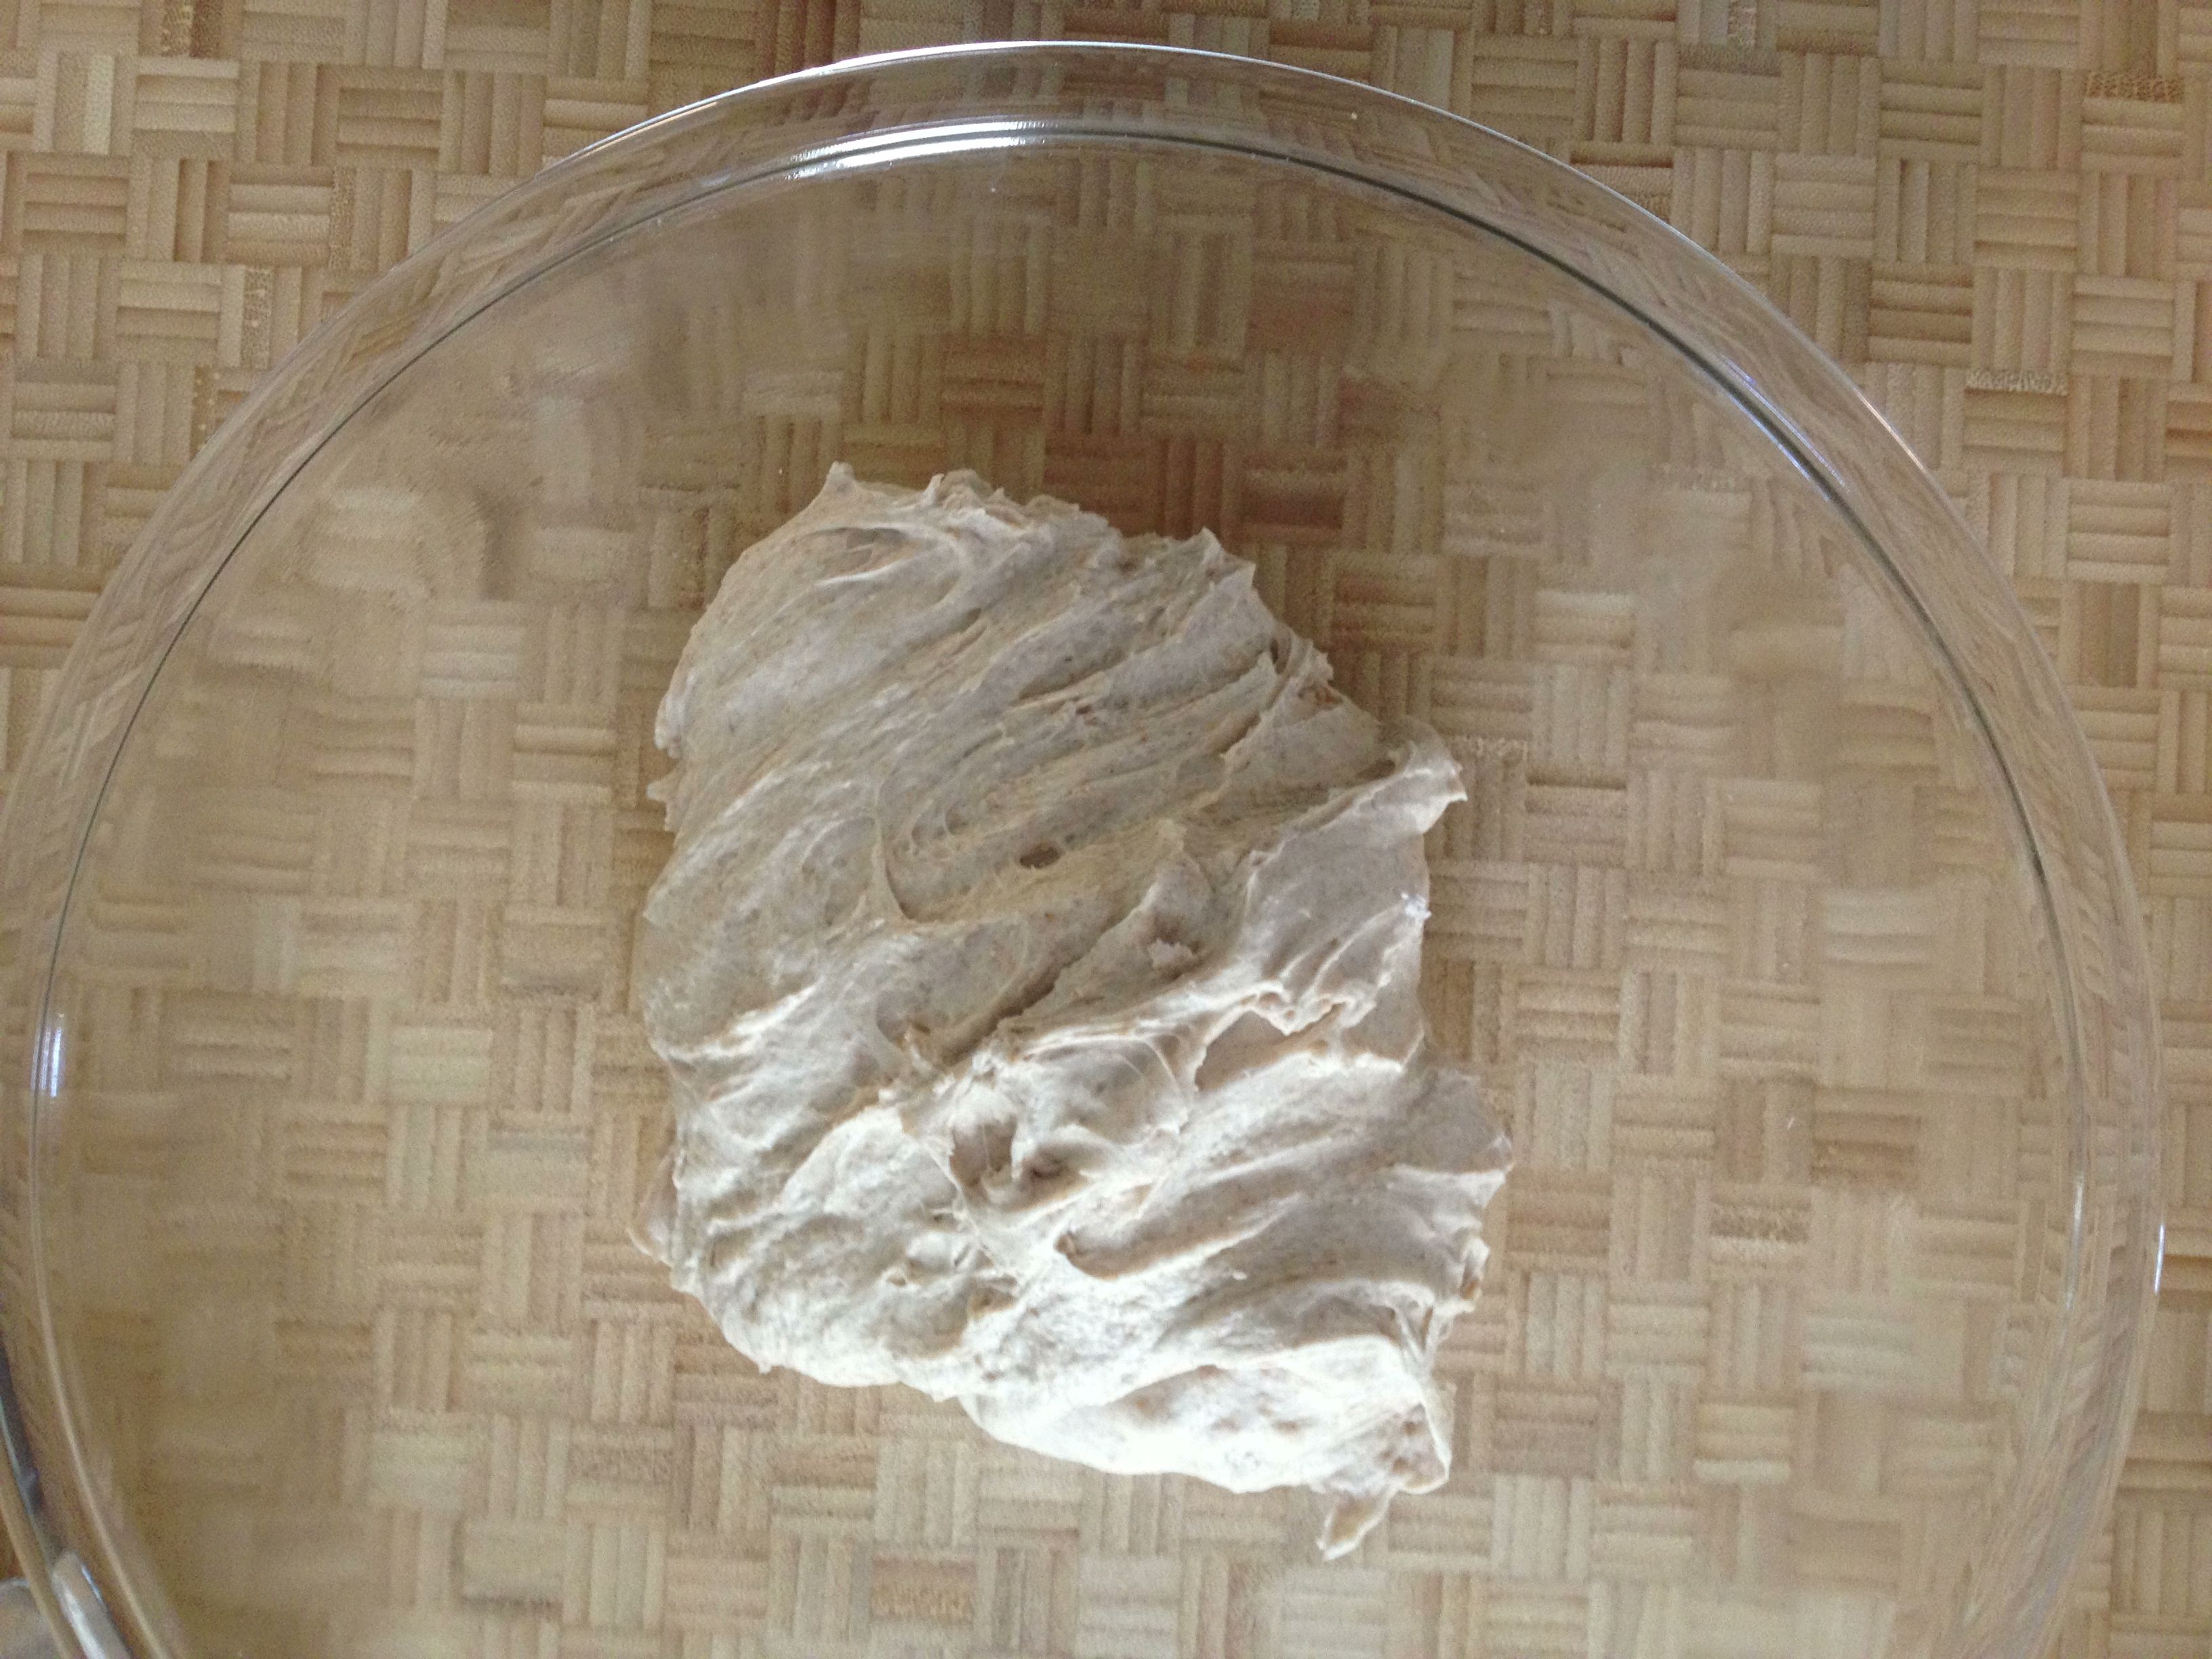
3. Put bowl onto mixer with a dough hook attachment, add one cup of flour and start to combine on low speed. Slowly add in two more cups of flour and continue to let the dough need in the bowl over the next 3-5 minutes. If it seems wettish, add in a sprinkling of flour as it mixes. You’re looking for a smooth dough.
4. Put dough in an oiled bowl and roll it around in there until the dough surface is oiled, too. Cover with a clean tea towel or plastic wrap, set in a warmish place (75F is good) for about an hour or until the dough has doubled in bulk. It could take up to 1.5 hrs.
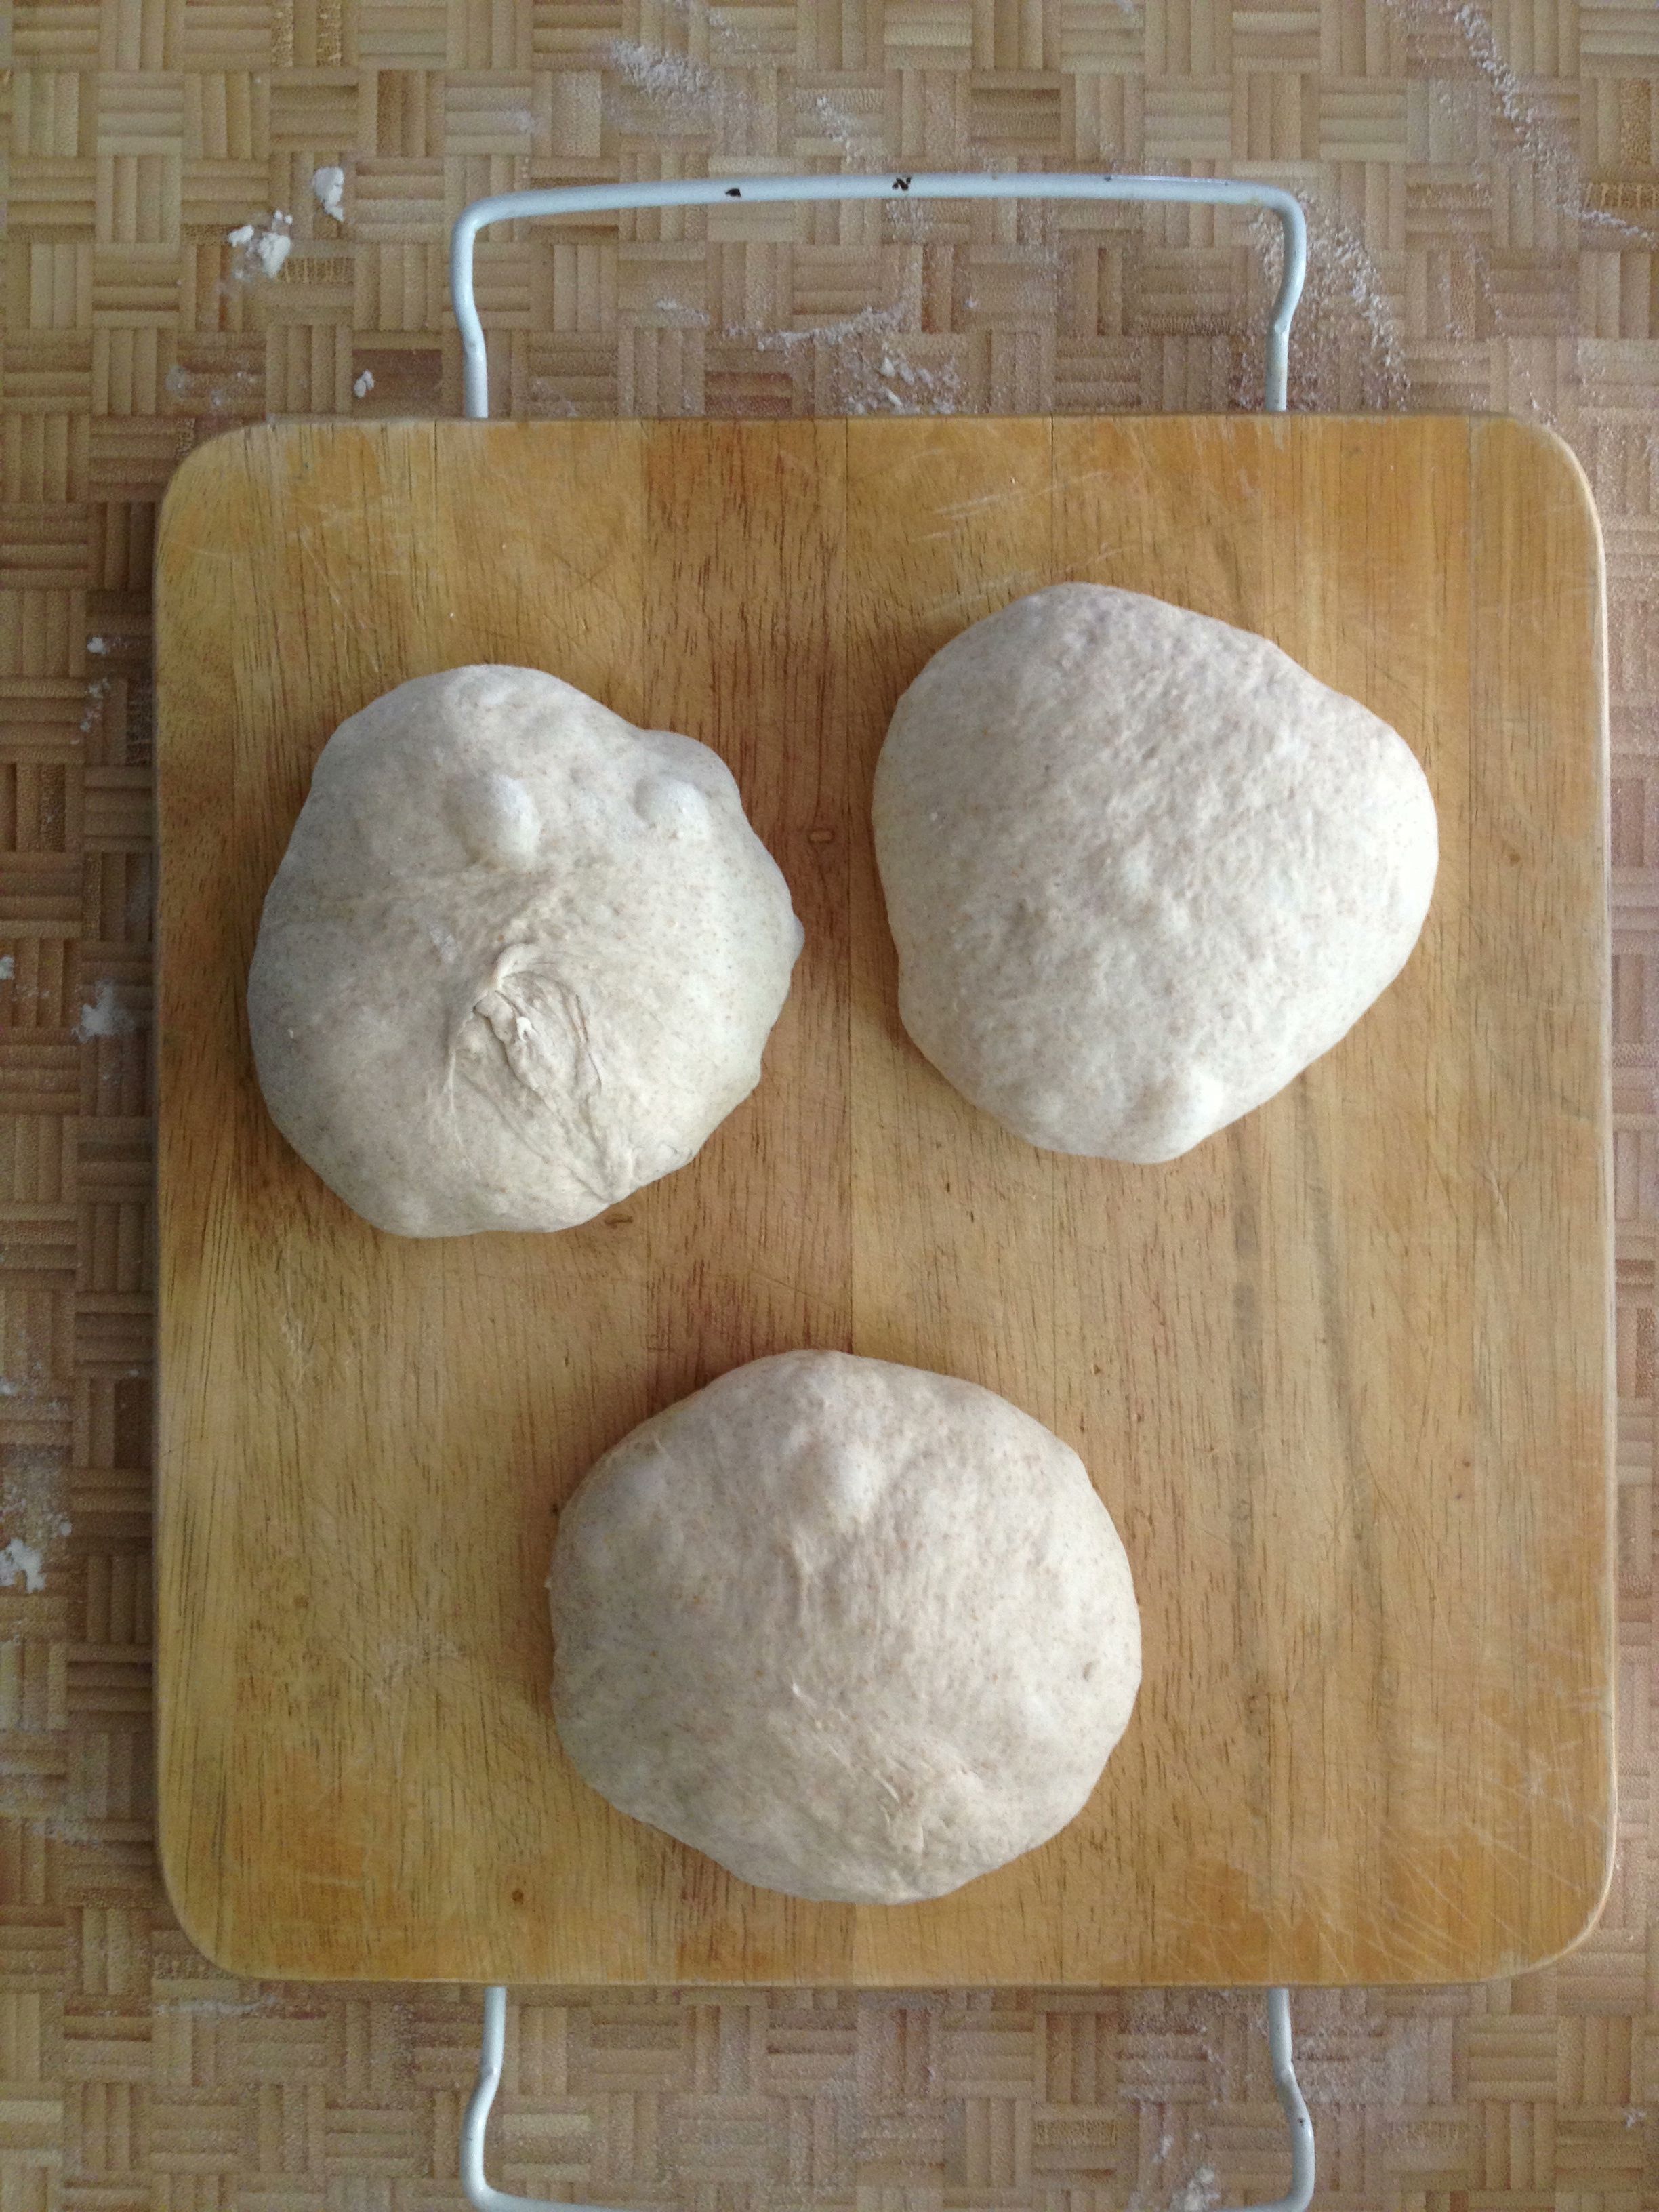
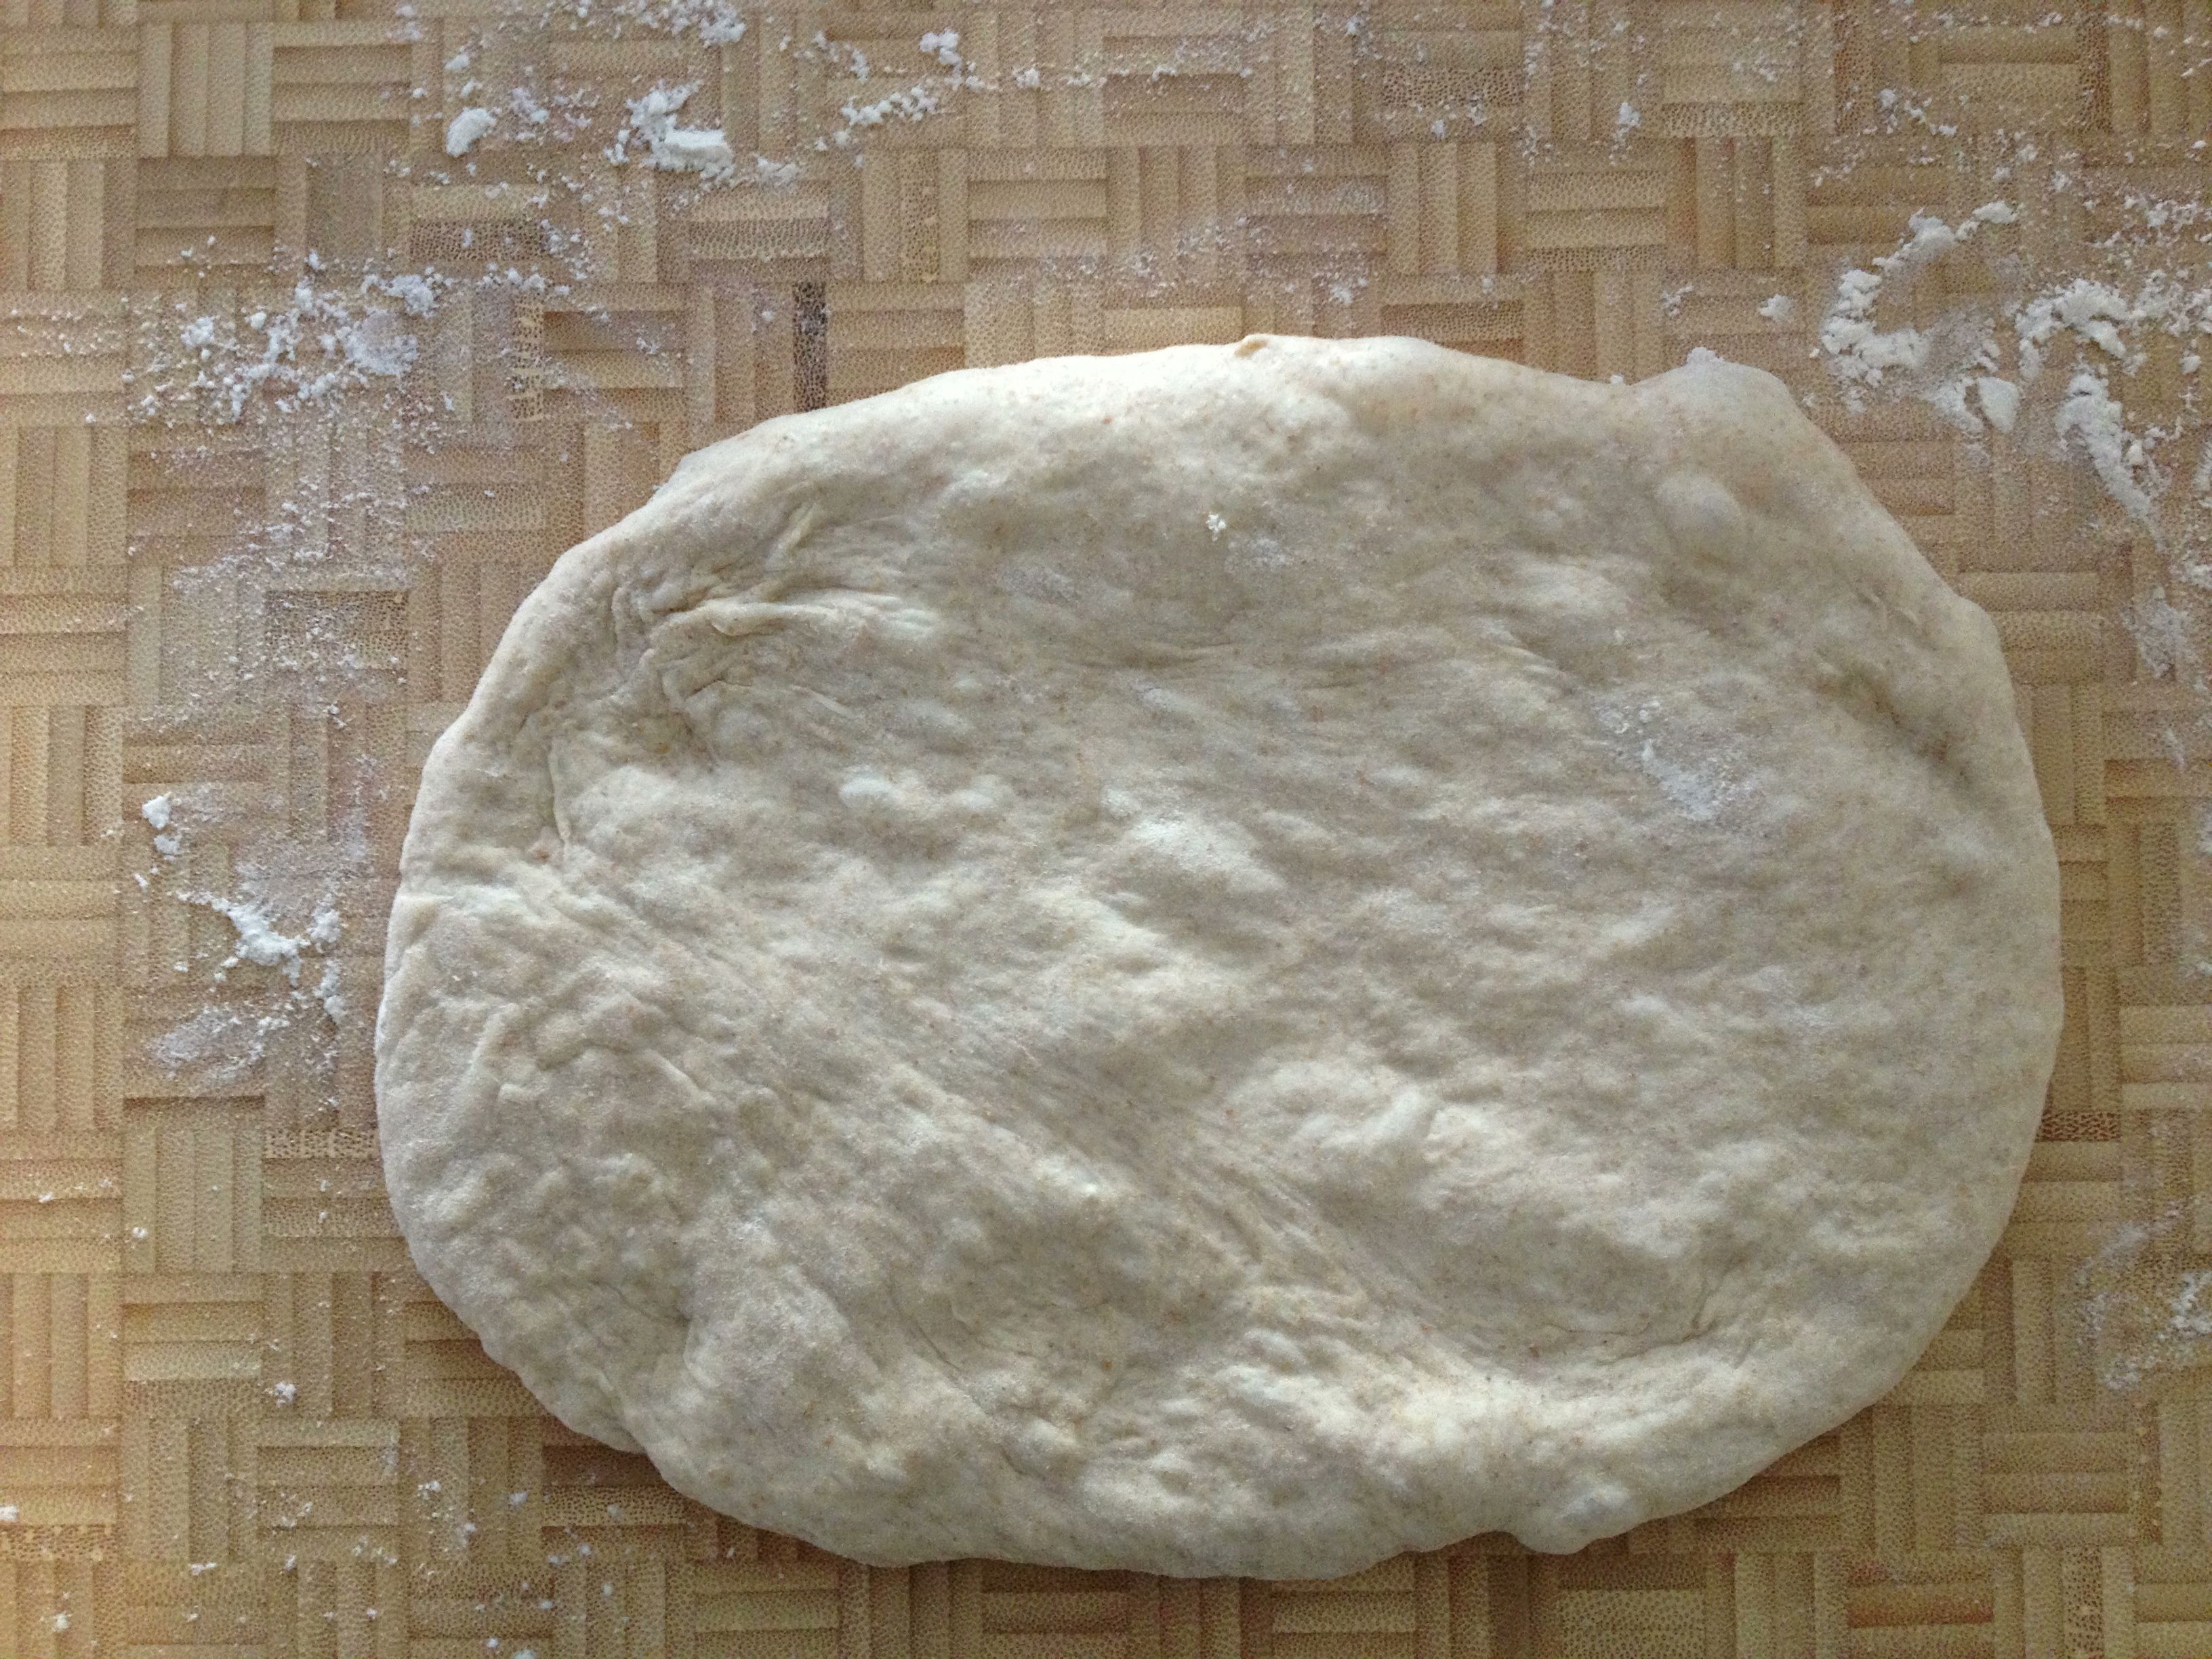
5. Punch down dough and set it onto a clean and floured surface. Kneed it by hand for 5 minutes. Cut the dough into equal-sized pieces, anywhere from 6 to 12 segments. I made 8 because it was simple, and the pitas turned out just the size I wanted. . Knead each little dough ball for a minute or so (I turned each 30 times and figured that was about right). With a rolling pin, roll out each dough piece into a VERY THIN circle (or near circle, it doesn’t matter exactly). You WILL need to throw down extra flour. DO make sure the dough is no more than 1/8 inch thick—otherwise you end up with a pizza crust, no kidding. Let the dough circles rest for 30 minutes. After I rolled out each circle I placed it on a half sheet-sized piece of parchment, four per sheet overlapping slightly. It’s ok, don’t worry.

NOTE: This circle-making process takes some time. By the time you are done rolling out the whole batch, the first circles have already been resting about 15 minutes. So at this point set the timer for 15 minutes, get your oven ready and start moving toward the next step.
6. Preheat oven to 500F. OR, if you have a silly oven like mine that will not go above 450F (Ggrrrrr…), set it to 450F and work with it. Place a sheet pan in the oven to warm up a bit then brush it with oil or cornmeal to prevent the dough from sticking. OR, place the dough circles on parchment and slide them onto the baking sheet, fitting as many dough circles in the oven as you can without them touching. Due to the craziness of my oven I am able to fit just two dough circles, which were placed on the parchment.
7. Let the circles bake for 6-8 minutes or until the circles puff up and are lightly browned and, more importantly, look like pita! At 450F, 8 minutes was the perfect amount of time. As soon as one batch is done, remove from the oven and wrap the pitas in a clean but damp tea towel and place them in a brown paper bag. Close the bag for 15 minutes. This keeps them soft(ish) for a day or so. After a day I would transfer them to a plastic bag.

As an experiment, roll out one dough circle a little thicker than 1/8 inch and bake. Whereas the thinner circles puff up like you’ve filled them with helium, you’ll notice the thicker circle doesn’t puff up much at all—if at all. It’s ends up more like a pizza crust. Which tells me why not have this same recipe handy for when you want to make pizza?

Give pita a try and let me know what you think!
Whole Wheat Baguette
February 28, 2013 § 2 Comments
If we run out of crackers, I make Crackers. If we run out of hummus, I make Jennifer make Red Pepper Hummus. And if we run out of bread, I make bread. It’s just what we do. We make things. Bread included.
Bread is work. There’s the mixing and the kneading and the proofing and the punching and the second proofing and the loaf shaping. It’s up-to-your-elbows-in-dough kinda work—the type of work that gives you strong-as-oxen forearms.
Until a rather vigorous episode of dough kneading a few years ago set off some rather painful carpal tunnel symptoms, I kneaded all dough by hand. Then by necessity I had my Kitchen-Aid mixer and its dough attachment take over. And now, thanks to Mark Bittman, I’m letting the food processor do all that work.
It’s odd—almost sacrilegious—to think that a machine with a sharp spinning blade can make a soft and smooth clump of dough rather than a bowlful of shredded sticky flour. But it does. And while I was once skeptical and hesitant to come under the no-knead tent, I have entered, heard the word, and am now a food-pro convert. Halleluiah.
Mark Bittman, the New York Times‘ food guy, included the following recipe in the Feb. 3 NYT Sunday Magazine. It’s actually what he calls “not quite whole grain,” and I agree, but there is enough wheat flour in there to give it that nice flavor and chew. What I really like about this is the hands-off nature of the recipe. The first step takes no more than 3 minutes, then you’re free for the next 3 hours while the dough rises. The most work comes during the baguette shaping process. And quite honestly, if you want to learn how to shape a baguette, search for it on YouTube.
In all, you’ll have lovely baguettes in a little over 4 hours—and with very little effort. Throw some flour in your hair to make it look like hard work.

dry ingredients in bowl of food processor

dough comes together in food processor after about a minute
dough turned out into lightly oiled bowl, ready to rise

dough rises about this much after 3 hours
after turning the risen dough out onto a lightly floured surface, cut into three segments and roll into a tight ball
form the dough ball into the best rectangle you can get

fold the bottom side up toward the center

then fold the top down to create something that looks like an envelope

fold length of dough down about a third and press the seam to seal – and repeat.

set formed loaves into stiff canvas to help them keep their shape while they rise another 30 minutes.

fresh out of the oven! okay, so they are odd shaped. embrace the odd.
Whole Wheat Baguette (from Mark Bittman, New York Times Sunday Magazine, Feb. 10, ’13)
100 g. whole wheat flour
400 g. all-purpose flour + some
10 g. kosher salt
6 g. instant yeast
water
1. Combine dry ingredients in a food processor. Turn machine on and while it’s whirring, add about 1.5 cups of water slowly over a 30-sec. period. Keep machine running for another 45 sec. or so. Dough will be held together nicely and tacky, not wet. Turn dough into a large bowl (I lightly oil mine just in case), cover with plastic wrap, and let it rise. It should take 2-3 hours. I let it go for the whole 3 hours and it’s risen quite nicely.
2. Turn the dough out onto a minimally floured surface, pat lightly, and cut into 3 equal pieces. Recipe says to form into a log, but I form into small round boules. Cover with a tea towel (or plastic wrap) and let it sit for 20 minutes.
3. Now shape each dough round into a baguette. I am SO not the expert at this but … This is how I do it:
-pat dough into a rectangle, kinda the size of a small 8.5×5 notebook. The following will work best if the corners are as square as possible (yes, getting dough to be exactly square is impossible but give it your best try).
-Position the long side down. Fold the bottom end up about a 1/3 of the way, and then fold the top end down over it so it looks like an envelope. Take the heel of your hand or your thumb and press and seal that seam together. Lightly flatten the dough.
-Next, fold the top down about a 1/3 of the way and seal the seam again. Lightly flatten. Repeat this process another two to three times.
-Starting from the center of the dough, place your hands over the top of the dough and slowly and lightly roll the dough up and down, pressing outward to lengthen it. Don’t go all that far. The longer it is, the thinner it is. And … that’s it.
4. Once the baguette is formed, put the baguettes into something like a baguette pan. Or, use a lightly floured swatch of canvas (or a heavy tea towel) and shape the canvas around the long sides of each baguette. You want the canvas to cradle the dough and help keep the dough’s shape. Let the dough rise for about 30 minutes.
5. Meanwhile, get your oven heated to at least 450F (Bittman’s recipe says 465F, but my oven only goes to 450F). A few minutes before the dough is ready to go in the oven, open the oven door and spray some water around the side walls and close it back up. Just before putting the loaves in, put them on a piece of parchment on a sheet pan and slash the tops with quick movements of a very sharp knife. Slide it in the oven, give the loaves a quick squirt with was water and close the door. Repeat the squirting with water about a minute later. Keep them in the oven for about 25-30 minutes, or until the loaf sounds hollow when you thump the bottom of it with your thumb. Cool on a wire rack.
Now, why are we spraying with water? To create a bit of moisture in the oven and around the loaves. This moisture helps to create that light and crisp exterior on the loaf. It works, so give it a go.
You likely have your own favorite bread recipe. Let me know what it is in the comments below.
Tomato and Pesto Sandwich
September 27, 2011 § 2 Comments
Leaves falling from trees, temperatures dropping, plants succumbing to the elements, days shortening … The world as we’ve known it these last few months is coming to an end. We must eat as many fresh tomatoes and as much basil as possible.

Our world is collapsing. Eat tomatoes and basil while you can.
I’ve taken up that challenge, gladly. Who wouldn’t? Fresh tomatoes and bright bristly green basil is the ultimate garden combination, really perking up the mouth with the pairing of acid and mellowness. I don’t have to describe it—you know all too well how delectable the two are together.
Maybe one of the simplest pairings of tomato and basil is in a sandwich. I know, it’s not really a recipe. It’s more of a lunch suggestion. And if you’re like me and disregard the miniscule amount of Parmesan cheese in pesto, tomato and pesto on toasted sourdough becomes a vegan meal. The tomatoes—homegrown. The pesto—homemade, with the added “yeehaa!” of the basil being homegrown. The sourdough—made by my own two little hands.
Want to share lunch with me? There’s enough here for at least five more sandwiches.

Kinda looks like a big smiley face, don't it?
Your favorite tomato—basil combination? Do tell. (please! feel free to share below!)

Nothing but goodnes here.
Five Random Thoughts
May 4, 2011 § 3 Comments
Sigh.
A recent visit to the family homestead has wiped me out. Psychologically, that is. Physically, too, as the trip was mainly to help my parents with some of their spring gardening. But my parents, especially my Mom, are difficult and heavy on the soul. It takes a few days to rebound.
So, while I’m rebounding, I think I’ll share a few random thoughts with y’all.
1. I had the good fortune this week to go to both Symphony Hall (my first time, can you believe it?) and Fenway Park. Both buildings are about 100 years old. Has anyone noticed how much wider the seats are at Symphony Hall? I mean, substantially wider. You need a shoe horn to squeeze most Sox fans into the old grandstand seats. And the reasoning has always been, “Oh, people were smaller back then.” Then why the ample room for the music lovers?
2. Speaking of Fenway, I had a Fenway Martini last night. As good as ever. We introduced the guy next to us to the fabled drink. He got to the end of it, ate a peanut, shell and all as is the custom, then complained that the shells were too crunchy. Here’s the thing: He drank his beer too fast. The shells need to soak a bit. Drink slower, dude.
3. I’ve been making rye salt starter and liquid levain to make a tangy sourdough. The recipes are from the Amy’s Bread book. It kills me when it says to let the starter rise at room temperature – 75F-80F – for X number of hours. 75F-80F? Come on now, that’s not room temp – that’s a bakery’s room temp.
4. I haven’t been doing much gardening yet this spring. My mother’s gardening, yes. A garden project I’m working on for a local human services agency, yes, putting a lot of brain power into that one. But our own garden, not so much. I’ve planted a bunch of seeds, indoors and out. Some are up, some aren’t. Nothing seems to be growing in my “carrot bed” and I can’t figure out why. I hope my luck turns around.
5. Who are you, Tracey Hawkins? You took the time to hunt down my professional email address and write, “Are you the Ellen of the Dainty Dot? Kind regards, Tracey Hawkins.” And then nothing. Did you have a question? Can I help you with something? I’ve come up with lots of scenarios of who you are and why you wanted to contact me. You are a hipster and you love my recipe for trout. You’re a scout for Martha and want Dainty to be a regular on the show. You’re a book agent and think I have a compelling style and are going to offer me a contract. You’re an attorney and want to sue me for … I dunno, something. You rep a line of cookware and want to offer me some products to test. You, Tracey, are many people. Let me know which one I’m addressing.
That’s it, my five random thoughts. Please feel free to share your random thoughts, too. Especially you, Tracey.
Bread Cracking in the Oven—Solved!
March 14, 2011 § Leave a comment
Last summer I discovered the joys of bread baking. I guess you’d call it my hobby now. And I say hobby because … well, unlike putting a Pop Tart in the toaster and waiting for the ding, there are levels of complexity at every step. There’s practice and skill and problem-solving and continual learning from mistakes. Described that way, it seems more like a sport. And, considering I currently have three different sourdough ferments tucked snuggly in the warm and draft-free microwave, perhaps I’m also a collector.
Yesterday, I had one of those “Aha!” learning experiences. I made a batch of Country Sourdough from the Amy’s Bread cookbook. It was my first time making this recipe and considering my firm levain wasn’t so firm and I substituted in my sourdough starter, I wasn’t so sure the recipe would work properly.
I made the dough, let it autolyze, formed it into a ball, let it rise, punched it down, let it rise again, separated into two doughs, formed boules and let them rise again – seam side down – in floured baskets. The dough looked and felt great. So far, so good.
Now, in Amy’s instructions, typically once you get to this point in the recipe it’s almost as if they copied and pasted the remainder of the instructions for each and every recipe. At least for the handful of recipes I’ve tackled so far. BUT, this time she had a slightly different twist in the instructions. She said to tip the boule out of the basket onto the prepared parchment paper so the seam was now on top. Hmmm … I had not encountered that in previous recipes. All others were seam side down. Why would you put the seam up?
I had two boules – I thought, “Let’s try one seam side up, one seam side down, and see what happens. I scored both loaves on top, put them in the oven, and let them go.
Here’s what came out of the oven. Can you guess which one was which?

Seam side up on the left, seam side down on the right.
The one on the right was the seam-side down. Even though I scored the top, the steam escaping the loaf escaped through the seam on the bottom, causing it to tear.
For the boule on the left, the scores through the seam on top let the steam escape. Not having a weak spot—a seam on the bottom—prevented the bottom from bursting.
I tried to seal that seam as tightly as possible, but apparently not enough. This doesn’t happen with all of the breads I’ve made, but I have had this happen before. And now I know why. Problem solved.
Apple Sourdough: Updates
February 11, 2011 § Leave a comment
No, I’m not obsessing over this apple-based sourdough. Not in the least.
But … I did keep an eye on it throughout the day on Tuesday. Good stuff was going on inside that quart container. Liquid pockets continued to build up around the apple chunks. I could see bubbling going on in there – they’d form lines from the base of the pocket going upward. Occasionally some bubbles would burst forth from that area, not unlike some undersea activity where bottom feeders send up the intermittent belch. The surface of the starter was covered with tiny bubbles, too. And, it smelled nicely fermenty. All good signs.
Wednesday, 5:57 a.m.: The layers have separated completely. No bubbles. Flour looks settled. Hmm … this happened to the grape starter, too. So, I move on to the next step, which calls for me to remove the apple chunks and add 36 grams flour. Stir well.
8:06 a.m.: I took a peek—bubbles seem to be appearing again. Bigger bubbles on the surface this time. But fewer. So far. A quick temperature reading says it is 75F. The starter pulls a bit as I bring up the thermometer. Fingers crossed.
Friday, 6:30 a.m. So, I just poured the starter down the drain. Again. Calling it starter is not correct—it was a mass of watery flour, that’s all. No bubbles. No yeasty activity. Nothing.
I don’t understand where I’m going wrong. I look online and I see all sorts of success with wild sourdough starters. Lots of bubbling! Lots of yeasty stuff going on! And me? The starters just … stops.
I will try again! I will. I just won’t blog about it—I’m getting sick of it.
BUT, if anyone out there (is anyone out there? anyone?) has some advice or a wild sourdough recipe or some suggestions of where to look for success, please let me know. Help a girl out, yo.
Obsessing with Sourdough Starter
February 8, 2011 § Leave a comment
There’s a fine line between baker and mad scientist. And I’m walkin’ that line.
I hate to fail. Hate it. And when the sourdough starter recipe from the Amy’s Bread cookbook failed miserably—TWICE—I was a volcano inside. Watch out, sourdough … I’ll get you yet.
The Amy’s Bread sourdough is, as I envision it, the sourdough the pioneers relied upon. They didn’t have a packet of Fleischmann’s Active Dry tucked into their bonnets. They used yeast, baby … real yeast just floating around in the air or found on … things. Like grapes. This is where I stop envisioning – I don’t want to know what else they used as yeast sources.
The Amy’s Bread sourdough used grapes as the yeast source. Organic grapes. Well … Okay. This is where I admit I went wrong with the recipe. I used conventionally grown grapes, not organic. I went to two or three different Whole Foods! Even the HUGE one in Legacy Place – nada! According to one produce manager, organic grapes are sparse this time of year. Conventional grapes didn’t have that yeasty bloom. What else could explain my lack of bubbling?
What to do …
This is where Dainty the Mad Scientist makes her appearance. Jennifer had related to me a scene from one of Anthony Bourdain’s books. Apparently he had a mad scientist of a baker who worked under him at one point. He was a drug-addled guy, but a baking genius. All sorts of funky smells emerged from his underground yeast lab. He had to be using all sorts of … things … to source his yeast. So, in the middle of the Whole Foods produce department I thought, “What would a drug-addled baker use?”
I didn’t go too crazy in my problem solving. I just looked around and picked what I thought would harbor the most yeast. I chose an organic apple. I figured that, while the smooth part of the apple would have been wiped or polished in some way, the indentations on both ends of the apple would have something native still hangin’ out in there. Now that I think about it, I bet an organic fig would be a good bet, too.
I added 113 grams of 75F-78F water, 72 grams all-purpose flour to a quart container. I chopped the apple into about a 16 pieces and added mostly the end sections to the other ingredients. Stirred vigorously. Put the cover on. Heated some water in the microwave to create a warm environment. Put the container inside at around 3pm on Sunday.
Monday: I checked on the dough periodically throughout the day. Small bubbles started to appear around the apple chunks. Pockets of liquid appeared later on. Lines of bubbles and flour appeared through those pockets. I heated the water about three times during the day to maintain a warmish environment. Hmm … could this possibly be working?
Tuesday, 5:57 a.m. 39 hours later, there’s definitely yeast activity in the container. The bubbles are bigger with the mixture. And there’s small bubbles – like someone took a straw and blew bubbles – on the surface. And, it smells like fermenting apples. Good sign! I stick an instant-read thermometer into the mix and it reads 70.7F. Not bad. Plus, when I pull it out, the substance is a bit gooey and pulls up with it. Yay!!
I move on to the next step – my first refreshment. I add 113 grams of 76F water and 72 grams of flour. Stir vigorously. Close container. Stick in a warmed microwave. Cross fingers.

The sourdough with apples begins to bubble.

Liquid pockets and bubbles appear around the chunks of apple
Rye Bread: Do-Over
February 3, 2011 § Leave a comment
Thursday, 6:01 a.m. No signs of life in Baby Dough. Sad. So sad.
What did I do? Where did I go wrong? Tuesday morning Baby was full of life! Thick and gooey! Bubbly and giggly! Now … now it’s just some mass of water-soaked flour in a 1-quart container.
But, there’s no odor of death in there. It doesn’t smell toxic. Baby didn’t turn bad on me. There might not be a breathing and burping going on, but I don’t think there’s any rank, poisonous build-up taking place either.
So, I’m keeping Baby and attempting to do a Frankenstein-like operation here. I’m adding more grapes. Yeast – Baby has no more yeast (a good thing for a real child, but as a dough baby, it’s the stuff of life). Thinking back to Tuesday, Baby started going downhill once I removed the grapes. So, I’m adding them back in. Fingers crossed.
I saw a good idea from a YouTube video yesterday. Henrietta Homemaker put her grapes in cheesecloth for easy removal of the grapes. Brilliant idea. In those little grapes went, cheesecloth and all. It’s like Baby Dough has a diaper now.
So, Baby Dough is back in the microwave, tucked in there with some warm water. I’ll check on him tonight. Perk up, Baby.
Rye Bread: Day 2
February 1, 2011 § 5 Comments
My friend Amanda’s comment on my Rye Bread: Day 1 post was this: “Amazing how you make this sound time consuming and gross… yet totally tasty and motivating!”
Little does she know what this mass of flour, water and punctured grapes has turned in to …
Here’s a brief journal of my sourdough starter experience. Consider it a journal of Baby’s First Days. And oh boy, if real babies are as slimy as this, I’m so glad I don’t have one.
(I skipped the first few hours. Perhaps I had a bout of postpartum depression.)
**
Monday. 11:21 a.m. Sourdough starter roughly 19.5 hours old. Microwave trick and dissipating boiled water have warmed the starter to 74F. The best I’m gonna get at this point.
Monday, 5:12 p.m. 25-ish hours old. Sourdough starter has turned into bubbly goodness! It smells like … grapes. Really. Yeasty. Grapes. Alas, work prevents me from tackling Step 2 at the moment.
Monday, 6:49 p.m. Still bubbly goodness, with a pleasant grapey-yeasty aroma. Added 113 grams room temperature water and 72 grams unbleached all-purpose flour. Stirred. Put back in microwave. Crossed fingers. Needs to bubbey away for another 12 to 24 hours.

Baby Dough at 26 hours
Tuesday, 6:02 a.m. Baby Dough’s big! Must have almost doubled in size overnight. Lots of big bubbles. Hmm… should I move on to the next step?

Baby Dough at about 38 hours. Such a big boy!
Tuesday, 8:27 a.m.: I decided to move on to Step 3 after only 14+ hours. It calls for scooping out the grape remnants and a bit of the starter. It’s snot. It looks like snot. It pulls like snot. It’s baby snot. Of course the grapes all settled on the bottom and I had to scrounge around with an iced tea spoon and pull them up through miles of gooey snot. Good thing was there was a layer of liquid on the bottom through which I could see all the grapes. Finding them all wasn’t so hard through the gooey yeasty snot.

Baby Dough at about 40 hours
Answer me this: Why would anyone EVER think this would be something yummy to add pulverized wheat to and then put in a container to cook over hot coals? That leap of faith from snot to baked goods—if you think about it, that crazy idea created civilization. Goo. Flour. Water. Heat. The wheel. The combustible engine. The Internet.
Added 36 grams flour. Mixed thoroughly. Put back in the microwave. Waiting another 12-24 hours.
Tuesday, 4:24. Baby Dough is 48 hours old – yay! Threw a little party, invite other doughs from the neighborhood. They are so adorable at that age …
Baby Dough’s looking a tad under the weather, a little runny. I snuggled him in the microwave with another cup of boiling water and will check back in later. For now, I’ll let him rest. Perhaps the party was too much.
Croutons Are Always an Option
January 12, 2011 § 3 Comments
They are facts of life: milk goes sour, lettuce wilts, and bread gets stale.
There’s only so much you can do with sour milk and wilted lettuce. Actually, the only thing I can think of is to pitch them. Stale bread, on the other hand, has more options. You can take your stale bread to the park and feed the pigeons, I suppose. You can save up a bunch of it and make a stuffing.
Or, my fave—make croutons. In fact, sometimes I make bread just for the crouton possibilities.
That oh-so-yummy loaf of whole wheat bread I baked up yesterday will get a bit dense in a couple of days, I know that. I could exclusively eat sandwiches or snack on toast spread with peanut butter for the next 48 hours to make sure the cursed touch of Stale never approaches. I also don’t want to spend all my time on the treadmill burning off the extra.
Instead, I’m perfectly fine with letting the bread take its natural course to staleness. Croutons are always an option.
Recipe:
Croutons are super simple. Give cubed bread a little oil, add salt and pepper to taste, and toast. All that does is give your salad or soup a bit of crunch – maybe not so much flavor.
Guy Fieri’s recipe for croutons gives the toasted bread a flavorful kick. It calls for (word for word):
* 1/2 teaspoon salt, plus more for sprinkling
* 1 teaspoon freshly cracked black pepper
* 1/4 teaspoon cayenne
* 1/2 teaspoon paprika
* 2 teaspoons dried parsley
* 1 teaspoon dried basil
* 2 teaspoons garlic paste, (2 cloves garlic smashed with the flat side of a knife and a sprinkle of salt, to make paste)
* 1/3 cup extra-virgin olive oil
* 4 cups cubed stale Italian bread, cut into 3/4-inch cubes
Mixed the oil and herbs together. Add bread and toss, put on baking sheet. Toast at 325F for 20-ish minutes. Toss to expose other sides half way through.
Now, that’s all very fine and good. I riff on this recipe quite a bit. We never seem to have dried basil and parsley – only fresh during the gardening season, or only frozen parsley and pesto at other times. I’ll sub in a generous shake of Italian seasoning if I need to.
Plus, I proportion this down to maybe two cups of stale bread—after all, I’m eating as much of that loaf as possible before it gets stale. Watch the oil amounts—you really don’t need that much.
And, when you’re dealing with smaller amounts of croutons, there’s no reason to heat up an entire oven. Toaster ovens are perfect for this. BUT, since the mini oven heats up so much faster, 20 minutes will get you dark brown nuggets instead of flavorful toasties. DO set the toaster oven to 325F, but DON’T step away from it for too long. After 5 minutes, give ’em a look-see and a quick shake. At 10 minutes, consider taking them out to coast in and cool.
Hmm … I should have a photo. Let me get through this loaf of bread first.
