
Jicama Salad
June 4, 2013 § Leave a comment
My new favorite item to add to a salad is jicama, otherwise known as Mexican potato or yam bean. My fondness of the roundish, beige and nondescript tuber with a potato-pear texture began in an Asian restaurant in California (surprisingly not a Mexican place) about a month ago, when I had it in a jicama-grapefruit salad. And that was pretty much all it was: matchsticked jicama mounded on a plate and dressed with a spicy but light dressing. The grapefruit, ringed around the pile of jicama, was there to cool the heat. Toasted cashews added some crunch.

Jicama salad with apples, grapefruit and toasted cashews
I attempted to recreate my own jicama salad. Online searches gave me oodles of salad dressings that would serve the purpose. But I failed. And I failed because I attempted to recreate what I had experienced previously. I had a pile of poorly julienned jicama, grapefruit that I hadn’t segmented properly, and well, the Cat Cora-inspired dressing was okay. But just okay. And aside from properly preparing the jicama and grapefruit, the success of a jicama salad really pivots on its dressing.
Turns out friends returning from a vacation in Sedona also became infatuated with jicama in salads. They had a delectable jicama salad in one of Sedona’s best restaurants, Elote. Wisely, they bought the restaurant’s cookbook, complete with the recipe for the jicama salad dressing.
We have since used this to dress traditional salad greens to which we’ve added all sorts of things including jicama, orange, grapefruit, apple, cashews, peppers, etc. You could put it on an old shoe and it would taste wonderful. My suggestion is to keep a jar of this in your fridge at the ready for any type of salad (or shoe) you may be serving.
Jicama Salad Dressing (courtesy Elote Cafe Cookbook)
1 cup olive oil
2/3 cup lime juice
1/4 cup Cholula hot sauce
1 tsp kosher salt
1 tsp fresh ground pepper
1 tsp sugar
1. Add all ingredients to a lidded jar and shake vigorously until combined.
2. That’s it! You’re done! Pour it on! As with any salad, use a combination of whatever and however much you’d like: julienne a chunk of jicama, chop up an apple, segment half a grapefruit, add in a 1/2 cup of toasted cashews, through in some thinly sliced red peppers, and toss it all on top of some salad greens. Your salad is served.
NOTE: The brand of hot sauce matters here, or at least makes a difference in taste. Our friends make it with Cholula and the dressing is quite spicy. We have used Frank’s Red Hot (it’s what we have in the fridge) and it results in a less spicy-hot experience. Both are delightful on a salad. In fact, it’s what I’m having for lunch.
Homemade Fig Newtons
April 2, 2013 § 2 Comments
My mother is a sucker for cookies of any kind. And I, being her offspring, somehow inherited that trait. She would bake cookies, yes. But wasn’t it more exciting to experiment with the cookie treasures found on store shelves? Oh, what those Keebler Evles did to us. Chocolate-covered anything went directly into our shopping cart. Those chocolate-covered marshmallow puffs on a graham cracker-like cookie were Mom’s favorite. I also had a soft spot for those styrofoam-like wafer cookies with “vanilla creme” sandwiched inside.
But what I really, really liked were fig newtons.
I contend that I never ate that many fig newtons. Not really. Just one box on average a year. Thing is, I would eat an entire sleeve of them at each sitting. Why else would they put them in a sleeve? Ah, logic of childhood. And to have that metabolism again…
A few years ago when I saw that Joanne Chang’s Flour cookbook had a recipe for fig newtons, I was surprisingly conflicted. I love fig newtons—so wouldn’t gourmet fig newtons be the bomb? But … do I want the ability to create something so cravingly delicious? I mean, I’m not a calorie counter but these could be dangerous.
It took me three years to work up the nerve, but I finally made Flour’s fig newtons this weekend. Homemade fig jam in a shortbread cookie. Yes, they are cravingly delicious. Yes, it requires self control to not eat the entire batch. They’re also nothing like the original fig newton. It’s more of a pastry, really…like a slice of fig pie with a shortbread crust. This is dessert worthy of far more than a sleeve. This is a dessert of adult sophistication.
Homemade Fig Newtons (from Joanne Chang’s Flour Cookbook) 
Fig Jam Filling
2+ pints ripe black mission figs, stems removed and figs quartered (2 is too little, 3 makes slightly too much)
1 orange, peeled, seeded and finely chopped (try to remove the white pith and membrane, too)
110 grams light brown sugar
1 tbs finely grated lemon zest (about 1 lemon)
1 tsp vanilla extract
Shortbread Dough
1 cup (2 sticks/228 grams) unsalted butter at room temp
75 grams granulated sugar
2 tbs confectioners’ sugar
1 egg yolk
1 tsp vanilla extract
140 grams all-purpose flour
120 grams cake flour
1/2 tsp baking powder
1/4 tsp kosher salt
1. Make the filling: Place quartered figs into a medium-sized, non-reactive saucepan. Add orange, brown sugar, lemon zest and salt. Heat on medium to simmer. Reduce to medium-low and simmer, uncovered for 40 minutes. Stir occasionally to prevent sticking. The mixture will turn into something reminiscent of jam. Remove from heat and add the vanilla. Let cool completely and set aside for 2 hours. (You can also refrigerate for up to three days in an airtight container.)
2. Start to make the dough: Using a KitchenAid mixer with a paddle attachment, cream together the butter and both sugars on medium speed until mixture is fluffy. This takes about 5 minutes with stoppages now and then to scrape sides of bowls and the paddle. Once that is fluffy, add in egg yolk and vanilla on medium (stopping and scraping) for another 2 or 3 minutes.
3. Separately combine the two flours, baking powder and salt in a small bowl and sift or mix it together well (I added all into a sieve to sift). Add these dry ingredients into the wet ingredients with the mixer on low, and let it combine for another 15 seconds or so. Do the stop-and-scrape thing again.
4. Cut a large piece of plastic wrap and scoop out the dough onto it. Wrap it up well and press the dough into a 6-in. disk about an inch thick. Pop it in the fridge for at least 30 minutes. At this point you can store it for up to 5 days or freeze it. If in the fridge for a long while, let it come to room temp for about 30 minutes before working it. If in the freezer, let it thaw out in fridge overnight.
5. Heat oven to 350F. While that is heating up, upwrap the dough disk and place onto a large piece of parchment paper. Add a bunch of flour to the parchment and onto a rolling pin, then gently roll the dough into a rectangle about 9 in. by 16 in. and about a 1/4-in. thick. Be careful not to pull or push the dough as this dough tears easily. Fix any tears by pressing together with your fingertips. I found it useful to trim the edges straight (saving the extra dough for treats later!).
6. With the long edge of the dough facing you, spoon the jam lengthwise across the center of the dough, left to right. The width of this jam “river” should be about 2.5 inches. You might not be able to fit all of the jam onto the dough. That’s okay—it’s tasty on toast. Once the jam river is down, you’ll grab the left and right edges of the parchment above the jam river and fold it down overtop of the jam. The dough should fold halfway down over the jam. Do the same with the bottom half of the dough, folding it up. Take pains to make sure these two dough halves meet in the middle, not overlapping and not having a gap. Side by side is what you are looking for. Once that happens, pinch those two dough halves together to seal, as well as the ends. Now, flip the jam-filled dough log over so the seam is on the bottom. Be careful! You may need to finagle it with adding another piece of parchment and rolling it over. Use your brain to figure it out.


Use your brain to figure out how to turn this jam-filled log seam-side down without damaging it.
6 optional. At this point you can wrap it up and refrigerate or place in the freezer.
7. Pop it in the oven for 60 minutes or until golden brown all over. The recipe says 65-70 minutes, but it really depends on your oven. My edges were getting awfully dark, so I opted to take it out 5 minutes early. Let it cool on a wire rack for at least 2 hours—I know, it’s a crazy long time but you want the jam to firm up a bit. Once cool, cut into 1-in. pieces crosswise. Enjoy with hot tea or coffee. And realize things are so much better than when you were a kid.
Roasted Eggplant on Toasted Pita
March 26, 2013 § Leave a comment
Ah, an over-stuffed pita sandwich…yum.
Who am I kidding!? When have I ever stuffed a pita and have it NOT break apart on me? Never. Ever. And once it breaks, it’s just all downhill from there. Your fingers get full of hummus. Whatever dressing you’ve put on the sandwich runs down your wrist into your sleeve. It’s no good, stuffing a pita.
Better to use pita like a sandwich bread.
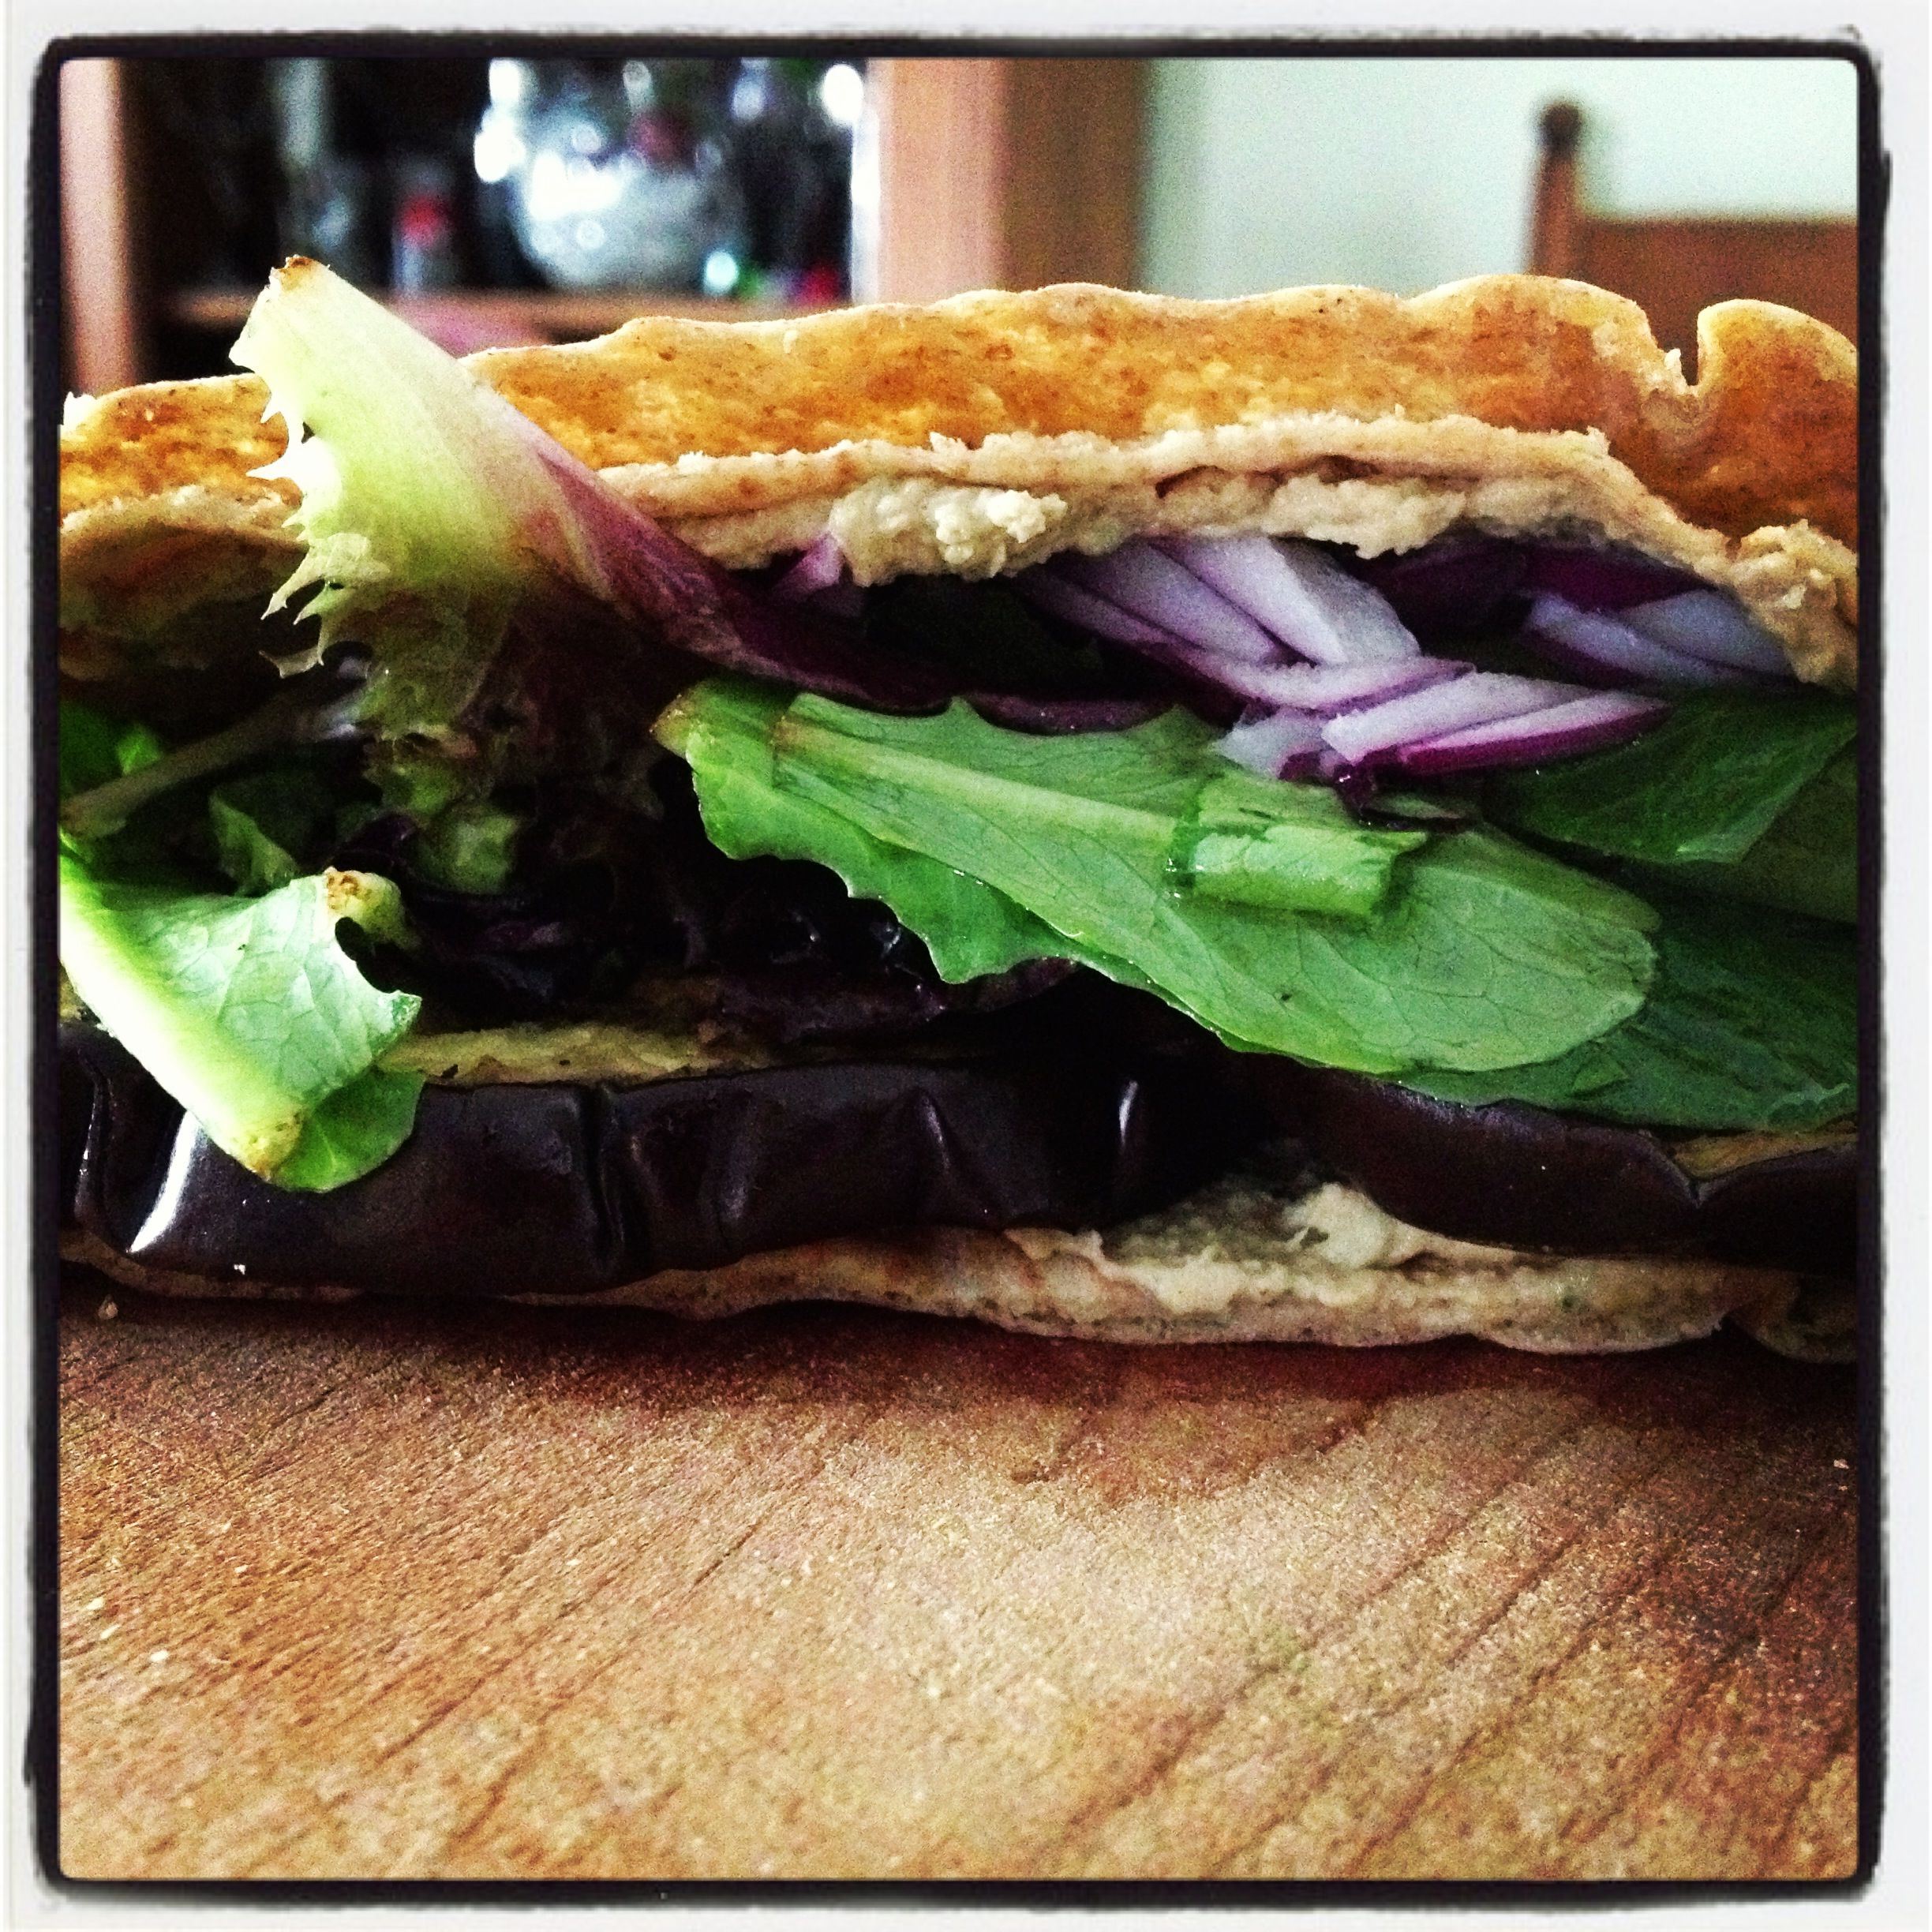
Roasted eggplant and hummus on toasted pita
That’s exactly what I did for lunch yesterday. Toasted pita cut into two half moons, each spread with Red Pepper Hummus, some roasted eggplant, and some greens lightly dressed with Lemony Vinaigrette. After chowing down, I realized the Fiery Onion Relish may have been a fun thing to have as a topping, too.
Maybe I’ll try that for today’s lunch.
Apple Hand Pies
March 15, 2013 § 3 Comments
March 14. Or, 3.14. Known throughout the world as Pi Day in honor of that irrational number beginning with 3.14. But wait – wouldn’t they write it 14.3 in Europe?
I would rather consider it Pie Day. It’s the middle of March—we need a good pie this time of year. I’m all for it, quite honestly. Think about it—have you eaten pie since Thanksgiving? I didn’t think so.
I decided to make pie yesterday for Pie Day. But what kind? My go-to pies are those traditional fruity treats—peach, rhubarb, peach rhubarb (see a theme here?), apple, pumpkin. Nah. What about a cream pie? They get runny after a few days. The problem with any of these pies (if there can be a problem with pie) is that they are so darn big for two people (I know, I could invite you over but…). And as much as I’d like to eat an entire pie, I just can’t do it. At the last piece, all old and soggy, I begin to detest it. We must not go there. Can’t ruin pie like that.
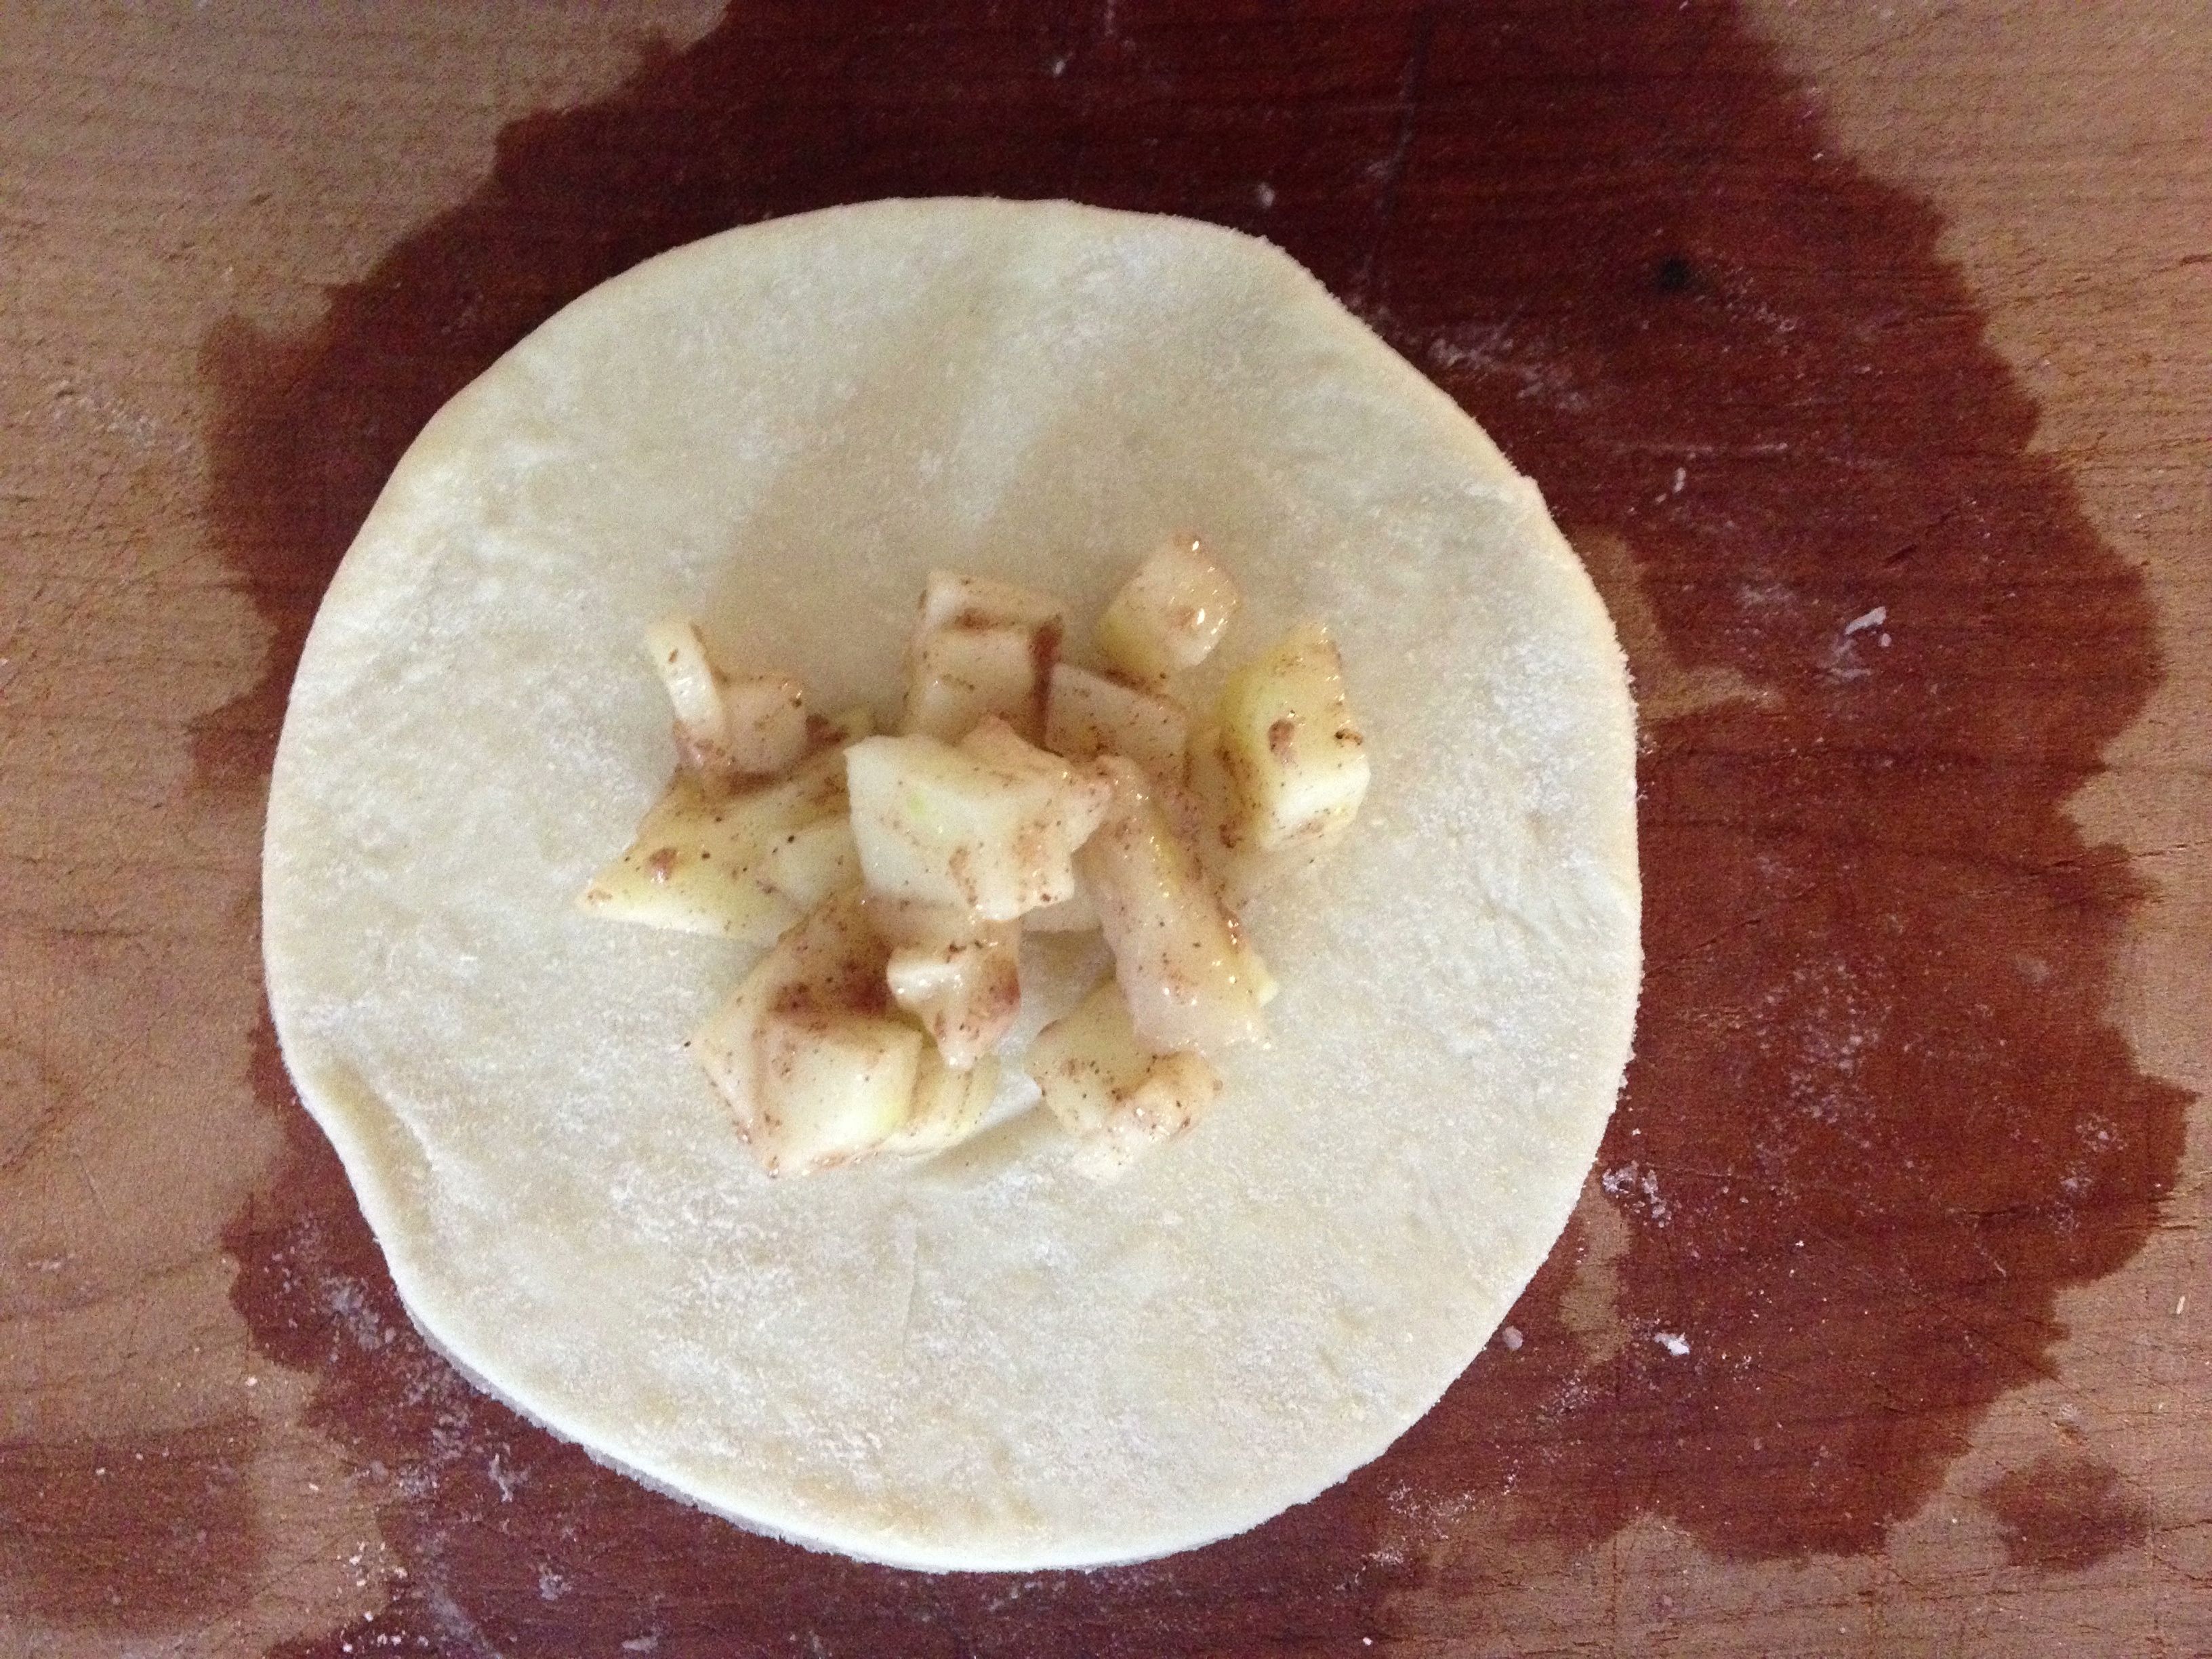
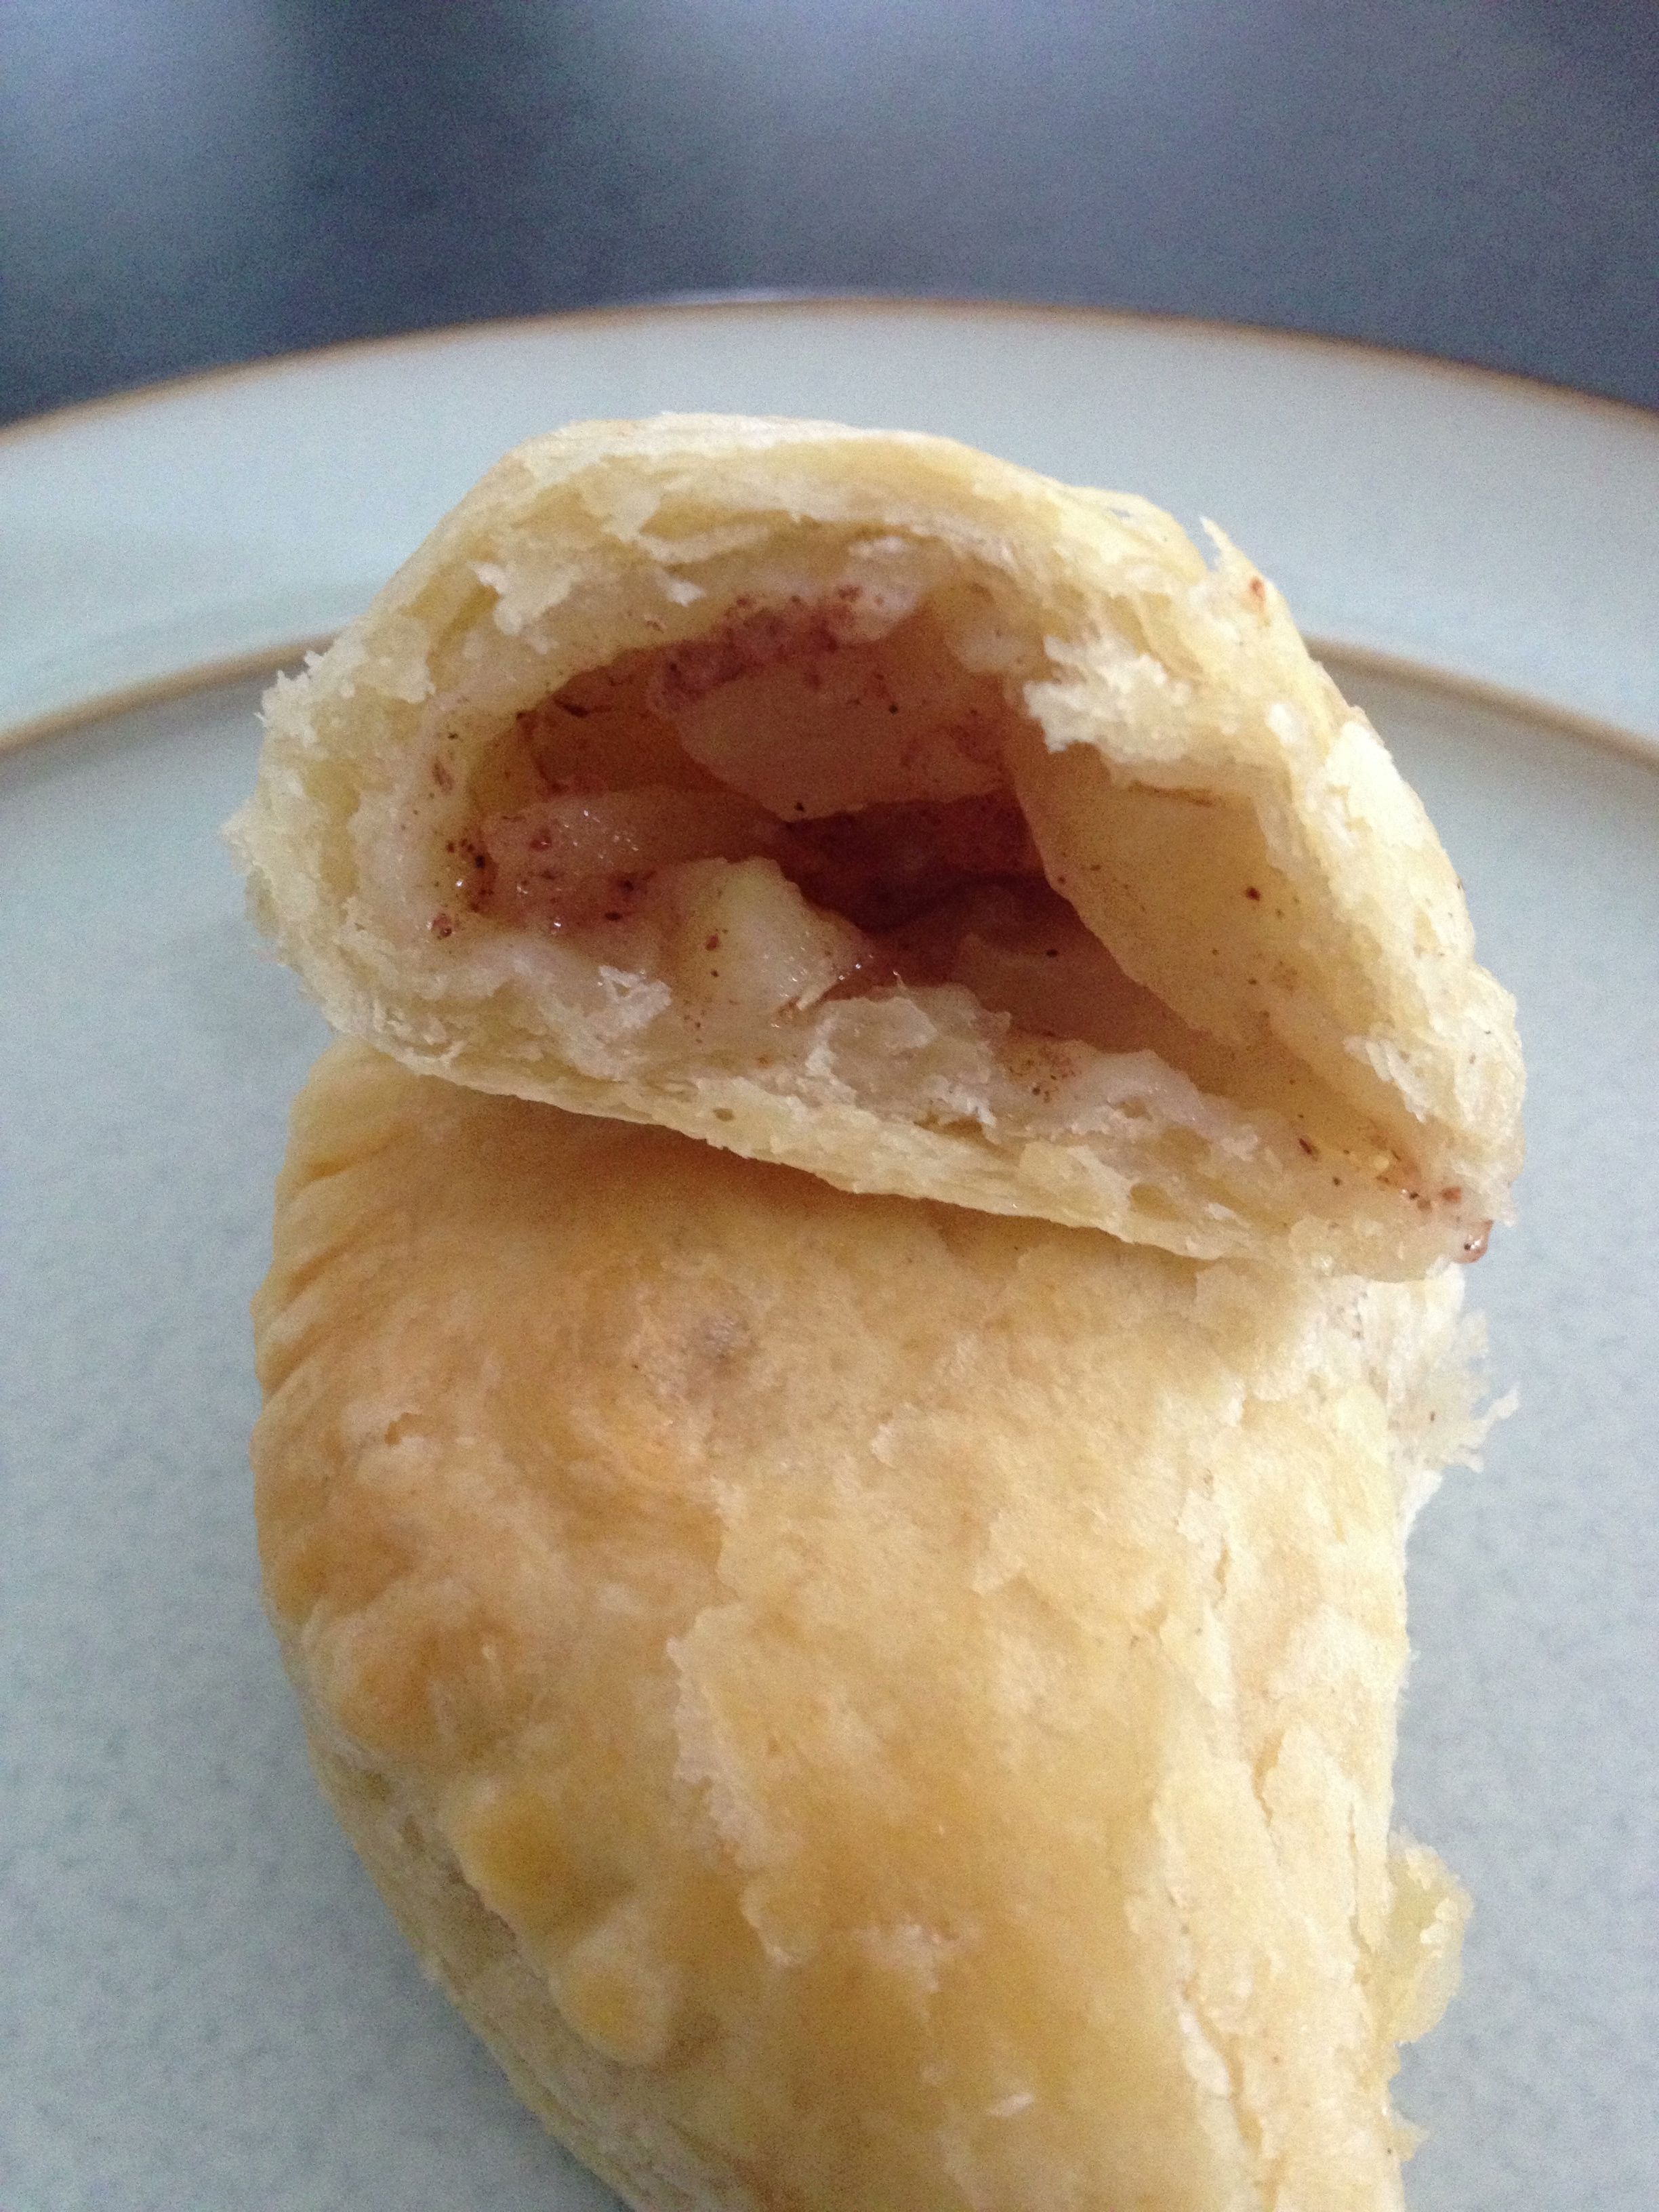
So I decided on hand pies: Pies that fit into your hand. Individual servings of pie, all wrapped up in their individual casings. Perfect! Thing is, I’d never made hand pies before. What to do? What to make?
A little Googling got me to the Smitten Kitchen blog and her recipe for Bourbon Peach Hand Pies. Hmmm…peaches. Peaches and bourbon. And, according to the recipe, this dough holds up to the inevitable leaks that result in boiling hot fruit juicy spilling away, while also being light and flaky. Print it up—I’m in.
Alas, Trader Joe had other dessert intentions for me. Not a fresh peach to be found. So apples it was.
Before I get to the recipe, a few notes about it and the resulting pies:
- I used a food processor. When you have one, use it.
- The dough did exactly what she said it would—it held up well, didn’t leak (much) and is tasty and flaky. I’m definitely keeping it in my repertoire. BUT—it’s not really a pie dough. It’s more of a flaky morning pastry. Which is fine, just not very pie-ey.
- I used the same amount of apples as peaches the recipe called for. WAY TOO MUCH. Below is my estimation of half the recipe.
- The filling I made was tasty but 1) wasn’t juicy enough – maybe more sugar or let it sit longer? and 2) not enough of it in the pie. But that’s all I could fit in the dough rounds while still being able to close them securely. I’ll just need to experiment more, won’t I? One thought is to slice the apples (or peaches) lengthwise and layer the slices in the center of the dough rounds.
Apple Hand Pies (adapted from Smitten Kitchen’s Bourbon-Peach Hand Pies)
For the pastry dough:
2 1/2 cups all-purpose flour placed in bowl of food processor and chilled one hour in freezer
1/2 tsp. salt
2 8 oz. sticks unsalted butter, cut into pieces, placed into small bowl and chilled for 1 hour in freezer
1/2 cup sour cream
4 tsp. fresh lemon juice
1/2 cups ice water
For the filling:1 lb. apples, peeled and finely chopped
2 tbs. flour
2-4 tbs. sugar (the more sugar, the juicier it should be if you let it sit awhile)
pinch of salt
1 tsp. lemon zest
To finish:
Egg wash (One egg yolk beaten with 2 tbs. water)
Sanding sugar
1. Remove bowls from freezer. Add salt to the flour and stir. Place flour bowl onto food processor and add in chilled butter. Using 2- to 3-second pulses, whir up the flour and butter until the mixture looks like course corn meal.
2. Combine sour cream, lemon juice and ice water to a small bowl and whisk until combined. Add to flour-butter mixture one half at a time, whirring in between. You’re looking for large clumps to form. Turn clumps out onto a work surface and bring mixture together with your hands to form a big ball. WARNING: Dough will be sticky. Lightly flour your hands before touching dough. Wrap dough ball in plastic wrap and refrigerate one hour. (At this point dough can be frozen up to one month. If doing so, wrap in something a bit more freezer proof.)
3. Divide dough ball into quarters. Work with one quarter at a time, leaving the others in the fridge while you work. Lightly flour the work surface (keep that flour handy). Roll the dough into a 1/8-in. thickness. Using something round with a 4.5-inch diameter, cut rounds out of the dough. NOTE: Only thing I had available was a 1-quart plastic container similar to the kind you’d get filled with potato salad at a deli. It’s about 4 inches, but it works. Use what you have on hand. Transfer these dough rounds onto a parchment paper-lined baking sheet and pop into the fridge. Repeat with other dough balls, filling up the parchment, and layering additional parchment on top of the previous. Keep these rounds chilled for 30 min. or more.

4. Filling: While the dough rounds chill, add the finely chopped apple to a large bowl. Add in the flour, sugar, pinch of salt and lemon zest. Let sit until the dough rounds are ready – this will let the sugars produce some juicy apple goodness—something I didn’t do this time around.
5. Assembly: Remove chilled dough from fridge and let them sit for 2-3 minutes to get a bit more workable. Spoon in about 1-2 tbs. of the apple mixture into the center of the round (more for larger circles, less for smaller). Brush the dough edges with water and fold one half over to meet the other to form a half circle. Seal it lightly with your thumb, then press closed with the back of a fork. Place each little pie back onto the parchment and return to the fridge for another 30 minutes.

ANOTHER OPTION: Place a slightly larger amount of apple mixture onto the center of one round and place another round on top, stretching the top dough a bit so it meets the bottom’s edges. Seal as before. This makes a fun UFO-shaped pie.
6. Heat oven to 375. Removing the pies from the fridge, give each one a small slice of poke with a fork (to let steam out). Lightly brush each pie with the egg wash and sprinkle with sanding sugar (optional of course but yummy). Bake until the pies are golden brown – 20 to 23 minutes. Remove and let cool.


If you serve them still slightly warm, you’ll want to serve with vanilla ice cream. Otherwise, these are excellent pastries to have on hand for breakfast.
Seriously bummed that Trader Joe’s didn’t have peaches. What would you fill these with? Any suggestions for other dough that might be more like a traditional pie?
Eggplant Rollatini
March 12, 2013 § 1 Comment
Sometimes you have to shop for dinner. Sometimes it’s in your fridge or freezer, in bits and pieces, just waiting for you to assemble.
That’s what happened with last night’s dinner—Eggplant Rollatini. Open the fridge and there’s an eggplant needing to be used ASAP. Open the freezer and there’s a cup or so of frozen ricotta and chard lasagna filling left over from last fall’s Roasted Vegetable Lasagna making festivities. And there’s a large can of whole peeled tomatoes in the cabinet.
Get out the mandolin, folks—it’s rollatini-making time. And having never made rollatini before, this was all off the cuff.
Eggplant Rollatini

Eggplant Rollatini
- olive oil (to be used throughout recipe)
- kosher salt and pepper to taste (to be used throughout recipe)
- 3-4 cloves garlic, depending on size, smashed and minced
- 1 28-oz. can whole peeled tomatoes
- 1-2 tsp. Italian seasoning
- 1 tsp. sugar
- 1 medium-large eggplant, sliced lengthwise to about 1/4-in. thickness with a mandolin (be careful!)
- Chard-ricotta mix from Roasted Vegetable Lasagna, or about 1-1.25 cups plain ricotta for this recipe
- About 1/ cup Parmesan cheese to sprinkle
1. Turn oven to 400F.
2. Add 1 tbs. olive oil to pan on medium heat. Add garlic and let it go until it becomes fragrant. Slowly pour in the liquid from the canned tomatoes. Take out each tomato from the can and gently mush and tear it into pieces with one hand and add to the pan. Messy, but it’s the best and easiest way to do it. Add in Italian seasoning, sugar (really, it helps brighten the sauce, trust me) and a large pinch of kosher salt.
3. The sauce will really be bubbling at this point. Turn it WAY down and let it simmer gently. Add in a turn or two from the pepper mill. Continue to simmer until it thickens a bit, about 20-30 minutes, just about until you’re ready to assemble the rollatini.
4. Meanwhile, slice eggplant. Place each slice on a sheet pan, and pour a bit of olive oil (not a lot, not a little) over each slice, using a brush to spread the oil over each slice. Sprinkle kosher salt and pepper on each slice. No need to do both sides, one side will do. Pop the sheet pan in the oven and bake for 15-16 minutes, or until the firmness of the eggplant is gone but the eggplant has not become wicked soft. When done, take out and let cool enough to handle, about 5-8 minutes. Keep oven on!

Eggplant, thinly sliced and baked.
5. Working with one slice of eggplant at a time, spread about a tablespoon of the ricotta mixture over the surface of the eggplant slice. You don’t want it too thick or you won’t be able to roll it very well. Starting at the narrow end of the eggplant slice, roll it into a “cigarello,” or, as I would rather imagine it, roll it up like you’d roll your yoga mat. Set aside. Continue with the next slice until you either run out of ricotta or eggplant.
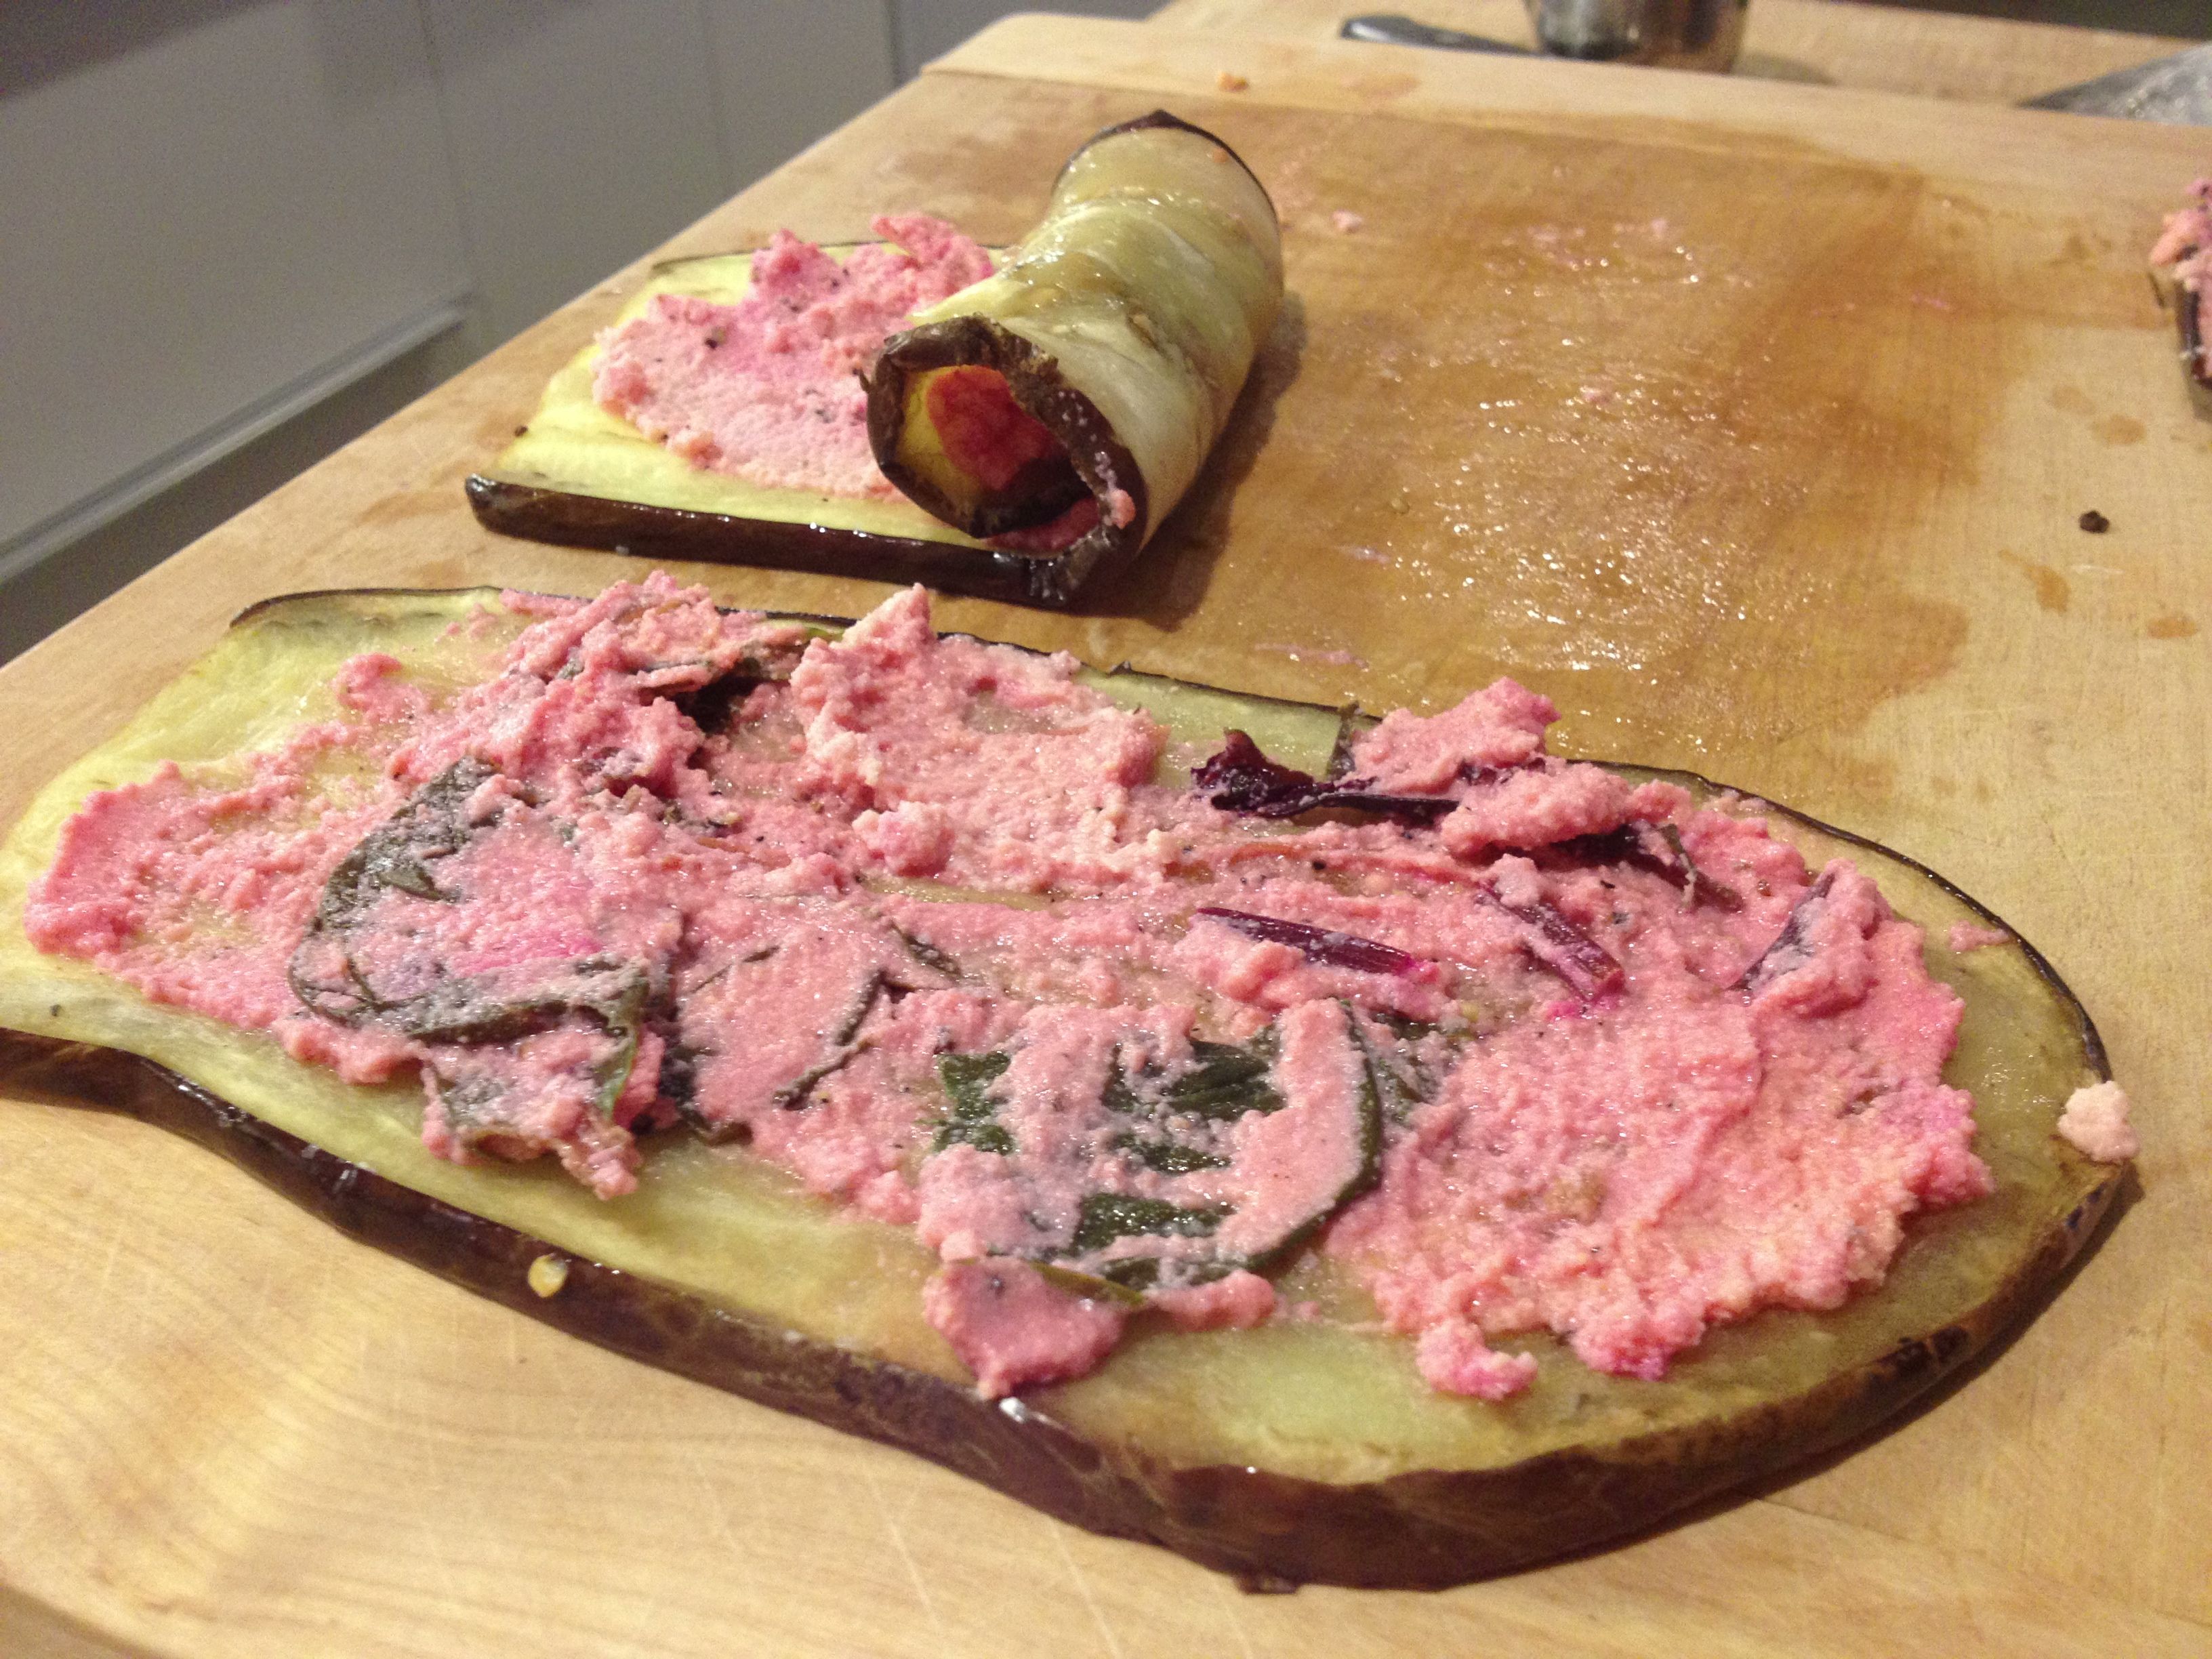
Eggplant slices spread with ricotta mixture and rolled.
6. Lay down about 1/4 cup of the tomato sauce in the bottom of an 8×8 baking dish. Place eggplant rolls in dish on their sides (not standing up). Fit as many as you can in there. When done, generously spoon sauce over the surface—but you don’t want it soaking wet, either. Find the happy medium. When done, sprinkle a coating of grated Parmesan on top and cover with foil.

Lay the rollatinis side by side in an 8×8 baking dish

Spoon sauce over top and sprinkle with Parmesan cheese
7. Pop back into the 400F oven for about 20 minutes. Remove foil and bake another 5 minutes or so. Remove and let cool for 5 minutes before digging in.
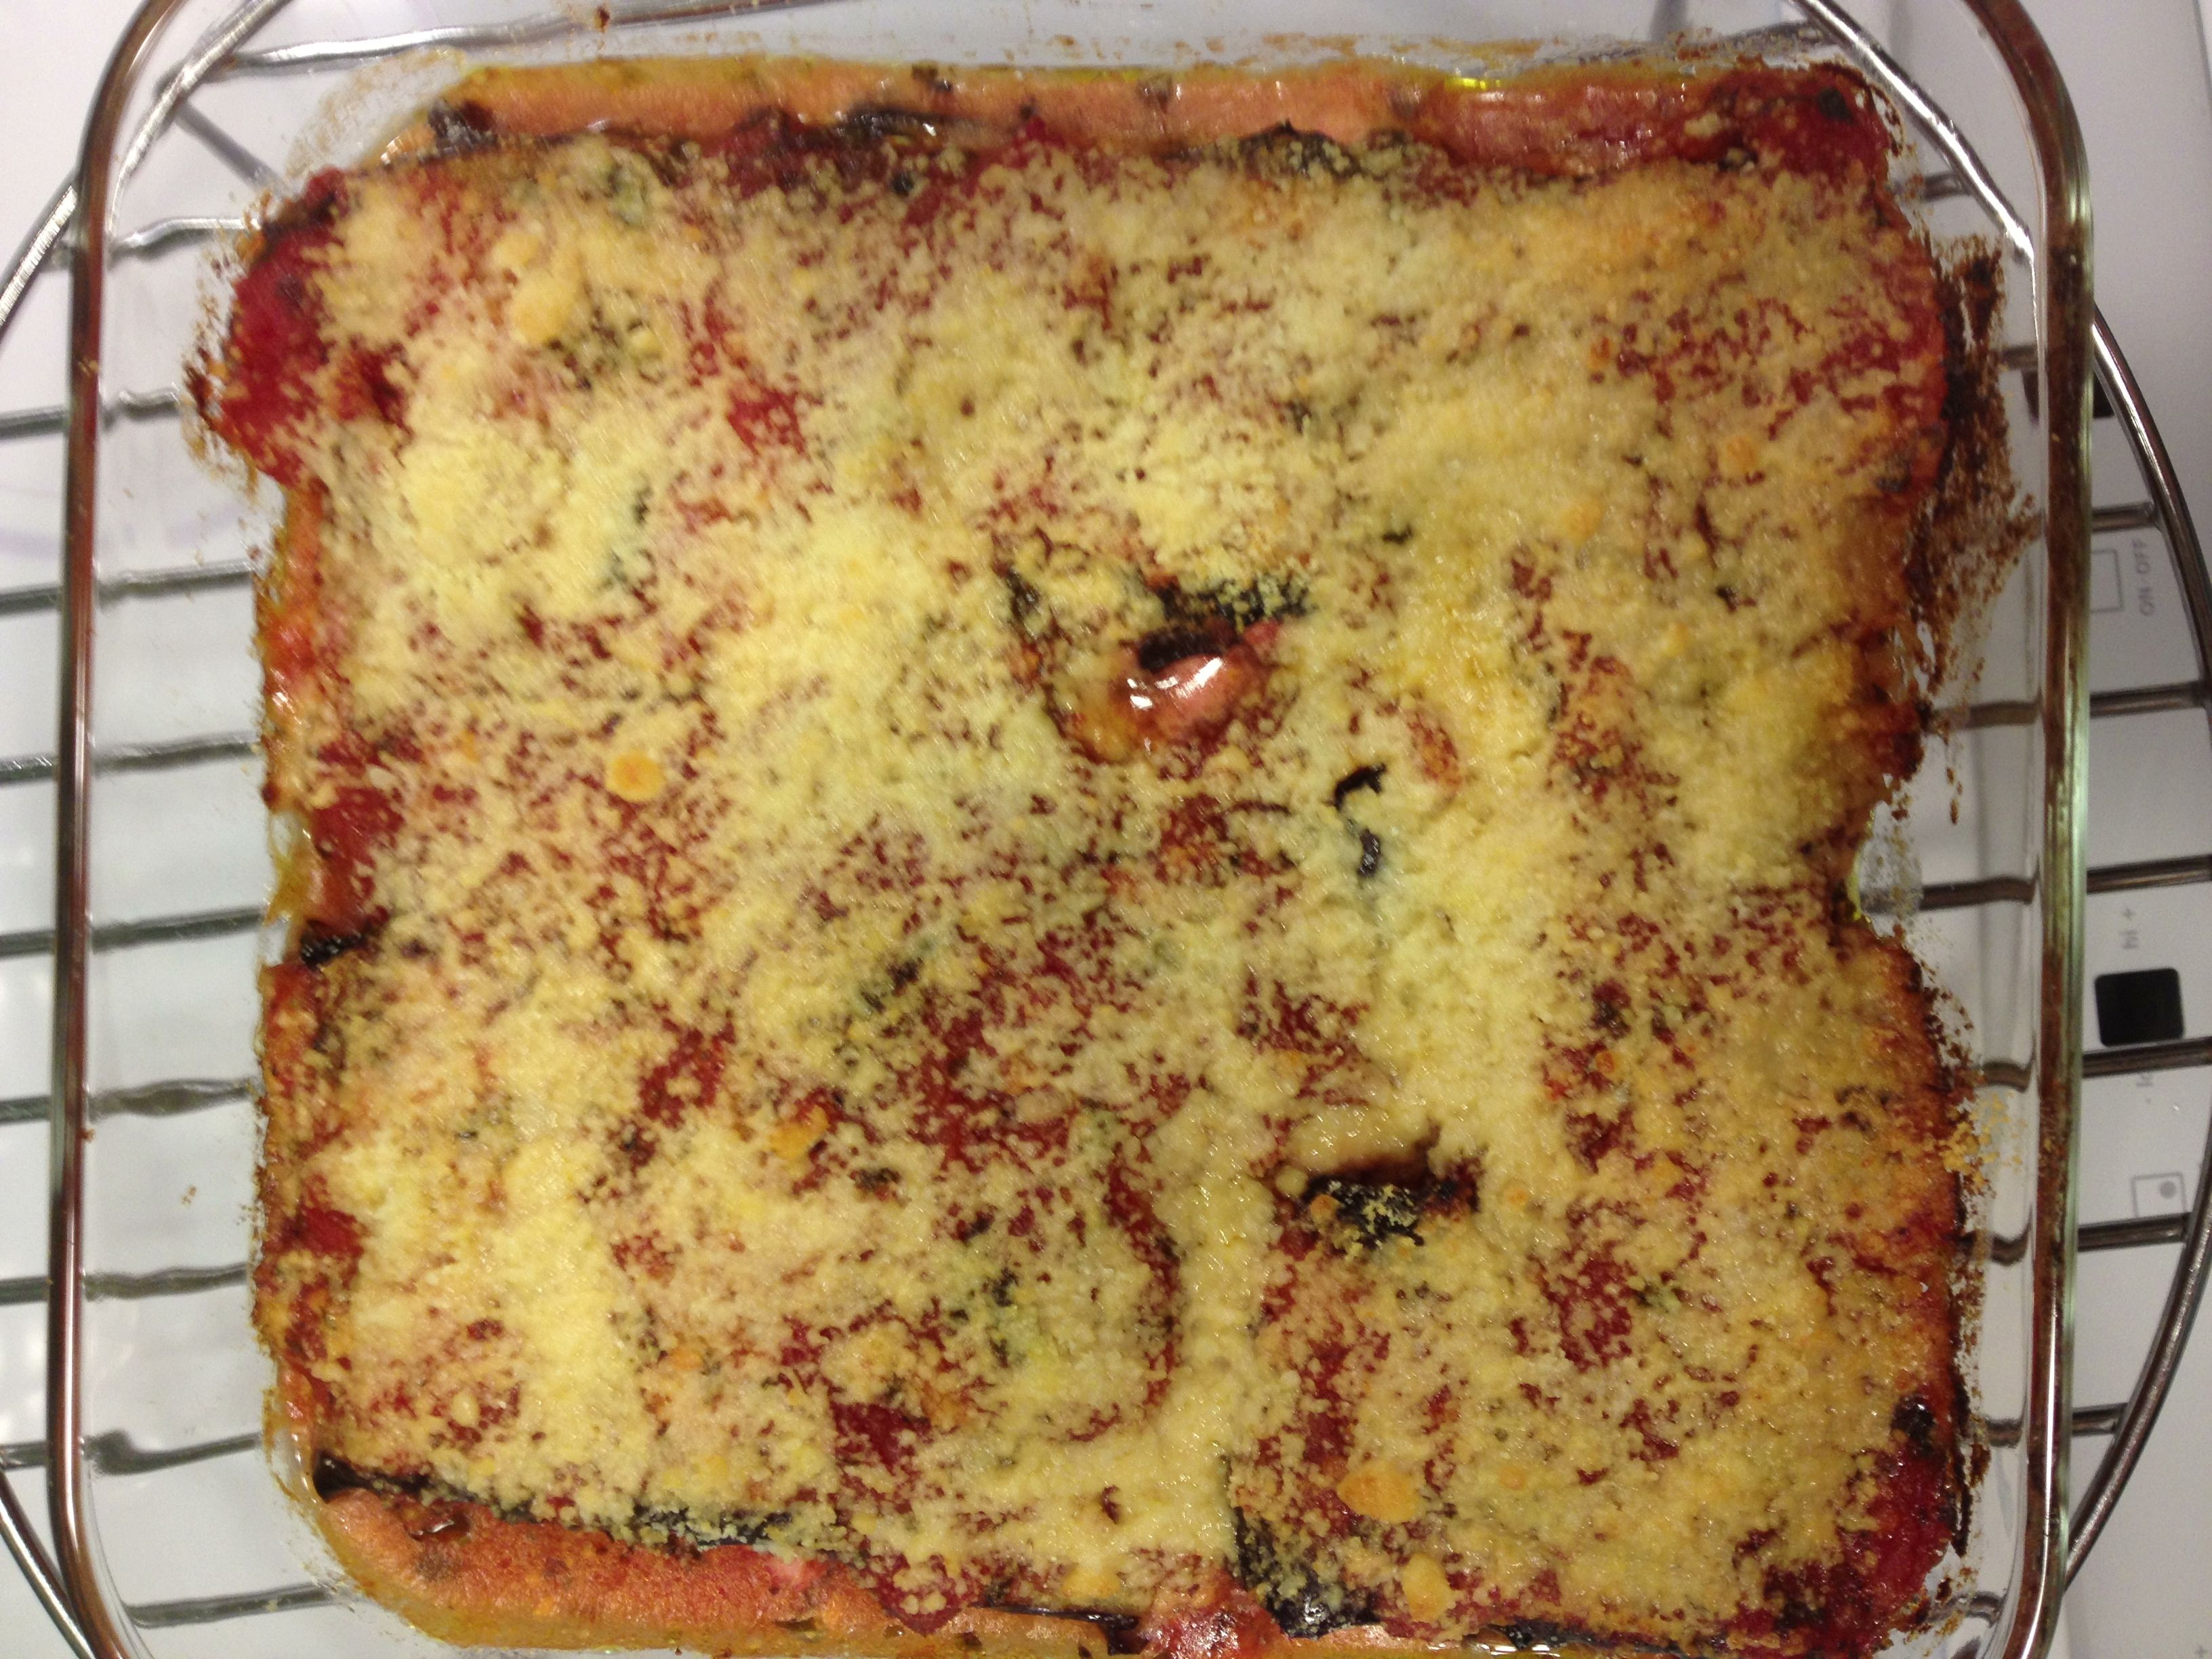
Bake for a total of about 20-25 minutes.
Have something like this in your repertoire? Let me know your version in the comments section.
Wheat Berry and Bean Salad
March 6, 2013 § 2 Comments
The only on-the-package-recipe you should ever make is Nestle Toll House Chocolate Chip Cookies. Truly. It’s a proven recipe and makes a darned-good cookie, a cookie you will experience from the first years of your life to your last. It’ll even be served at your wake. Every other recipe found on a package—whether it’s a box of Velveeta or a fancy grain—should be embarked upon with hesitation and doubt. A dingy full of doubt.
I love what wheat berries do for me for breakfast. I’ve also included them in bread recipes and sprinkled them on a green salad. So when I grabbed my bag of Bob’s Red Mill Wheat Berries and noticed the Wheat Berry & White Been Salad recipe on the back I thought, “Why not try something new today?” “New,” I am reminded now, means a learning experience and not necessarily a guarantee of something awesome.
The salad is simple—wheat berries, white beans (I used chickpeas I had on hand), scallions, celery and tomato with a vinaigrette. The vinaigrette is what I regret here. Following the recipe as I did, the ratio of vinaigrette to salad ingredients was way too much. It was more of a thick soup than a salad because it was so heavily dressed. I had to fill out the salad somehow.

A little too overdressed for my liking.
Reconstructive salad making ensued. Wheat berries went from 1 cup to about 1 3/4 cup (all of what I had just cooked). I had no more chick peas, and no more lentils, which are my usual go-to filler for salads like this. Bulgar would have been too fine of a texture to add into the salad. In the end I cooked up a batch of black beans and added to the soupy salad until it was soupy no more. I must have added close to 2 cups, no kidding.
Wheat Berry and Bean Salad (adapted from Bob’s Red Mill) 
Salad:
1 cup cooked wheat berries
1 cup chick peas
2 cups black beans (or some sort of bean or lentil)
1/2 cup scallions, chopped
1/2 cup celery, diced (makes for a nice crunch)
1/2 cup cherry tomatoes, quartered
Vinaigrette:1/2 cup olive oil
2 tbs. lemon juice (about 1/2 lemon)
2 tbs. white wine vinegar
2 tbs. chopped parsley
1 tbs. honey mustard
2 tbs. minced shallot
1/4 tsp. kosher salt
1/4. tsp. black pepper (or 5-6 grinds from a pepper mill)
1. Mix the vinaigrette ingredients together. I chose to emulsify with an immersion blender. I then added the vinaigrette to the bottom of a large bowl.
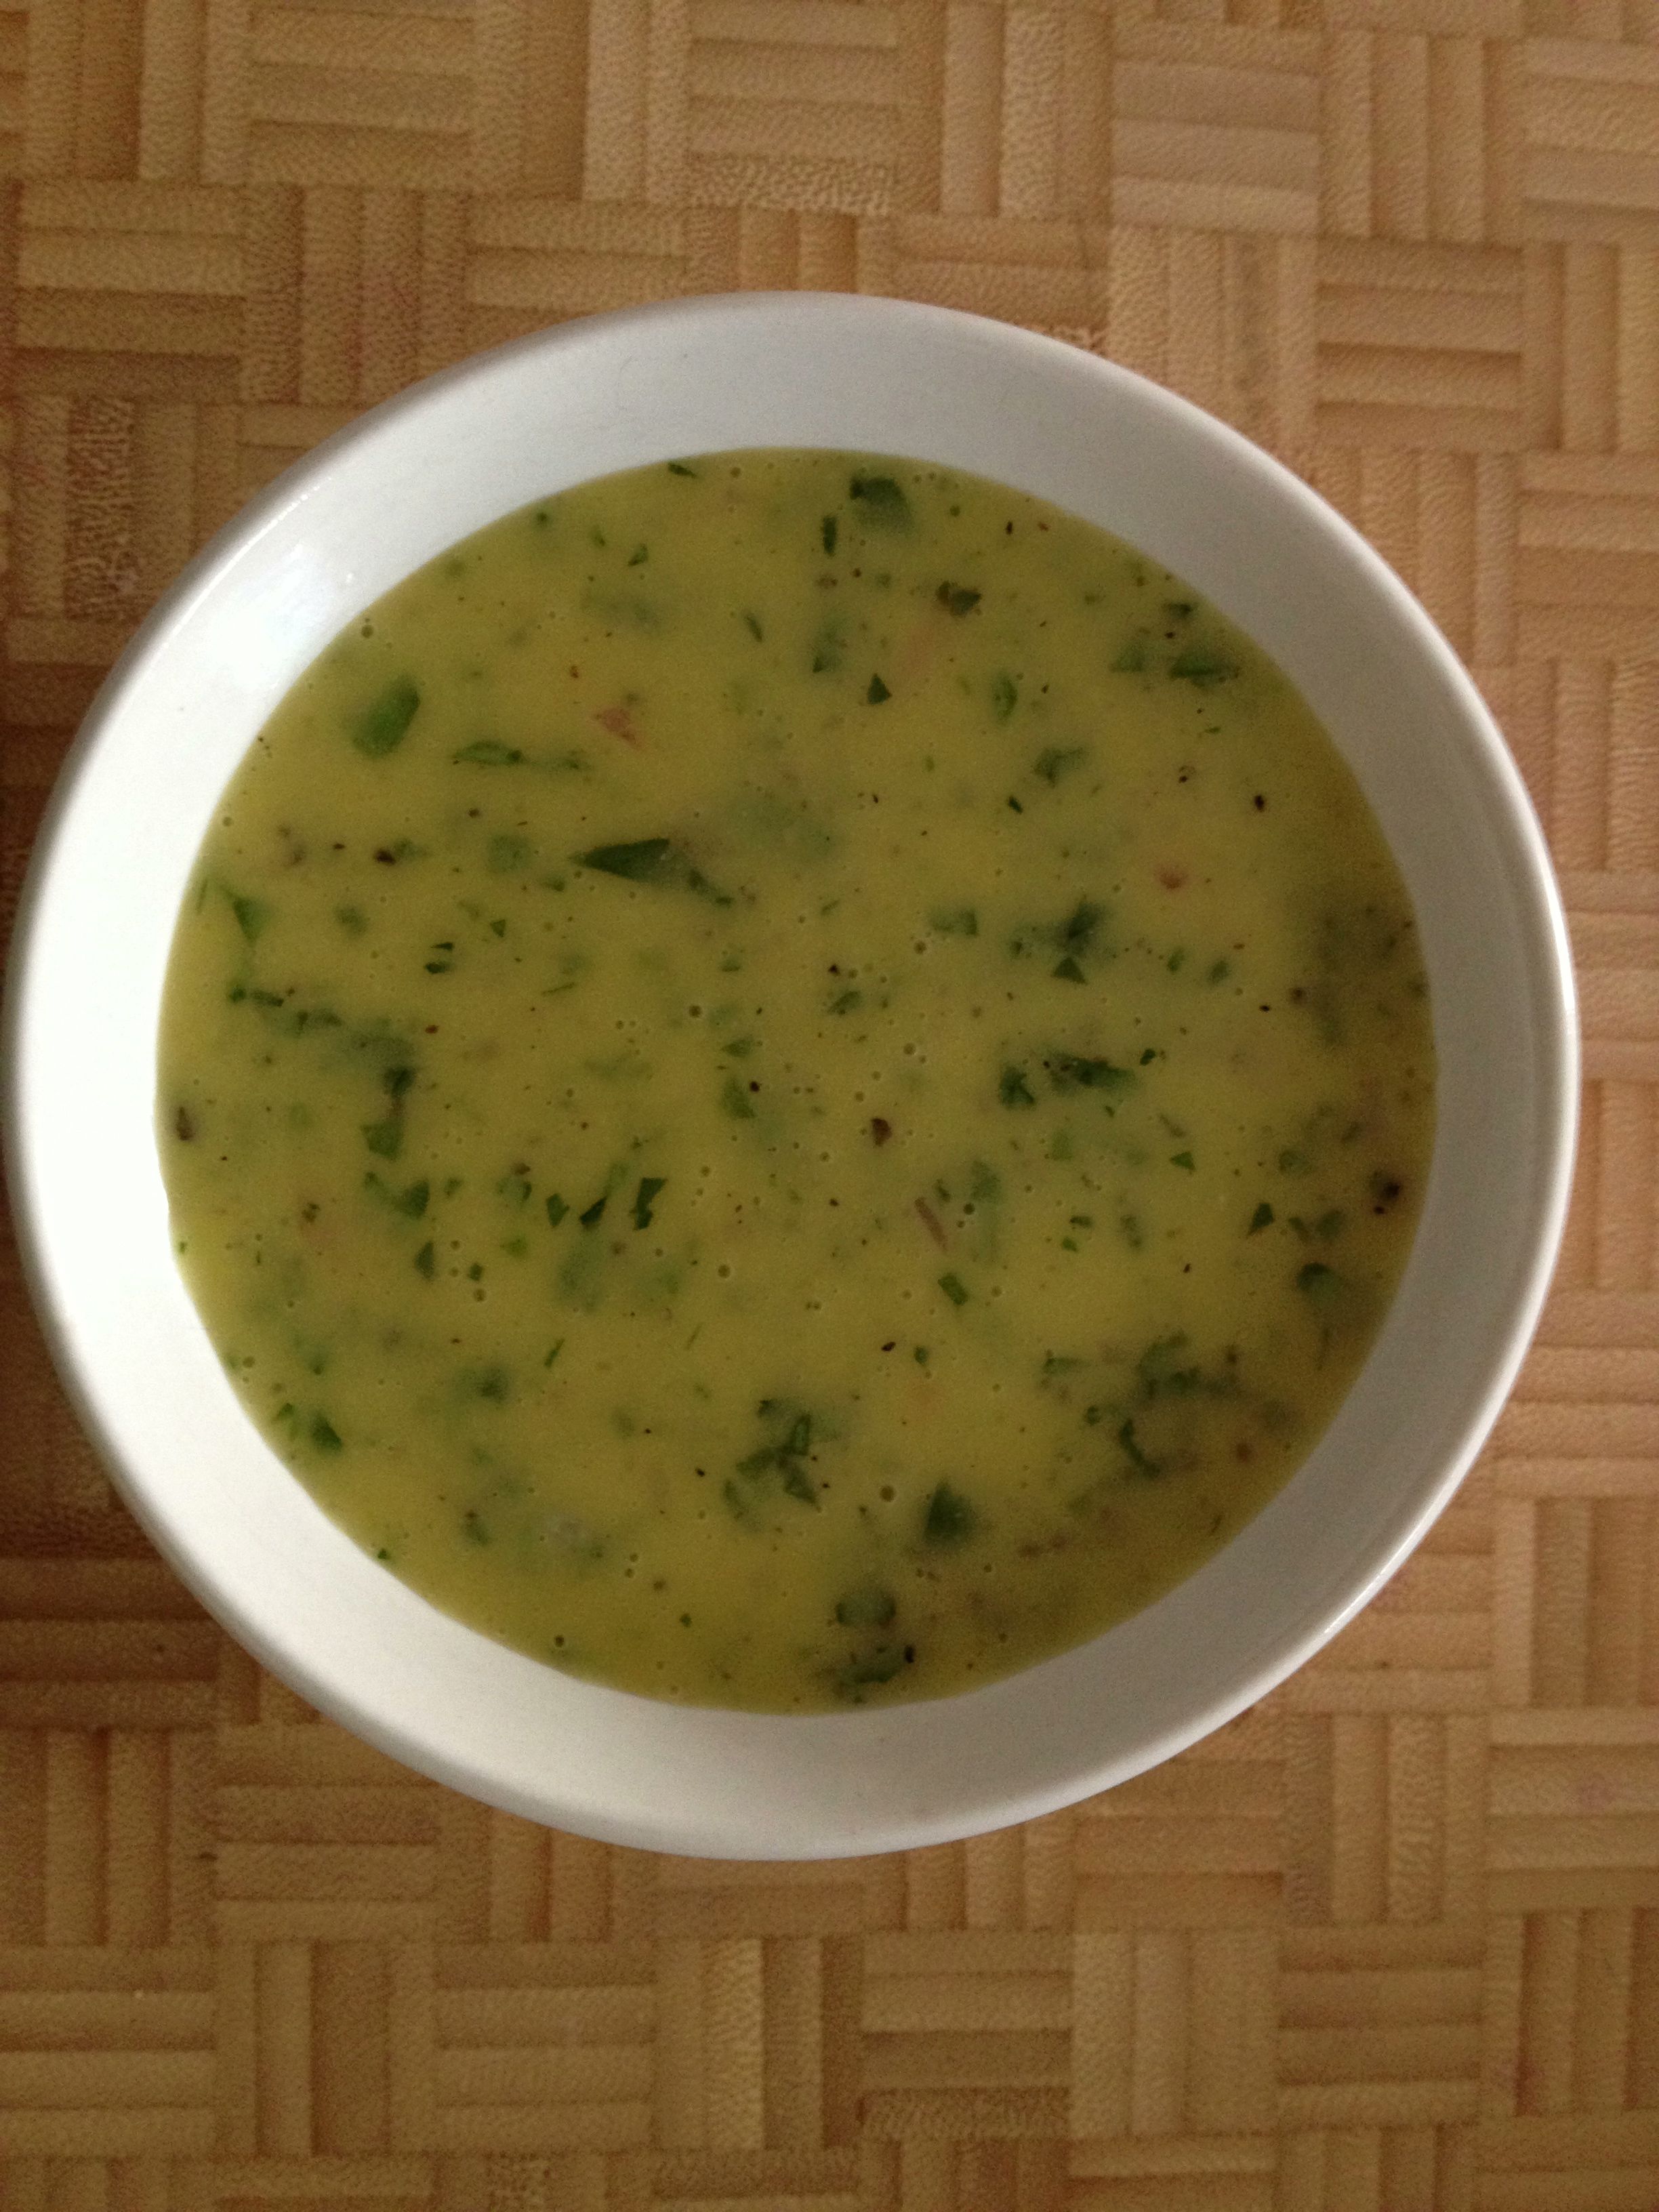
wheat berry salad vinaigrette
2. Add the salad ingredients to the vinaigrette and combine. If it looks overdressed to you, add something to it! Soggy salad is not something you should put up with, really and truly.
3. The recipe says to chill overnight to blend the flavors. Perhaps over that period the beans and berries are supposed to soak up some of the vinaigrette? I didn’t want to leave it to chance. Serving suggestion is to serve on a bed of leaf lettuce. Again, I didn’t want my greens to be soaked, so the additional beans were necessary.
Eat and enjoy—and let me know what you think about the amount of vinaigrette here, please! Too much? Not enough? Just right in a Mamma Bear sort of way? Comments are not just appreciated—they’re anxiously awaited!
Salad on a Pizza
November 27, 2012 § 2 Comments
Indecision can be crippling. Seriously crippling. Should I wear the green coat or the black leather? Should I dodge this person on the left or right? Should I sit here or there? Soon enough you find yourself standing in the produce aisle for 15 minutes, not sure which head of broccoli is the one destined for your dinner table.
Don’t think it hasn’t happened to me. It has.
Today I avoided a near calamity in the kitchen—the calamity of not knowing for sure what to have for lunch. At breakfast time (and by breakfast I mean my two helpings of coffee), I was thinking I’d have a salad for lunch. And yes, I do consider lunch that early in the morning.
Then at 10am, I spied that last ball of pizza dough in the fridge. Pizza for lunch. My fave. But … there’s the salad. And gosh darn it, that pizza dough is sitting there, asking me to redeem myself for a not-so-great pizza making session last night.
Salad.
Pizza.
Salad … on a pizza? Salad pizza! Why not, right? Why not, indeed.
I’ve had arugula pizzas at fun, fancy pizza joints before. So I felt comfortable enough throwing something together despite my lack of arugula. Here’s what I eventually made, using 1/2 of one ball of pizza dough.

Pizza topped with pesto, lightly dressed greens, shrimp and goat cheese.
Since my new convection oven tops off at just 450F (a minimum of 480F is what I prefer for pizza), I baked the dough naked for 8 minutes, knowing I’d want my salad topping in the oven for just a minute. After 8 minutes, I took out the base and applied:
-pesto
-baby spinach/young greens with thinly sliced red onion and red pepper, lightly dressed with a balsamic vinaigrette
-leftover sauteed shrimp (pre-heated while the naked dough cooked)
-goat cheese
Sneak it back into the oven for just a minute more. Sprinkle with kosher salt and pepper.
Delicious. It was so good, it’s gone.

I’m always looking for not-your-typical pizza topping suggestions. What are some of yours? Leave a comment and let me know.
Zucchini Tomato Mozzarella Sliders
July 27, 2012 § 4 Comments
Zucchini. It doesn’t stop.
Turn around for a minute and the long green veggie is 3 inches longer on the vine. Not kidding. Hold off on picking it for a day and … well … it becomes a billy club. Growing up, we’d throw the very large zukes into the pig pen. Healthy, zucchini-loving pigs, that’s what we had.
Lately, thoughts during my 25-minute walk back home from yoga have turned to how to use that day’s zucchini. Pizza. Pasta. Salad. I’ve done them all and wanted something different. Last night, my craving for a burger—really, the craving for something meaty between two bready buns—decided dinner for me. Why should sliders be reserved for meat eaters? Zucchini can play that game, too.
Ingredients
1 5-6 in. zucchini
2 tbs olive oil
1+tbs balsamic vinegar
1 spring oregano
kosher salt and freshly ground pepper
6 small French rolls, cut into top and bottom halves
2 cloves garlic, peeled
1-2 tbs olive oil
1 deliciously red heirloom tomato
mozzarella
1. Slice zucchini into rounds slightly thicker than 1/2 in. Discard (or eat!) the smaller rounds. Shoot for using 12 rounds.
2. Combine oil, vinegar, oregano, a big pinch of kosher salt and several turns of the pepper grinder in a medium bowl. Dip your finger in there and adjust seasoning if you’d like (more vinegar? more oil? It’s your food—make it taste the way you like!). Add zucchini slices and toss. Put aside.
3. Smash those garlic cloves with the back of your chef’s knife (on a cutting board, of course) and schmear it together until the garlic becomes kinda pasty. You can add a sprinkle of salt or not. Add this to a small bowl of 1-2 tbs olive oil. Brush this oil onto the bun halves.
4. Set a grill pan onto medium-high heat. When it’s hot, place buns, cut side down, onto the pan and flatten slightly. 10-15 seconds will do. Put grilled buns into a bowl and cover with a tea towel for now. Turn off grill pan.
5. Meanwhile … we’re still waiting for the zucchini to marinate a bit. Take this time to make a small side salad and whip up a quick vinaigrette.
6. Okay, done with the salad? Time to move on. Get that grill pan back up to medium high. Place your zucchini rounds onto the grill pan. Using a brush, dab some of the liquid remaining in the bowl onto each slice. Let them sit for 4-5 min, or until they get some nice-looking grill marks on the bottom.
7. While those are grilling, slice the tomato into 6 slices and add to whatever liquid remains in the bottom of that bowl.
8. Mozzarella. Time to slice it. Slice it about 1/4 in. thick or less, and into whatever size will sit nicely on top of a zucchini round.
9. Back to those zucchinis. They should be ready to flip onto the other side. Do that. Then place a bit of mozzarella on top of each. Let them grill for a minute.
10. Get your buns ready, working with one top and bottom at a time. This part is optional: Make some room in that grill pan and place the buns cut side down into the goodness the zucchini has been cooking in. Only takes a second, and remove quickly. If not doing that: Place one zucchini slice onto the bun bottom, and overlap a second on top of that. Add a slice of tomato. Top it off with other half of the bun. Repeat with the remaining zukes and buns.
Super. Good. I ate one and a half. Coulda had two. Or three.
Enjoy. I’m off to make zucchini bread now.
Do you have a favorite zucchini recipe? Share it in the comments section.
Dainty’s Concocted Curry
April 28, 2011 § Leave a comment
Several weeks ago I attempted my first-ever Indian-spiced meal. Cauliflower masala. Turned out pretty well—read about it HERE. That was then followed by a chana bateta from the Brooklyn Eats blogger, not blogged about here but really tasty. That one includes potatoes in a homemade tomato-based curry. From those two recipes I figured if you have some mustard seeds, cumin, coriander and a touch of heat—and a whole bunch of other stuff—you can whip up a curry.
Last night’s meal is what I’m calling Dainty’s Concocted Curry. I had 2/3 cup of coconut milk I needed to finish off, and I didn’t have all the ingredients for either of the above recipes, so I kinda/sorta combined the two. Believe me, it can be tweaked here and there, especially in the heat department. But I’m pretty proud that I even attempted getting jiggy with these East Asian flavors.
Dainty’s Concocted Curry

Dainty's Concocted Curry over roasted broccoli, marinated baked tofu and brown rice
2 shallots, thinly sliced
3-ish garlic cloves, minced
0.5-1.0 TBS grated ginger
1-2 TBS oil (I always use olive but you can use canola)
1 tsp mustard seed
1.5-2 tsp cumin
2 tsp coriander
0.5-0.75 tsp cayenne (Would have added a touch more if we had it.)
1 tsp tumeric
couple pinches fenugreek
1 28 oz. can whole tomatoes
2 big dollops of tomato paste
2/3 cup coconut milk
salt and pepper
-Heat oil in a fairly deep fry pan, medium heat. Add shallots and garlic. Move ’em about in the pan now and then and you’re looking for them to be a bit translucent or, better yet, wilted. At this point I just grate the ginger right on top of that, guesstimating a tablespoon’s worth.
-While this is happening, put the mustard seeds in a small skillet with a slight amount of oil and heat on med-high. Cover! These seeds will start popping when they are ready – not long, about 3 minutes.
-When shallots/onions/ginger are done, add mustard seeds and all the spices to the mix. Stir about – it’ll be kinda pasty. You just want to get some heat on them to begin releasing their aromas. Doesn’t take long – a minute or two.
-Now, this can of whole tomatoes—one recipe called for one diced tomato, the other for a 14 oz can diced tomatoes. Other than a handful of cherry tomatoes, all I had was this 28 oz can of whole tomatoes. Open the can, reach on in there and grab one or two tomatoes, hold it over the pan and squeeze—carefully, otherwise it’ll squish tomato juice all over you. Do this for the entire can, then add the juice. And also add the tomato paste‚—that’ll help thicken it. Add coconut milk and stir. Give it a taste and see if you need to add salt or anything extra. Since I added way more tomatoes than I needed, I gave the mix a few extra shakes of all the spices except the cayenne (no more left) and the mustard seeds. Bring to just about boiling, then turn down to simmer and thicken. We had this on low while our brown rice was cooking for 45 minutes. Stir now and then and check up on it.
We’re pretty much done at this point. We did a take-out sorta thing with this when it came to assembling the meal. I roasted some broccoli and also baked some marinated sliced tofu. We put a big spoonful of brown rice in a salad-sized bowl, added some of the broccoli and a few tofu slabs, and then spooned the curry on top. Not too bad, I have to say.
You? You can add some cubed potatoes (as in one of the original recipes) and let those cook away while the curry is simmering. Or, maybe add some mushrooms. Maybe some stir-fried chicken. Steamed veggies. It’s a curry, and you can use it to add a little East Asian flair to your Wednesday evenings without leaving the house.
Fresh, Homegrown Parsley
January 7, 2011 § Leave a comment
“Fresh garden parsley in January, yo.”

Parsley harvested in November still going strong in January, thanks to some prepping tips.
That’s from my “Linguine with Clam Sauce: The Payoff” post. I had bragged about how our homegrown parsley is like Methuselah—it just keeps on keepin’ on even after being in our fridge for nearly two months. What the hell kinda parsley are we using, after all? Plastic?
No, not plastic. In fact, it’s one of those no-named varieties of flat-leafed parsley seedlings we bought from a pop-up garden center back in May. It’s the most gutsy plant we have in our community garden plot, and we couldn’t kill it if we tried. I planted pretty much every seedling that was broadcast-sown in the 4-in. pot we purchased—and every single plant survived.
Here are the growing instructions: Nothing special; water now and then.
I’m not kidding you. Nothing special. And, as a result, the two rows of parsley grew into a small hedge. In fact, it’ll probably come back from the dead when the soil warms this spring.
Just as the living stuff is indestructible, so too is the harvested parsley. Here’s how we prepared and stored the herb:
- Gently wash with cold water.
- Remove stems. Reserve stems for your stash of veggies for making veggie stock.
- Lay leaves flattish on towel to air dry excess water. Best thing about parsley as a plant is that it’s sturdy—it’ll dry before it begins to wilt.
- Once dry, store loosely in zip-lock freezer bag. Put in refrigerator. Since the storage bags are a bit thicker, I think that helps prolong the parsley’s life.
We also stashed six or eight of these zip-locks in the freezer, where it forms frozen sheets. When we run out of the fresh stuff, we’ll break off a corner of the frozen parsley sheet and add it to soups, stews, pasta, and so forth.
More importantly, this is what we DON’T do: Store the parsley wet, wrapped in a moist paper towel in a sealed bag. The humidity just seems to build up along the bag’s sides, eventually making the leaves black and slimy. Sure, we’ll do this if we’re in a hurry or we know we’ll use the whole batch quickly. But it’s not something I’d do for long-term storage.
Will our parsley-storage technique work with the store-bought stuff? I don’t know—we haven’t had to buy the fresh stuff in years. But please do give it a try and let Dainty Dot know the results.
And did I mention, we also have fresh dill from the garden still going strong in the fridge, as well? It’s like a magic tomb, that refrigerator of ours.
