
Eggplant Rollatini
March 12, 2013 § 1 Comment
Sometimes you have to shop for dinner. Sometimes it’s in your fridge or freezer, in bits and pieces, just waiting for you to assemble.
That’s what happened with last night’s dinner—Eggplant Rollatini. Open the fridge and there’s an eggplant needing to be used ASAP. Open the freezer and there’s a cup or so of frozen ricotta and chard lasagna filling left over from last fall’s Roasted Vegetable Lasagna making festivities. And there’s a large can of whole peeled tomatoes in the cabinet.
Get out the mandolin, folks—it’s rollatini-making time. And having never made rollatini before, this was all off the cuff.
Eggplant Rollatini

Eggplant Rollatini
- olive oil (to be used throughout recipe)
- kosher salt and pepper to taste (to be used throughout recipe)
- 3-4 cloves garlic, depending on size, smashed and minced
- 1 28-oz. can whole peeled tomatoes
- 1-2 tsp. Italian seasoning
- 1 tsp. sugar
- 1 medium-large eggplant, sliced lengthwise to about 1/4-in. thickness with a mandolin (be careful!)
- Chard-ricotta mix from Roasted Vegetable Lasagna, or about 1-1.25 cups plain ricotta for this recipe
- About 1/ cup Parmesan cheese to sprinkle
1. Turn oven to 400F.
2. Add 1 tbs. olive oil to pan on medium heat. Add garlic and let it go until it becomes fragrant. Slowly pour in the liquid from the canned tomatoes. Take out each tomato from the can and gently mush and tear it into pieces with one hand and add to the pan. Messy, but it’s the best and easiest way to do it. Add in Italian seasoning, sugar (really, it helps brighten the sauce, trust me) and a large pinch of kosher salt.
3. The sauce will really be bubbling at this point. Turn it WAY down and let it simmer gently. Add in a turn or two from the pepper mill. Continue to simmer until it thickens a bit, about 20-30 minutes, just about until you’re ready to assemble the rollatini.
4. Meanwhile, slice eggplant. Place each slice on a sheet pan, and pour a bit of olive oil (not a lot, not a little) over each slice, using a brush to spread the oil over each slice. Sprinkle kosher salt and pepper on each slice. No need to do both sides, one side will do. Pop the sheet pan in the oven and bake for 15-16 minutes, or until the firmness of the eggplant is gone but the eggplant has not become wicked soft. When done, take out and let cool enough to handle, about 5-8 minutes. Keep oven on!

Eggplant, thinly sliced and baked.
5. Working with one slice of eggplant at a time, spread about a tablespoon of the ricotta mixture over the surface of the eggplant slice. You don’t want it too thick or you won’t be able to roll it very well. Starting at the narrow end of the eggplant slice, roll it into a “cigarello,” or, as I would rather imagine it, roll it up like you’d roll your yoga mat. Set aside. Continue with the next slice until you either run out of ricotta or eggplant.
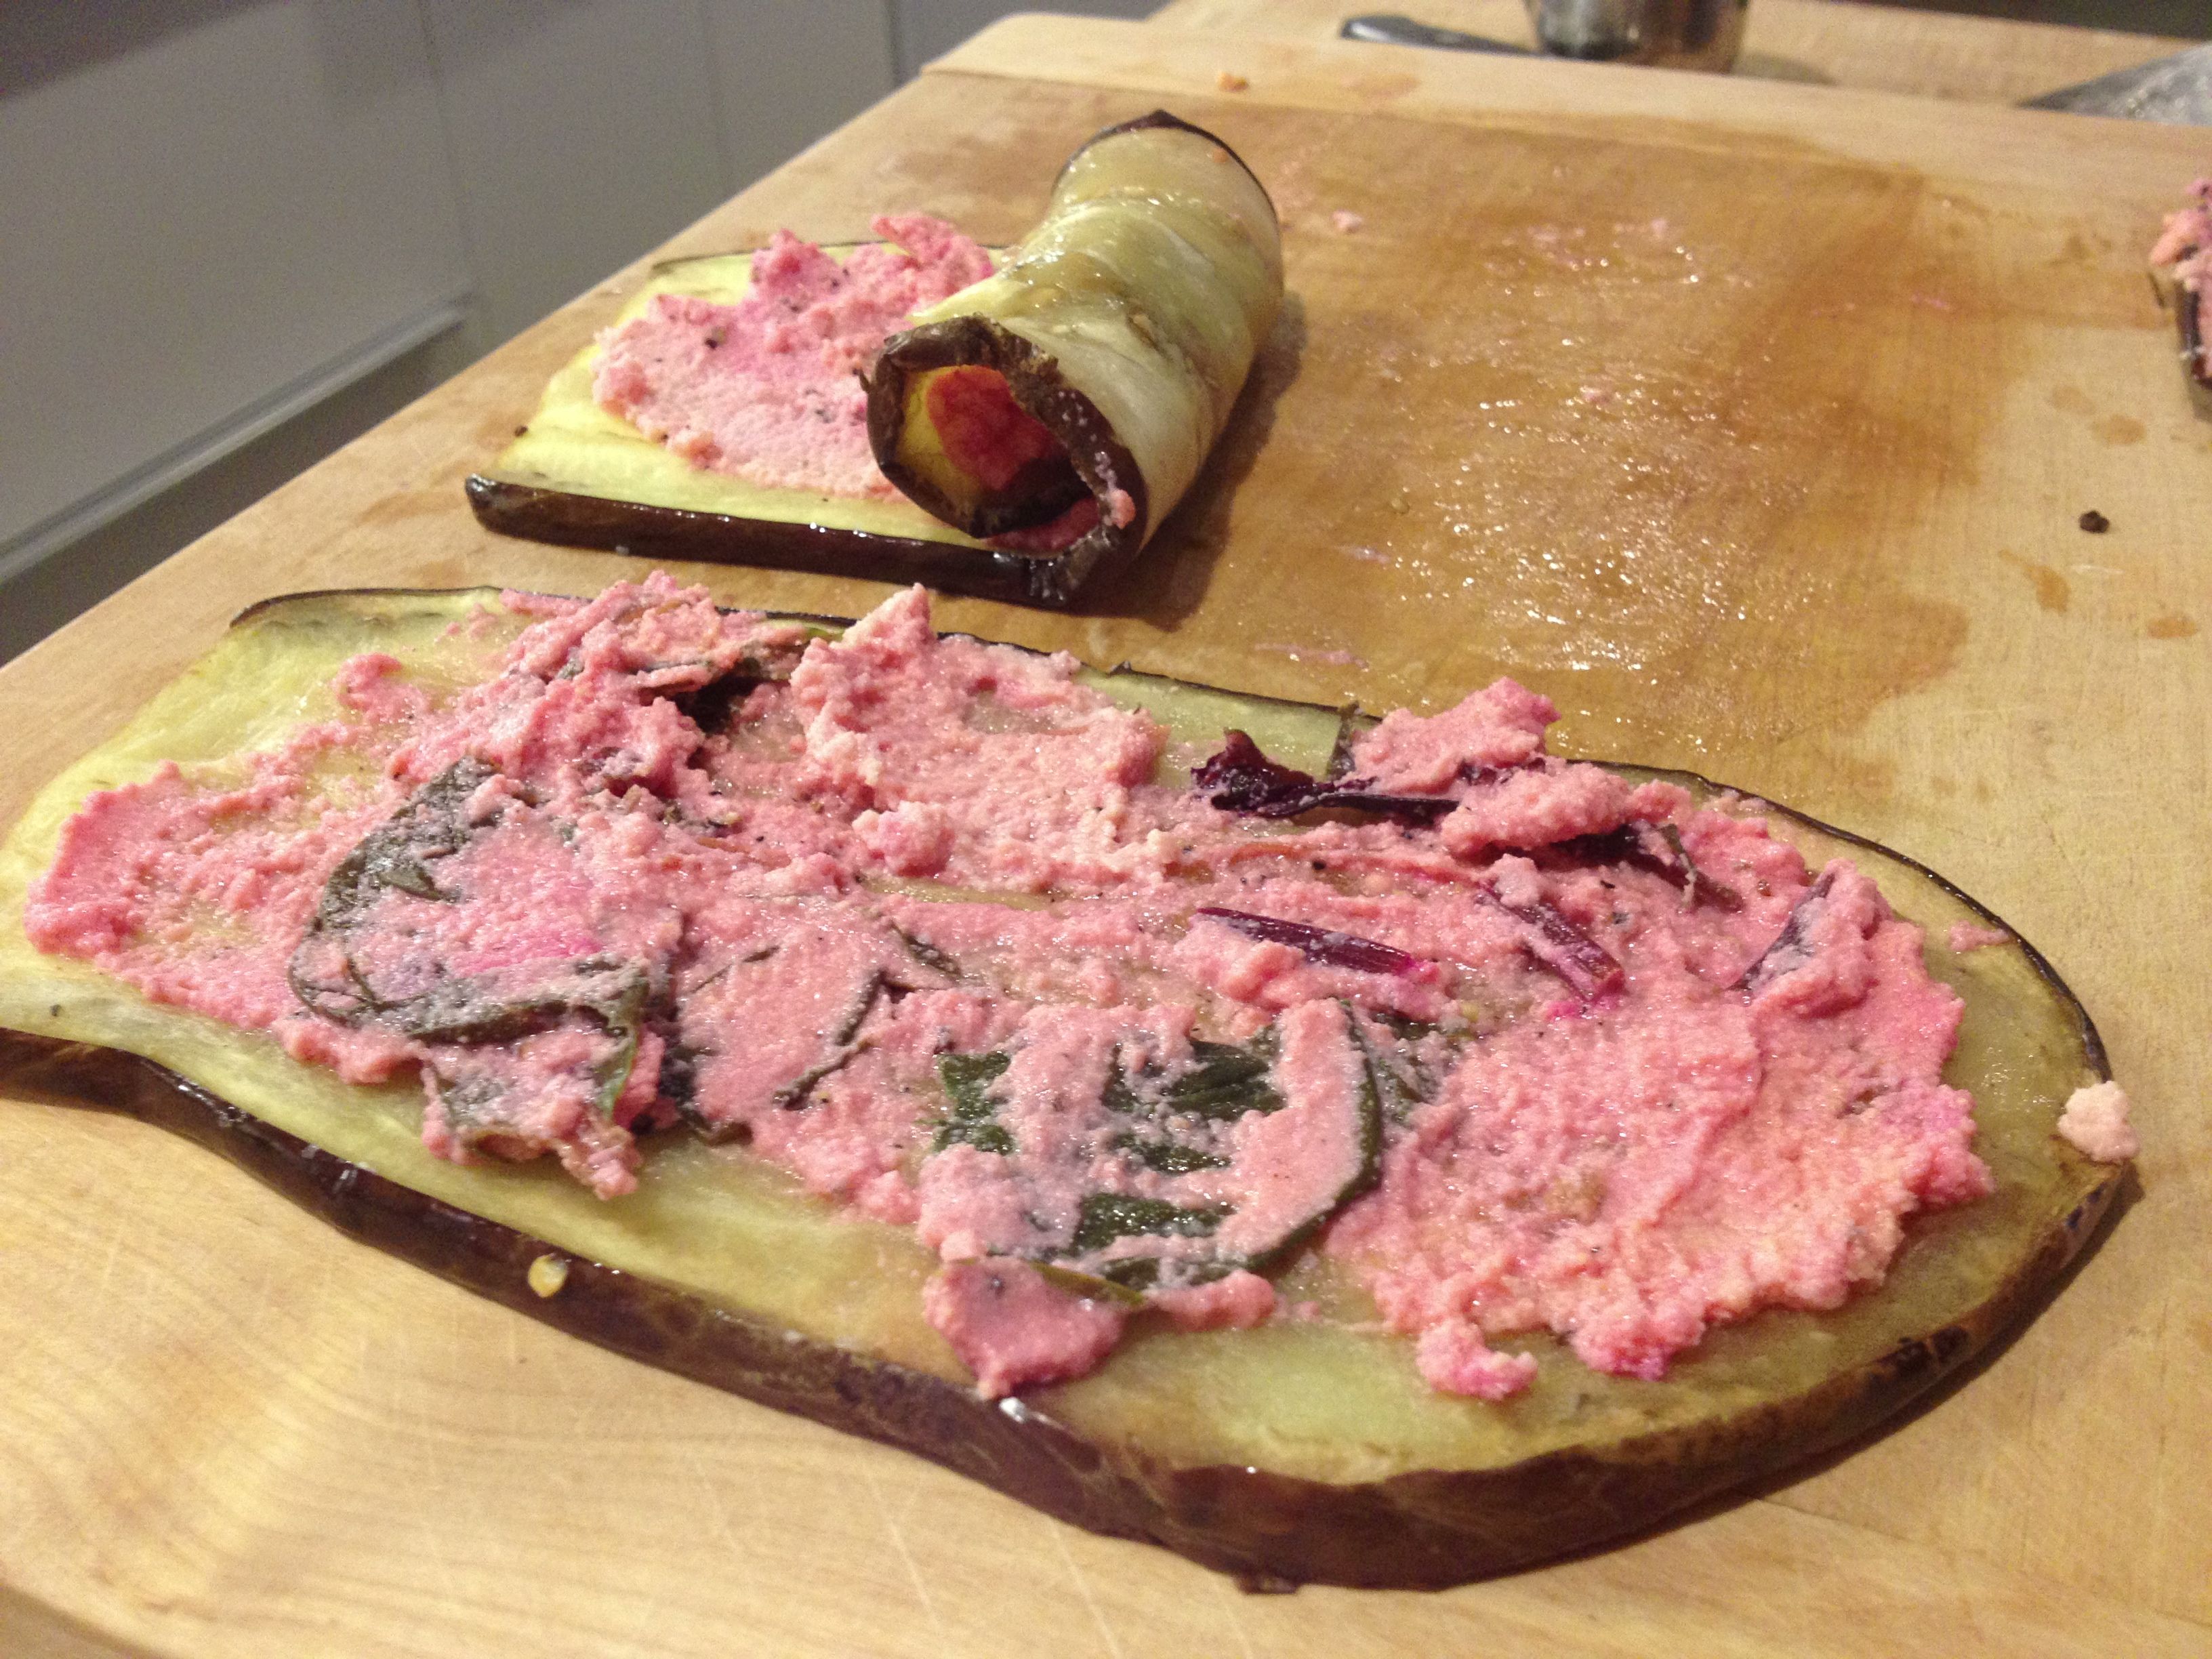
Eggplant slices spread with ricotta mixture and rolled.
6. Lay down about 1/4 cup of the tomato sauce in the bottom of an 8×8 baking dish. Place eggplant rolls in dish on their sides (not standing up). Fit as many as you can in there. When done, generously spoon sauce over the surface—but you don’t want it soaking wet, either. Find the happy medium. When done, sprinkle a coating of grated Parmesan on top and cover with foil.

Lay the rollatinis side by side in an 8×8 baking dish

Spoon sauce over top and sprinkle with Parmesan cheese
7. Pop back into the 400F oven for about 20 minutes. Remove foil and bake another 5 minutes or so. Remove and let cool for 5 minutes before digging in.
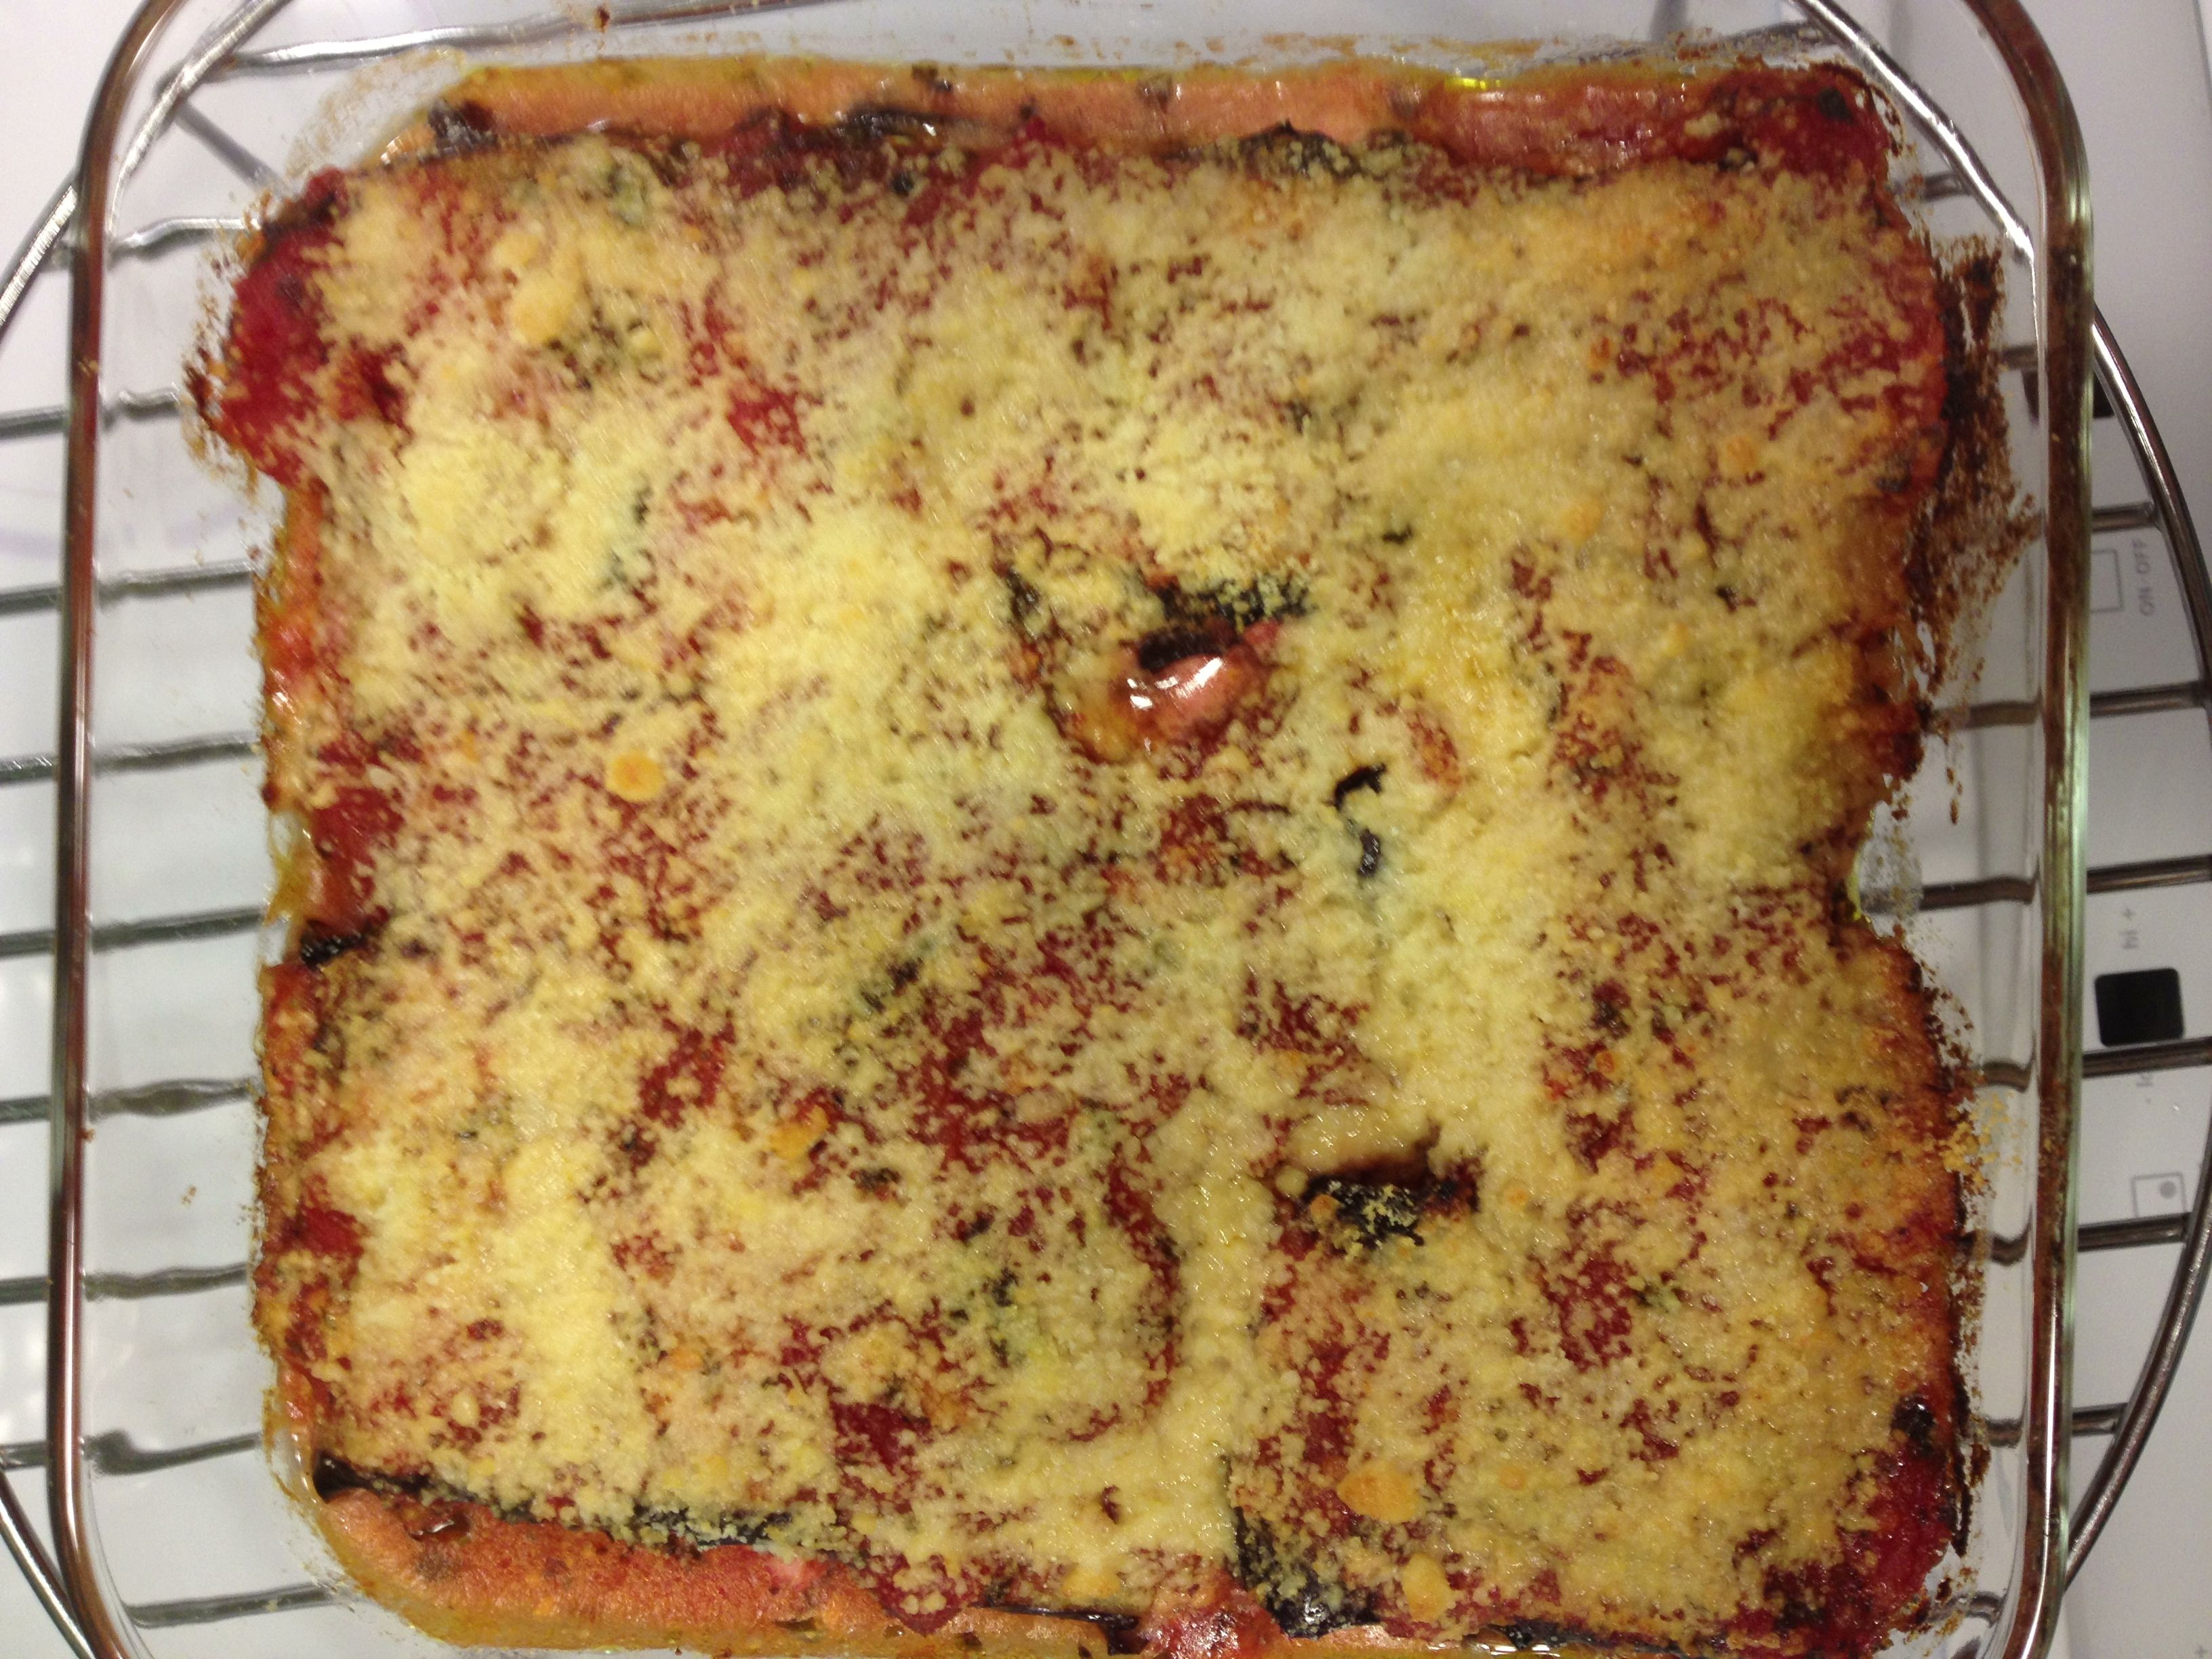
Bake for a total of about 20-25 minutes.
Have something like this in your repertoire? Let me know your version in the comments section.
Tofu Noodle Soup
January 29, 2013 § 3 Comments

Tofu Noodle Soup
I’m a fan of tofu. Not a crazy fan, but a fan nonetheless. And I’m not sure how it happened. Omitting red meat and poultry from my diet accounts for some of my fandom, I guess. Quite honestly, I am just going to let me fondness of tofu exist for what it is. Why bother explaining, right?
The best tofu I ever had was in a take-out dish from a Chinese restaurant in Ithaca, New York, about 18 years ago. The name, the flavorings, the accompaniments all escape me now. The one piece of the dish that remains in my memory is the tofu. Crispy on the outside. Soft on the inside. The closest thing to a McDonald’s french fry this side of the Golden Arches. I want that. I crave that even.
In the absence of that crispy tofu dish, I’ll take this tofu noodle soup. Soy sauce is in there, but it’s not too salty. And the hoisin gives it that … umami. There, I said it. Umami, that fifth and most flavorable of the basic tastes. A bowl of this broth will satisfy me for lunch. The tofu and noodles make it a real deal meal.
I’ve adapted this recipe – and I keep adapting each rendition of it – from a VegNews Magazine newsletter. I found that the original recipe had too little broth and way too many noodles. A halving of this and a doubling of that with on-the-fly adjustments takes care of that problem.
Ingredients
1 thinly sliced yellow onion
4 garlic cloves, minced
1 tbs grated fresh ginger (about an inch or less)
4 tbs hoisin sauce
4 tbs soy sauce
9 cups vegetable broth (or water)
1 15-oz. package extra-firm tofu, cut into 2-inch cubes
1 8-oz. package rice noodles, cooked and drained
4 tbs rice vinegar
4 tsp Asian hot sauce
Scallions, bean sprouts and cilantro to sprinkle, if desired
- In a large pot, saute the onion in about 1 tbs of oil over medium-high heat until translucent, about 5 minutes. Add the garlic and ginger and saute for another 30 seconds or so.
- Stir in hoisin, soy and broth. Bring to a boil. Lower heat to a simmer and let cook for 15 minutes.
- Stir in tofu, noodles, vinegar and hot sauce. Now, here’s an embarrassing thing: I have JUST NOW realized the recipe calls for cooking the noodles FIRST, then adding them to the pot. This explains a lot. Well, adding them at the end is fine, too—just simmer them in the broth for about 5 minutes or so.
- Serve soup in bowls and sprinkle with scallions, sprouts and/or cilantro if you so choose.
Next time, I’ll boil up the noodles beforehand THEN add them to the soup and report back to you if there is a major difference. Meanwhile, enjoy!
Zucchini Tomato Mozzarella Sliders
July 27, 2012 § 4 Comments
Zucchini. It doesn’t stop.
Turn around for a minute and the long green veggie is 3 inches longer on the vine. Not kidding. Hold off on picking it for a day and … well … it becomes a billy club. Growing up, we’d throw the very large zukes into the pig pen. Healthy, zucchini-loving pigs, that’s what we had.
Lately, thoughts during my 25-minute walk back home from yoga have turned to how to use that day’s zucchini. Pizza. Pasta. Salad. I’ve done them all and wanted something different. Last night, my craving for a burger—really, the craving for something meaty between two bready buns—decided dinner for me. Why should sliders be reserved for meat eaters? Zucchini can play that game, too.
Ingredients
1 5-6 in. zucchini
2 tbs olive oil
1+tbs balsamic vinegar
1 spring oregano
kosher salt and freshly ground pepper
6 small French rolls, cut into top and bottom halves
2 cloves garlic, peeled
1-2 tbs olive oil
1 deliciously red heirloom tomato
mozzarella
1. Slice zucchini into rounds slightly thicker than 1/2 in. Discard (or eat!) the smaller rounds. Shoot for using 12 rounds.
2. Combine oil, vinegar, oregano, a big pinch of kosher salt and several turns of the pepper grinder in a medium bowl. Dip your finger in there and adjust seasoning if you’d like (more vinegar? more oil? It’s your food—make it taste the way you like!). Add zucchini slices and toss. Put aside.
3. Smash those garlic cloves with the back of your chef’s knife (on a cutting board, of course) and schmear it together until the garlic becomes kinda pasty. You can add a sprinkle of salt or not. Add this to a small bowl of 1-2 tbs olive oil. Brush this oil onto the bun halves.
4. Set a grill pan onto medium-high heat. When it’s hot, place buns, cut side down, onto the pan and flatten slightly. 10-15 seconds will do. Put grilled buns into a bowl and cover with a tea towel for now. Turn off grill pan.
5. Meanwhile … we’re still waiting for the zucchini to marinate a bit. Take this time to make a small side salad and whip up a quick vinaigrette.
6. Okay, done with the salad? Time to move on. Get that grill pan back up to medium high. Place your zucchini rounds onto the grill pan. Using a brush, dab some of the liquid remaining in the bowl onto each slice. Let them sit for 4-5 min, or until they get some nice-looking grill marks on the bottom.
7. While those are grilling, slice the tomato into 6 slices and add to whatever liquid remains in the bottom of that bowl.
8. Mozzarella. Time to slice it. Slice it about 1/4 in. thick or less, and into whatever size will sit nicely on top of a zucchini round.
9. Back to those zucchinis. They should be ready to flip onto the other side. Do that. Then place a bit of mozzarella on top of each. Let them grill for a minute.
10. Get your buns ready, working with one top and bottom at a time. This part is optional: Make some room in that grill pan and place the buns cut side down into the goodness the zucchini has been cooking in. Only takes a second, and remove quickly. If not doing that: Place one zucchini slice onto the bun bottom, and overlap a second on top of that. Add a slice of tomato. Top it off with other half of the bun. Repeat with the remaining zukes and buns.
Super. Good. I ate one and a half. Coulda had two. Or three.
Enjoy. I’m off to make zucchini bread now.
Do you have a favorite zucchini recipe? Share it in the comments section.
Tofu Marinade
July 5, 2012 § Leave a comment
Tofu. Exciting stuff.
Exciting stuff that you most likely stay away from. Am I right? “Meh, whatever. I’ll have the chicken,” is what you’re saying.
The best tofu I’ve ever eaten was takeout from this hole-in-the-wall Chinese place in Ithaca, New York, about 18 years ago. It was a bit spicy with a shockingly crisp texture. No idea what they did to it but I can still remember how tasty it was.
While trolling the Web in search of what to do with tofu, I came across a fabulous marinade. And by fabulous I mean I had all the ingredients on hand and it was super-simple to make. The recipe has been on a Post-It Note on the fridge for about 8 months now, and before I lose it down that mysterious gap between the icebox and the counter, I thought I’d post it to Dainty for safekeeping.
Okay, so … you marinate this tofu baby. Then what? The cooked marinated tofu slabs go well with an Asian-style slaw. Put both in a wrap or on top of brown rice. A little added soy sauce is a good addition for the latter, as well.

marinating tofu
Ingredients*
1 tbs balsamic vinegar
1 tbs sesame oil
1 tsp agave nectar
1 tbs minced ginger (a heaping tsp of ground ginger works, too, and gives it a tiny bit sweeter flavor)
1 tbs minced garlic
1/2 tsp cumin
1/2 tsp coriander
1/4-1/2 tsp cayenne
*This recipe easily doubles BUT think twice before doubling the cayenne. A double recipe will more than adequately cover a standard block of tofu cut into 1/4-inch slices.
-Combine all ingredients in a tall-sided container and whir up with a hand-held immersion blender. Or, put in a regular blender. Blending isn’t totally necessary, but I feel it gives the marinade more body than just a simple whisking. It then holds onto the tofu better.
-Brush overtop 1/4-in. tofu slices, and the sides, too, if you wish. You may have extra marinade – keep that around to pour on top of your wrap or tofu rice bowl.
-Let sit in the refrigerator for an hour or two. Then place slices bottom-side down in a medium-hot pan. Flip after 3 minutes. Flip again after three minutes—this helps get the marinade onto the side that wasn’t brushed.
We used the marinated tofu in a brown rice bowl along with a raw corn-cabbage slaw and some leftover sauteed mushrooms that we reheated in the same pan used to cook the tofu. A sprinkle of nama shoyu or regular soy sauce gave the dish a nice pop.

marinated tofu overtop brown rice, mushrooms and corn slaw
What’s your favorite tofu marinade? Please share below – it’s good to have more than one in your recipe book!
Sweet potato, goat cheese and rosemary-sage pizza
May 7, 2012 § 1 Comment
The following is a paraphrased and nearly completely inaccurate account of a recent text conversation.
Text from Nan: J’s sick, can’t use tix to tonight’s show at Club Passim. Can you use them?
Text from Dainty: Uh … wha? Tonite? Sure! Who’s playing, where’s it?
Nan: Meg Hutchison. She’s great. H Sq.
Dainty: We’re in! Coming after Baptiste yoga, could eat a cow. Do they have food?
Nan: Veggie Planet serves their food. Order Henry’s Dinner. On a pizza. Trust me.
Jennifer and I do indeed trust Nan—she’s a lawyer, after all, and we love her. We go to Club Passim, ravenous, and after a cursory glance at the menu, immediately ordered the Henry’s Dinner, pizza version. Something about sweet potato, goat cheese, asiago, rosemary and sage—oh, don’t forget the caramelized onions—all atop a whole wheat pizza.
First thought: Um … yeah. It’s really good. Things that should come together as a side dish at Turkey Time turns out to be a great topping for a pizza.
Second thought: I could totally make that.
And I did Here’s my version.
Ingredients:
- 2 pizza doughs from the Biga-Based Pizza Dough recipe (which makes a total of four)
- 1 large sweet potato
- 1 sweet onion
- olive oil
- balsamic vinegar
- fresh rosemary and sage, ground in a spice mill together, about 2 tbs each
- a log of goat cheese
- asiago cheese (we used parmesan)
- salt and pepper go without saying …
-We had a gigantic sweet potato, so we spiked it with a few holes and popped it into a 425F oven for nearly an hour. After 45 min you want to keep poking a fork in it to see if it’s done all the way through. When done, let it cool enough to handle. The skin will just peel right off with your hands. Slice it into 1/4-1/2 inch think rounds.

Baked sweet potato
-While the potato is cooking, slice up that sweet onion. Add about 2 tbs olive oil to your trusty large skillet, set on medium high, and toss the onion in there. Add maybe 2 tbs balsamic vinegar. Sprinkle generously with kosher salt. Toss often. After a bit you’ll want to turn the heat down low and let it saute low and slow. Half hour, maybe. Give the onions a taste halfway through – you might want to add more balsamic to your liking. When they’re done, let them cool, too.
-Heat the oven to 480F. Got a pizza stone? You need one, seriously.
-When you’re ready, flour your counter and roll out that pizza dough – thin but not super super thin. Sprinkle a pizza peel with fine corn meal and lay that dough on there.
-Next, brush the dough surface with some olive oil. Now you can arrange your ingredients however you want. I put the caramelized onions on the bottom. Next I layer with sweet potato – I broke my potato slices into chunks and spread them out a bit. Same with the goat cheese – I just broke chunks off the log and applied liberally. Next, a generous dusting of the rosemary-sage mixture, followed by Parmesan cheese. Salt and pepper on top.
-Slide the pizza onto the stone. 6-7 minutes is all you need. You should have enough ingredients for two pizzas, so while the first one is cooking, get the second one all set to go.
-Wait 3 minutes before cutting into it. You gotta let that thing set up.

sweet potato, caramelized onion, goat cheese and rosemary-sage pizza
Jennifer just took the leftovers for lunch and popped it into the break room toaster oven. A colleague asked, “Hey, is that the Henry’s Dinner pizza from Veggie Planet?” Looks like I got it right.

Jennifer’s Ode to a Clam (Chowder)
April 1, 2012 § 5 Comments
What we have here is a guest post. My first guest – awesome! And it’s from none other than the best chef I know personally—my dear wife, Jennifer. She’s the real cook in the Dainty household. Who needs a recipe? Not her, not really. Today’s topic happens to be one of those recipe-less recipes that she just developed from experience. You eat enough chowder, you’re gonna know how to make it eventually.
So, without further ado, here’s Jennifer’s brilliant rendition of clam chowder.
Ode to a clam. Yes, I said clam. Many of you out there have an aversion to shellfish, which are easy to ruin in unskilled hands. Perish the thought. I know one former Eastern Long Island resident (editor’s note: That would be me) who had such an aversion, until she was able to experience what shellfish cooked well tastes like … manna from heaven. Well, actually the sea—the sweet, briny, bountiful sea.
Inspired by photos posted by dear friends who did some late-winter clamming, I suddenly remembered the quart-sized pouch of clams frozen in our freezer; harvested New Year’s weekend during an unseasonably warm morning outing in the flats of Provincetown Harbor. I had frozen the clams along with the liquor they produced, waiting for the right moment to make a chowder. Not your typical Monday night meal, and it only took moments to whip up!
-I thawed out 4 cups of clam broth and 2 cups of fish fumet

Jennifer's clam chowder
-Diced into 1 inch cubes 3 potatoes
-I cooked the potatoes in the clam liquor along with 2 bay leaves for seasoning. While the potatoes were cooking I sautéed up a mirepoix (fancy way of saying celery, carrot and onion).
-2 medium carrots
-2 celery stalks
-1 large onion
-Once the veggies were mostly soft I added 4 oz. of shitake mushrooms. I had them in the fridge, and thought, why not?!
-When the potatoes were done (15 minutes or so), I used an immersion blender to break down the potatoes, but not completely. I wanted to leave some chunks, but also give the illusion of some cream in the broth, so I let my starch be the cream substitute. To the pot I added my cooked veggies and the quart plus of clams, warmed the mixture through and wished I had some crusty bread to serve along with it.
Man, oh man that was good! Thank you P & J for inspiring me to bust out the bounty harvested a few months ago. Food-inspired memories!
Comments? Questions? Your favorite clam chowdah experience? Leave us a note below!
Brothy Asian-Inspired Soup
March 19, 2012 § 4 Comments
Hearty soups … yes, I love them. And the ones I make are nearing the definition of stew. But every once in a while I will be in the mood for something light, breathy and brothy.
This Asian-Inspired Soup is a riff on something Mark Bittman published in March 2011. He gave three simple (very simple) recipe suggestions in each of four categories: creamy, brothy, earthy and hearty. The second and third recipes are slight twists on the first in each category. By the end of making the twelfth, he says, you’ll never need to follow another soup recipe.
With a package of firm tofu and some leftover chickpea broth (remember that from Pressure Cooker Basics?), I twisted Mark Bittman’s own Asian twist on brothy soups.
Ingredients 
- 8 cups water, in this case chickpea broth and water
- 1/4 cup chopped scallions (about 3-4)
- 1 package firm tofu, drained and cubed
- 4 oz oyster mushrooms, roughly chopped
- 1 tbs soy sauce
- 1 tbs sesame oil
-To a large pot add the water or broth, scallions, tofu, mushrooms, soy and sesame.
-Heat over a medium-high flame to just boiling, them bring to a quiet simmer, partly covered. Let simmer for … 15 minutes? 20 minutes? It’s up to you and how tender you like your oyster mushrooms. Check it at 15, then check the mushrooms every few minutes.

Oyster mushrooms - aren't they just beautiful?
-Ladle into bowls. Garnish with a few chopped scallions. You might enjoy a crispy baguette to dunk.

Brothy Asian-inspired soup
Seriously, I tried to make this soup sound difficult/complex/sophisticated/finicky. But that’s just impossible. This soup is just way simple. And delicious.
Any Asian-inspired and simple soup suggestions or ingredient ideas? Leave a comment and let me know.
Hearty Soup: Potato & Kale
March 8, 2012 § 1 Comment
We’re nearing the end of Hearty Soup season. And I feel like it got short-shrifted this year. Bone-warming broths, stews and soups weren’t really needed so very much this winter. And it’s too bad—hearty soups are my favorite to make.
We were able to squeeze in a batch of Potato & Kale Soup earlier this week. Thank goodness, because a winter soup season shouldn’t go by without this cooking on the stovetop at least once.
Jennifer and I tag-teamed this recipe. I chopped and prepped late in the afternoon, then she came home and cooked, giving it her special touch while I lunged and downward-dogged and shavasana’d. The potatoes and kale really satisfied a hungry yogini.
Full disclosure here: Full credit goes to Jennifer, who got this recipe from a soups class she took back in the late ’90s. We’ve adjusted a bit here and there. But not spectacularly so.
Potato & Kale Soup

Potato-Kale Soup with a drop of sherry vinegar
- 1+ tbs evoo
- 2 cups chopped onion
- 2 leeks, white and light green parts only, sliced thin (we omitted, used extra onion)
- 6 cups water (we used 4-6 cups leftover chickpea broth – remember that from the chickpea stew and hummus?) PLUS 2 additional cups water/broth
- 4 medium potatoes, cut into medium-sized cubes (~4 cups)
- 2 tbs minced fresh parsley
- 3 carrots, trimmed but whole
- 3 celery stalks, trimmed but whole
- 2 bay leaves
- salt & pepper
- 1/2 lb kale (we used an entire bunch of kale as bundled by the local neighborhood grocery)
- sherry vinegar
-Heat oil in large Dutch oven over medium heat. Add onions (and leeks if you have them) and sautee until soft and translucent.
-Add potatoes, parsley, whole carrots, whole celery, bay leaves and 6 cups water or broth, and season with salt and pepper (several good pinches of salt/twists of the pepper grinder). Cover. Simmer on low to medium low for about 45 minutes.
-While the soup is simmering, wash the kale and remove the thick ribs. Tear the kale into a size that won’t annoy you – i.e. not too big. You’re going to steam/cook the kale in about a cup or two of water/broth in a high-sided skillet with a lid. Boil that water, add the kale, cover, and let it cook for not that long – 4-5 minutes. You want it tender but not melty-mushy. Drain out the water and set the kale aside.
-When the soup base has simmered 45 minutes, remove and RESERVE the carrots. And remove and DISCARD the celery. Puree by using a light touch with an immersion blender—you want part of it pureed but you still want some chunks of potato in there. OR, just puree half of the soup in a food processor and return it to the soup pot.
-Stir in kale. Chop the reserved carrots, add them back in there, too. Heat until nice and hot. Give it a taste – add salt and pepper as necessary.
-Here’s the last bit that is Jennifer’s touch and it’s completely optional: Add a tad – let’s say a 1 tbs – of sherry vinegar. Not so optional, uh? That’s good stuff, that soup is.
A nice “creamy” soup—and absolutely no cream! And now that I think about it, it’s vegan. Bonus.
What’s your favorite hearty soup recipe? Drop in a comment and let us know.
Moroccan Chickpea Stew
March 1, 2012 § 9 Comments
If you don’t like cumin, step away. You’ve made up your mind about the spice, and no amount of my praising it will change the way your taste buds feel. So, I’ll see you another day, okay?
But you cumin fans, lean in a bit closer—I have something to tell you. This stew … it’s awesome. Awesome as in delicious. Really. Super. Delicious. And it’s all due to the cumin.
It being from Bon Appetit may explain why it’s so delectable. Theirs is a meaty version. I’m sure the addition of chicken thighs is nothing but fabulous. I didn’t have them on hand—plus I’m doing a no-meat kinda thing currently. Still, this rocks with out the cluck factor.
Ingredients
- 4 tbs olive oil, divided

Chickpea Stew ala Bon Appetit
- 2 skinless, boneless chicken thighs—optional
- 1 medium sweet onion, sliced
- Kosher salt
- 3 large garlic cloves, minced
- 2 tbs ground cumin—yes, that much
- 2 tbs tomato paste
- 3/4 tsp crushed red pepper flakes
- 2 bay leaves
- 2 15-ounce cans chickpeas, rinsed, drained OR 1 lb. dry chickpeas cooked to firm
- 1/2 cup chopped drained roasted red peppers from a jar (I just roasted a whole large red pepper myself)
- 2 tbs (or more) fresh lemon juice
- country-style bread
- 3 tbs coarsely chopped flat-leaf parsley

-IF you’re going the chicken route, heat 2 tbs of the oil in a Dutch oven over medium-high heat. Season chicken with salt; add to pot and cook, turning once, until browned, 8–10 minutes. Transfer to a plate.
-IF you’re not using chicken, heat 2 tbs of oil to medium low, add onion and garlic, and saute for 5-6 minutes or until onions become translucent. Add cumin, tomato paste and red pepper flakes; stir until a smooth paste forms, about 1 minute.
-IF using chicken, add it back into the pot along with bay leaves and 4 cups water and dislodge any of the brown chicken bits that might be on the bottom of the pot.
-Just a quick note: I used dry chickpeas and cooked them in a pressure cooker with 9 cups water, kosher salt, a celery stalk, a carrot, 2 bay leaves and 3 whole garlic cloves for 28 minutes. When I drained the chickpeas, I reserved the liquid and used that in place of 4 cups water. Mmmmm … more flavor.
-Bring everything in the pot to a boil; reduce heat to medium-low and simmer, uncovered, with occasional stirring. IF using chicken, let it simmer until chicken is tender (20 minutes). Sans chicken, 10 minutes is enough to get the flavors to meld.
-Transfer chicken to a plate (if it’s in there). Add chickpeas to pot and bring to a simmer and cook for 5 minutes. Shred your chicken off the bone and add it in there. Otherwise, skip it. Add in the red peppers and stir in remaining 2 tbs of oil (but only if you want – you don’t need to).
-Don’t skip this part: Give it a taste. Good, right? Yummy power-packed cumin flavor. Okay, now add in 2 tbs of lemon juice (or about half a lemon). Let it simmer for a minute. Now give it another taste? Better, huh? Yup, that lemon is a major major plus here. Adjust seasonings with salt and maybe more lemon if you think it needs it.
-Serving: Bon Appetit says to cube crusty bread, put it in an individual bowl, and ladle the stew on top. DO NOT even attempt. All you get is soggy bread. Bleck. But DO enjoy a nice slice alongside, dipping it to your liking. Oh, and sprinkle some parsley on top, too.
Good, good stewy stuff. There’s no room for cumin haters here.
Moqueca, or a Tasty Brazilian Fish Stew
October 31, 2011 § 1 Comment
This year was supposed to be the Year of Ellen Baking, right? Or was it the Year of Ellen Reading? I was supposed to run three  half-marathons this year, read 12 books, and start the engine on something Big and Awesome. It’s turned out to be more of the Year of Ellen Waffling, and I don’t mean those maple-dripped golden squares on your brunch plate. It’s not been an all-that-great year, and I want it to be over with. I’ve petitioned the International Calendarological Society to just end 2011 here and now, and to get a move on with 2012. Apparently only Popes and Julius Caesar can do that. Officially. You can imagine my regard for “official.”
I’m declaring an end to 2011 as of Oct. 31—which conveniently makes Halloween the equivalent of New Year’s Eve. November 1st will begin a 61-day period known as Daintydays. It’s a time when Dainty and anyone who may have a thread of Daintyness in her/himself says “I’ve had enough of this, and I’m just gonna do ______” (with the blank being nothing that harms others, of course; that’s not very Dainty). Two months. Two months to do what you think you couldn’t by the end of the year. Think on it—we start tomorrow.
What does this have to do with moqueca? Absolutely nothing. Unless “Making the freakin’ best fish stew ever” is that thing you want to do by the end of the year. I first had moqueca at Edwige at Night in Provincetown in 2010. When I heard they were closing for good at the end of the Summer 2011 season, I rushed over for one last order. Last week, we made our own moqueca with a little help from Emeril Lagasse. While it’s no Edwige, it’s still damn good.
Moqueca (Brazilian fish stew)
Ingredients
- 2 1/2 pounds white-fleshed fish cut into 1-2 in. pieces —we used a combo of bluefish (from our Cape Ann Fresh Catch share) and some shrimp
- 3 tablespoons fresh lime juice
- 1/4 cup olive oil
- 1 1/2 cups thinly sliced onions
- 1 tablespoon minced garlic
- 2 tablespoons tomato paste
- 2 cups roughly chopped tomatoes – we used a 25 oz. can of whole peeled tomatoes and gave them a rough chop
- 1/2 cup fish stock or water
- 2 teaspoons salt, divided
- up to 1/4 cup hot sauce – recipe calls for Piri Piri, which is a blender hot sauce, but we dumbed it down a bit
- 1 (14.5-ounce) can coconut milk
- 2 tablespoons chopped fresh cilantro leaves
- Steamed white rice, as an accompaniment

-Put the fish in a glass mixing bowl with the lime juice. Set aside for 20 minutes and prep the remaining ingredients.
-Heat a large saute pan over medium-high heat. Believe me, you’ll need a larger pan than you expected. Heat up the oil, and saute the onions until translucent, about 3 to 4 minutes. Add the garlic saute for about 30 seconds. Add the tomato paste, chopped tomatoes, fish stock and 1 teaspoon salt. Stir to combine everything.
-Turn up heat a tad and bring the mixture to a boil. Once boiling, add the limed fish, the hot sauce (try half the amount first then add more after afterward) and the coconut milk. Stir it up again and let it heat to boiling. Reduce heat to medium-low and until the flesh starts to flake, about 10 minutes. IF you are using shrimp, add the shrimp separately from the fish, about 5 minutes through that cooking period.
-Remove the cover and sprinkle the cilantro over the fish. Season with the remaining salt and hot sauce, if you so choose.
-Serve with the rice. A nice basmati rice is perfect. Make LOTS of it, you’ll need it.

Ahhh ... leftovers.
