
Zucchini and Corn Salad
August 1, 2011 § Leave a comment
You can’t cook. I mean, you just can’t cook.
It’s 105F in the shade. It’s hot. The thought of lighting that pilot light and having a controlled fire on your stove top makes you break out in hives.
Or …
Or you’re in my friend Katherine’s position and don’t currently have a working kitchen due to home remodeling. Home “modeling,” I should say; her condo is so brand-spanking new, there are no appliances yet. But wait. She has an electric wok and maybe a microwave. Thank god, that’s something. She does dishes in her shower, I hear.
So, Katherine, this recipe is for you and all those other folks who can only make a meal the pre-discovery of fire way. Yes, it calls for you to eat corn and zucchini in their raw states. But it’s surprisingly good, and refreshingly cool.
Zucchini and Corn Salad (adapted from a Martha Stewart Living recipe)

Zucchini and Corn Salad
- 3 ears corn, shucked
- 2 medium zucchini, thinly sliced or matchsticked
- 2 tablespoons fresh lime juice
- 2 tablespoons extra-virgin olive oil
- 2 tablespoons coarsely chopped fresh cilantro
- Coarse salt and ground pepper
-Remove kernels from corn cob. Martha had a great suggestion: Cut off the cob ends, and stand cob up in a shallow dish. Take a sharp knife and, starting from about the middle of the cob, slice off the kernels in a downward motion, working your way around the cob. Don’t slice off too much of the cob – you want just the nice milky kernel. Flip the cob over and do the other half.
-Recipe calls for two medium zucchini. Not sure about you but my zucchini in the garden this time of year only come in the “extra large” size. I’d say you’re looking for 2-3 cups of zucchini, sliced thinly. Or, make matchsticks: I slice 1/4-in. thick rounds of zucchini and then run them down the large, single-slice side of my stand-up grater. Okay, it’s not the small, square-sided wooden matchsticks; more like the slim matches in those paper booklets. But matchsticks, nonetheless. Add the zucchini to the corn in that small shallow bowl.
-Add lime juice, evoo, cilantro and salt and pepper to taste. Letting it sit for about an hour before serving lets the flavors develop. Pop it in the fridge if you’d like for a nice crunchiness.
Salad from a City Garden
July 29, 2011 § Leave a comment
Remember yesterday?
Remember that haul of produce I brought home from my city community garden plot? All of it—the lettuce, the chard, the beets, the tomatoes and whatever else I gathered—is washed/bagged/roasted/drying/sitting in a hydrator.
Are you interested in how I saved the lettuce/chard/etc? There’s a way to do it. I can tell you about that later if you want …
But for now, let me tell you about my lunch. 
-Lettuce from the garden.
-A half of a beet from the garden, roasted.
-Cherry tomatoes from the garden.
-A half of a zucchini from the garden, roasted.
–Greek Salad Dressing, made with oregano from the garden.
-Boiled eggs, from our backyard hens (Oh, please. Who do I think I am? Jayme Jenkins?).
–Pickled red onions, pickled myself!
-Green lentils and bulgur – okay, I didn’t grow them but at least I boiled them myself.
-A slice of bread I made using my wild yeast sourdough starter.
I’m full. I need a nap.
First Big Harvest from Community Garden Plot
July 28, 2011 § 2 Comments
This …

harvest from Dainty's community garden plot
This is what it’s all about. The seeds planted in April. And replanted in May. The battles with bugs. The constant fretting over the weather. The worry while on vacation. This haul is worth the wait, worth the time, for sure.
Red and golden beets. The last of the lettuce. Most of the red and yellow chard. A big ol’ yellow squash. The first—the very first!—cherry tomatoes. Thyme and dill. Oh, and I shouldn’t forget to mention this is all in a 15′ x 30′ urban community garden plot. Call me a city farmer.
It’s not like we haven’t harvested anything at all up until now. Not true. We’ve snipped plenty of herbs. Fresh dill sprigs went into some homemade pickles a few weeks ago, for instance. We’ve pulled up a beet here and there. Just this Monday we took home three larger-than-intended zucchini and a couple of yellow squash. And, we’ve had lettuce for months.
But now, the last week in July, is when everything comes together.
Look for a whole lotta zucchini recipes coming your way.
Martha’s Chocolate Chip Cookie Icebox Cake
July 24, 2011 § Leave a comment
Martha, Martha, Martha … what where you thinking? Turning cookies into a cake? It’s this kind of thinking that made you rich and famous.

Martha's Chocolate Chip Cookie Icebox Cake
Spotted in the July issue of Martha Stewart Living, I just knew this dessert—alternating layers of homemade chocolate chip cookies with a marscapone whipped cream—would make my recuperating friend very, very happy. Okay, okay, I admit it, it would make me very happy, too. But I needed an excuse … and a houseful of people to eat it. No better time than weekend visit to Provincetown, I say.
As I said, the cake is layers of cookies—seven layers, in fact—and whipped cream. As it sits in the fridge overnight, the cookies soften a bit, just enough, from the whipped cream surrounding them. By the next day, you can slice right through the cake with no trouble.
Ingredients
8 dozen 2 1/4-in. chocolate chip cookies (use your favorite recipe)
4 cups heavy cream
8 oz. marscapone cheese
2+ tbs. sugar
-Chill a mixing bowl (preferably from a standing mixer). Whip up the heavy cream, cheese and sugar on medium high speed at first. It takes a while to form soft peaks. When it does, taste for sweetness and add a bit more sugar if you wish. Continue whipping until the mixture stiffens. Refrigerate until you’re ready to assembly the “cake.” At least an hour.
-Arrange 5-7 cookies on a plate or cake stand. If you use a plate, make the surface as flat as possible.
-Scoop out a big dollop or two of the cream mixture and spread it over the first layer of cookies. Don’t make it too thick or you’ll run out before you build up your seven layers. And don’t make it too thin or there won’t be enough cream to soften the cookies.
-Continue stacking the layers of cookies and spreading cream. Put your structural engineer’s cap on and try to build it as sturdily as you can.
-Really, it doesn’t matter how many layers you make it. If you want leftover cookies, great – don’t add as many layers. Just make sure you end with a layer of cookies on top and about a heaping cup of cream. Pop the cream in the fridge.

After sitting in the fridge overnight, the cookies are surprisingly easy to slice through.
-Cover the cake with plastic wrap. I lightly inserted a few toothpicks on top to make sure the wrap didn’t cling too much to the cake. Pop that in the fridge, too. Let it sit overnight.
-When you’re ready to serve, spread the last cup of cream over the top of the cake. Grate some chocolate shavings on top if you wanna get fancy.
This would be a fun cake for a kid’s birthday party. If you cover the cake completely with cream – sides, too – they’ll have no idea it’s filled with cookies. Surprise! Cookies! Cake! Whipped cream! You’ll be the hero.
Spicy Eggplant Relish ala Moosewod
July 22, 2011 § 1 Comment
One of the things we do when we spend time in Provincetown is head over to the Saturday farmers market. This time of year the stalls offer some great fresh produce we haven’t seen locally since last summer. This time we picked up two smallish eggplants. Versatile! Yummy! Pretty! Eggplants are all of the above … And also a bit short-lived on the countertop, especially in weather like this.
What to do with them? We could grill. We could stuff. We could make lasagna. We could bread. And we did none of those. Instead, when they began getting “long in the tooth,” we turned to an old standby – spicy eggplant relish.
I pulled this recipe from my Moosewood cookbook a few years ago for a get-together and used it as a dip. It got a great response. We used the leftovers in numerous ways, such as a spread for sandwiches, and also as an eat-by-the-forkful snack. Can’t remember exactly which Moosewood cookbook it came from, possibly the original. Luckily its a popular recipe and we were able to find it online – hey, we’re on vacation, we don’t travel with old cookbooks.
Recipe
2-3 Tbs olive oil
1 medium onion
1 small red pepper, large dice
2 small-medium eggplant, small cubes, don’t bother peeling
Salt, pepper and cayenne to taste
-heat oil over medium-low. Add onions and sautée until softish, 4-5 min.
-add cubed eggplant and red pepper. The eggplant will soak up a lot of the oil. Stir really well to coat all of it. Let it cook low and slow. Add a generous pinch or two of kosher salt and several turns of fresh pepper.
-Let it cook down awhile – 5 min or so. Add in as much cayenne as is appropriate for you. Cook partially covered for another 4-5 min.
-is the eggplant soft? Take it off the heat. Season with salt/pepper if needed.
We ran into one small problem during this – there was no cayenne in the house. How is that possible? We made due with some chili powder and red pepper flakes. The chili powder gave it a smoky flavor, making it a bit more savory. It was a good addition, actually. I added a bit too much red pepper flakes. Adding a small sliver of cheese when serving on a cracker will take care of that. Looking forward to having this in a tofu wrap for lunch. Perfect beach food.

In a Pickle
July 2, 2011 § 3 Comments
I was in a sour mood the other day. So, I made pickles.
I’ve been wanting to make pickles for a year or so, ever since I had an excess of small beets produced in our garden last year. I even kept the beets in a sealed bag in the fridge for several months, thinking I’d make pickled beets at some point. I didn’t. I searched for the just-right pickling recipe for so long, my beets eventually went bad.
And it’s not like I haven’t pickled anything before. I have. Pickled green cherry tomatoes. They were delicious. But still, there was something intimidating about the thought of making pickled beets.
I had had my eye on a Moosewood recipe for pickled red onions. I kept putting it off and putting it off. Then I spotted a recipe in Martha Stewart Living for pickled onions, radishes and snap peas – cocktail pickles. It got me thinking. Finally this week I decided to bite the bullet and pickle up some red onions.
I examined the Moosewood recipe – it called for brown sugar – and I examined the Martha recipe – white sugar. And then I dug out that old pickled green cherry tomato recipe – salt. I considered them all – and decided to go with this.
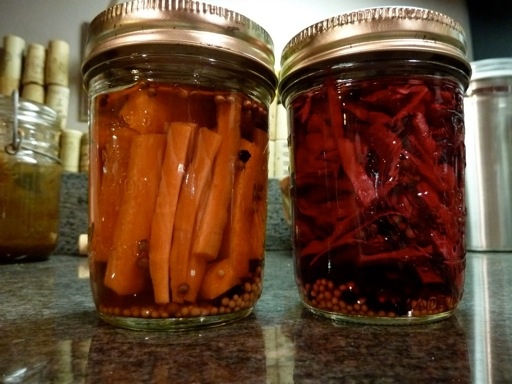
Jars:
Two jars of the one-pint jelly variety.
Ingredients:
1 cups cider vinegar
1/4 cup water
2 tbs packed brown sugar
-Boil the above and let cool.
-In each jar place
– 1/2 tsp coriander seeds
-1/2 tsp black peppercorns
-1/2 tsp mustard seeds
-1 bay leaf
-1 garlic clove
-1 sneaky dried chili pepper optional
While I was boiling the liquid, I realized I didn’t have red onions. Digging through the hydrator drawers, I found an older head of red cabbage and a carrot. I shredded enough cabbage to lightly pack one jar, and julienned a carrot to fit into the other jar. I divided the vinegar liquid between the two jars, and it was enough to cover the veggies. I covered the jars with lids and tightened with the rings, and popped them into the fridge. A day later, I had a taste of the results. And I have to say, not bad.
Kitchen Cobb Salad
June 25, 2011 § Leave a comment
When staying at our friend’s winter getaway in Vermont, the “fridge-tata” is the breakfast of choice. But it’s summer now, and our summer getaway is our friend’s bay-side home in Provincetown. No fridgetatas here. Lunches call for something lighter, something a little more summery. But just as easy.
Open the fridge. pull out the freshly harvested lettuce from the garden. Assess the leftovers. Make yourself a Kitchen Cobb Salad.
Now, a Kitchen Cobb is not an actual Cobb salad. It could be, I guess, if you just happen to have strips of turkey and bacon and egg and such. The Kitchen Cobb is much less structured, much less formal. Really, it’s anything you find in your fridge that you wouldn’t mind having atop some greens. Leftover roasted asparagus? Sure. Grilled salmon? Why not. A dollop of cottage cheese? Throw it on there. When it comes to a Kitchen Cobb, anything goes.
Today’s Kitchen Cobb benefitted from last night’s meal cooked for eight – steak, salmon, and lentil-bulgur salad, with the leftover pear and red onion green salad as a base. No steak on our salads, of course. We also threw in some roasted asparagus and goat cheese, and topped with lemon-oregano vinaigrette.
Jennifer gets credit for the name. She’s good like that.

Greek Salad Dressing
June 23, 2011 § 3 Comments

Lettuce and spinach from the garden
Did I mention it’s salad season? We have a plot in the Washington-Rutland Community Garden, right across from Flour Bakery, and it’s spitting out lettuce at a pretty good clip now. What we have most of now, actually, is spinach. It’s late June, and considering the warm temps, its the end of the spinach season. As my garden neighbor said, we had March until Memorial Day, then we had August. No normal spring weather – cool days and nights – to get a really good spinach crop going. Just cold and wet, not very good for seeds to germinate. And when they did finally come up, the seedlings didn’t like the heat. They sent up flower stalks immediately – at just 2 inches tall. Yikes. So what fills my salad spinner now are small, small spinach leaves. But a lot of them. Along with some of my larger lettuce leaves.
And did I mention I recently trimmed our oregano plant? It’s massive, and it was about to flower. To keep an herb going strong through the growing season, I trim off any flowers that pop up. I have a big bag of oregano clippings wrapped in moistened paper towel and sealed in a ziploc bag, sleeping nicely in the fridge. My recipes this week are leaning towards oregano.
What to drizzle over my spinach and lettuce leaves? The Lemon Oregano Vinaigrette is fabulous, but we need a little variety now and then. I found this recipe for a Greek-style dressing online at The Food Network site – it’s by a guy named Ernie? Never heard of him, but he’s got a knack for dressing, that’s for sure.
Ingredients
- 1/4 cup red wine vinegar
- 1/8 cup white wine vinegar (equals 2 tbsp)
- 1 teaspoon Dijon mustard
- 1 teaspoon salt – it calls for “fine salt,” but I used kosher and added a bit more to compensate
- 1/2 teaspoon fresh ground black pepper
- 1/4 teaspoon crushed red pepper or dash of cayenne, optional
- 1 small clove garlic
- 1/3 cup extra-virgin olive oil
- 1/2 cup canola oil
- 1 tablespoon chopped fresh oregano leaves
-Use a blender to combine the vinegars, mustard, salt, pepper, red pepper, and garlic on the puree setting. With the motor running, very slowly pour in a steady stream of olive oil to make a smooth dressing. Repeat with the canola oil.
-Transfer the dressing to a glass storage container and mix in the oregano. Season with salt and pepper to taste.
Lemon-Oregano Vinaigrette
June 11, 2011 § 1 Comment
Salad season is here. Fresh lettuce is popping up all over garden, and balsamic vinaigrettes are a little too heavy and wintry for delicate, home-grown leaves. There’s nothing that says summer quite like this Lemon-Oregano Vinaigrette. Sits politely and lightly but adds a lot to a conversation—yeah, that’s exactly how I’d describe it.
Jennifer found the recipe in the “R.S.V.P.” column in a few-years-old Bon Appetit, an adaptation of a recipe found at The Signature Room. We momentarily lost it, gone in the recycling maybe. But found once again—just last night—as a grainy photo on my computer. So, here it is, hopefully never to be lost again.
Ingredients
- 1/2 garlic clove
- 1 1/2 tsp freshly grated lemon zest
- 2 tbsp fresh lemon juice
- 1 tbsp distilled white vinegar
- 1 1/2 tsp Dijon mustard
- 1 1/2 tsp mild honey
- 1/4 tsp salt (kosher)
- 1/4 tsp black pepper
- 3 tbsp extra-virgin olive oil
- 2 tbsp canola oil
- 1 1/2 tsp chopped fresh oregano
-Blend all ingredients except oregano in blender until combined.
-Transfer to a bowl and stir in oregano. Salt and pepper to taste.
Dainty’s Concocted Curry
April 28, 2011 § Leave a comment
Several weeks ago I attempted my first-ever Indian-spiced meal. Cauliflower masala. Turned out pretty well—read about it HERE. That was then followed by a chana bateta from the Brooklyn Eats blogger, not blogged about here but really tasty. That one includes potatoes in a homemade tomato-based curry. From those two recipes I figured if you have some mustard seeds, cumin, coriander and a touch of heat—and a whole bunch of other stuff—you can whip up a curry.
Last night’s meal is what I’m calling Dainty’s Concocted Curry. I had 2/3 cup of coconut milk I needed to finish off, and I didn’t have all the ingredients for either of the above recipes, so I kinda/sorta combined the two. Believe me, it can be tweaked here and there, especially in the heat department. But I’m pretty proud that I even attempted getting jiggy with these East Asian flavors.
Dainty’s Concocted Curry

Dainty's Concocted Curry over roasted broccoli, marinated baked tofu and brown rice
2 shallots, thinly sliced
3-ish garlic cloves, minced
0.5-1.0 TBS grated ginger
1-2 TBS oil (I always use olive but you can use canola)
1 tsp mustard seed
1.5-2 tsp cumin
2 tsp coriander
0.5-0.75 tsp cayenne (Would have added a touch more if we had it.)
1 tsp tumeric
couple pinches fenugreek
1 28 oz. can whole tomatoes
2 big dollops of tomato paste
2/3 cup coconut milk
salt and pepper
-Heat oil in a fairly deep fry pan, medium heat. Add shallots and garlic. Move ’em about in the pan now and then and you’re looking for them to be a bit translucent or, better yet, wilted. At this point I just grate the ginger right on top of that, guesstimating a tablespoon’s worth.
-While this is happening, put the mustard seeds in a small skillet with a slight amount of oil and heat on med-high. Cover! These seeds will start popping when they are ready – not long, about 3 minutes.
-When shallots/onions/ginger are done, add mustard seeds and all the spices to the mix. Stir about – it’ll be kinda pasty. You just want to get some heat on them to begin releasing their aromas. Doesn’t take long – a minute or two.
-Now, this can of whole tomatoes—one recipe called for one diced tomato, the other for a 14 oz can diced tomatoes. Other than a handful of cherry tomatoes, all I had was this 28 oz can of whole tomatoes. Open the can, reach on in there and grab one or two tomatoes, hold it over the pan and squeeze—carefully, otherwise it’ll squish tomato juice all over you. Do this for the entire can, then add the juice. And also add the tomato paste‚—that’ll help thicken it. Add coconut milk and stir. Give it a taste and see if you need to add salt or anything extra. Since I added way more tomatoes than I needed, I gave the mix a few extra shakes of all the spices except the cayenne (no more left) and the mustard seeds. Bring to just about boiling, then turn down to simmer and thicken. We had this on low while our brown rice was cooking for 45 minutes. Stir now and then and check up on it.
We’re pretty much done at this point. We did a take-out sorta thing with this when it came to assembling the meal. I roasted some broccoli and also baked some marinated sliced tofu. We put a big spoonful of brown rice in a salad-sized bowl, added some of the broccoli and a few tofu slabs, and then spooned the curry on top. Not too bad, I have to say.
You? You can add some cubed potatoes (as in one of the original recipes) and let those cook away while the curry is simmering. Or, maybe add some mushrooms. Maybe some stir-fried chicken. Steamed veggies. It’s a curry, and you can use it to add a little East Asian flair to your Wednesday evenings without leaving the house.
