
Adding Landscape Edging
May 14, 2013 § 1 Comment
Jennifer and I moved into a newly constructed building last September. To be more accurate, it was still under construction when we moved in, with fine work still being done inside. At the time, the outside perimeter – the barely 3-ft. wide space between the sidewalk and the building – was still a rubble pile. Talk about unsightly. And being a gardener, I was itching to get at designing and installing a landscape that would match the mod look of this unique house.

The contractors eventually added some soil to that space. Correct that—it was fill and not anything near good garden soil. They also added in a strip of black steel landscape edging between the sidewalk and the soil. Thing is, though, the edging was flush with the sidewalk. Any sort of mulch that I would add to the garden space would wash onto the sidewalk. And with the $15 per bag mulch that I prefer, I didn’t want any of that washing away.

After the soil was added and a few plants were just hanging out.
Since the building is based on German Passivhaus technology, I wanted the landscaping to reflect some German landscape aesthetic. In other words, ornamental perennial grasses (the Germans love ornamental grasses). Ornamental grasses are awesome because they are low water use plants, add visually to a landscape even in the winter with their stiff (i.e. dead) stalks, look kinda cool as their feathery flowers blow in the wind, grow into nice-sized clumps, and come in a range of colors, textures and heights to choose from.The plantings around the new Shapiro Building at Boston Medical Center served as my inspiration.

Landscaping around the Shapiro Building at Boston Medical Center served as inspiration.
The grasses would act as the foundation of the landscape and I would add some color with bulbs, annuals or perhaps choose some smaller perennials later on. So, last fall I planted a dozen or so Pennisetum ‘Karly Rose’ grasses (those will become about 3 ft. high), added in several ‘Blue Pacific’ creeping junipers, and dug in 100 ‘Daydream’ tulips. And then we suffered through a very long and snowy winter.
In late March I trimmed back the dried stems of the grasses and eagerly awaited the tulips. And I admit, it was very, very exciting when they finally popped.
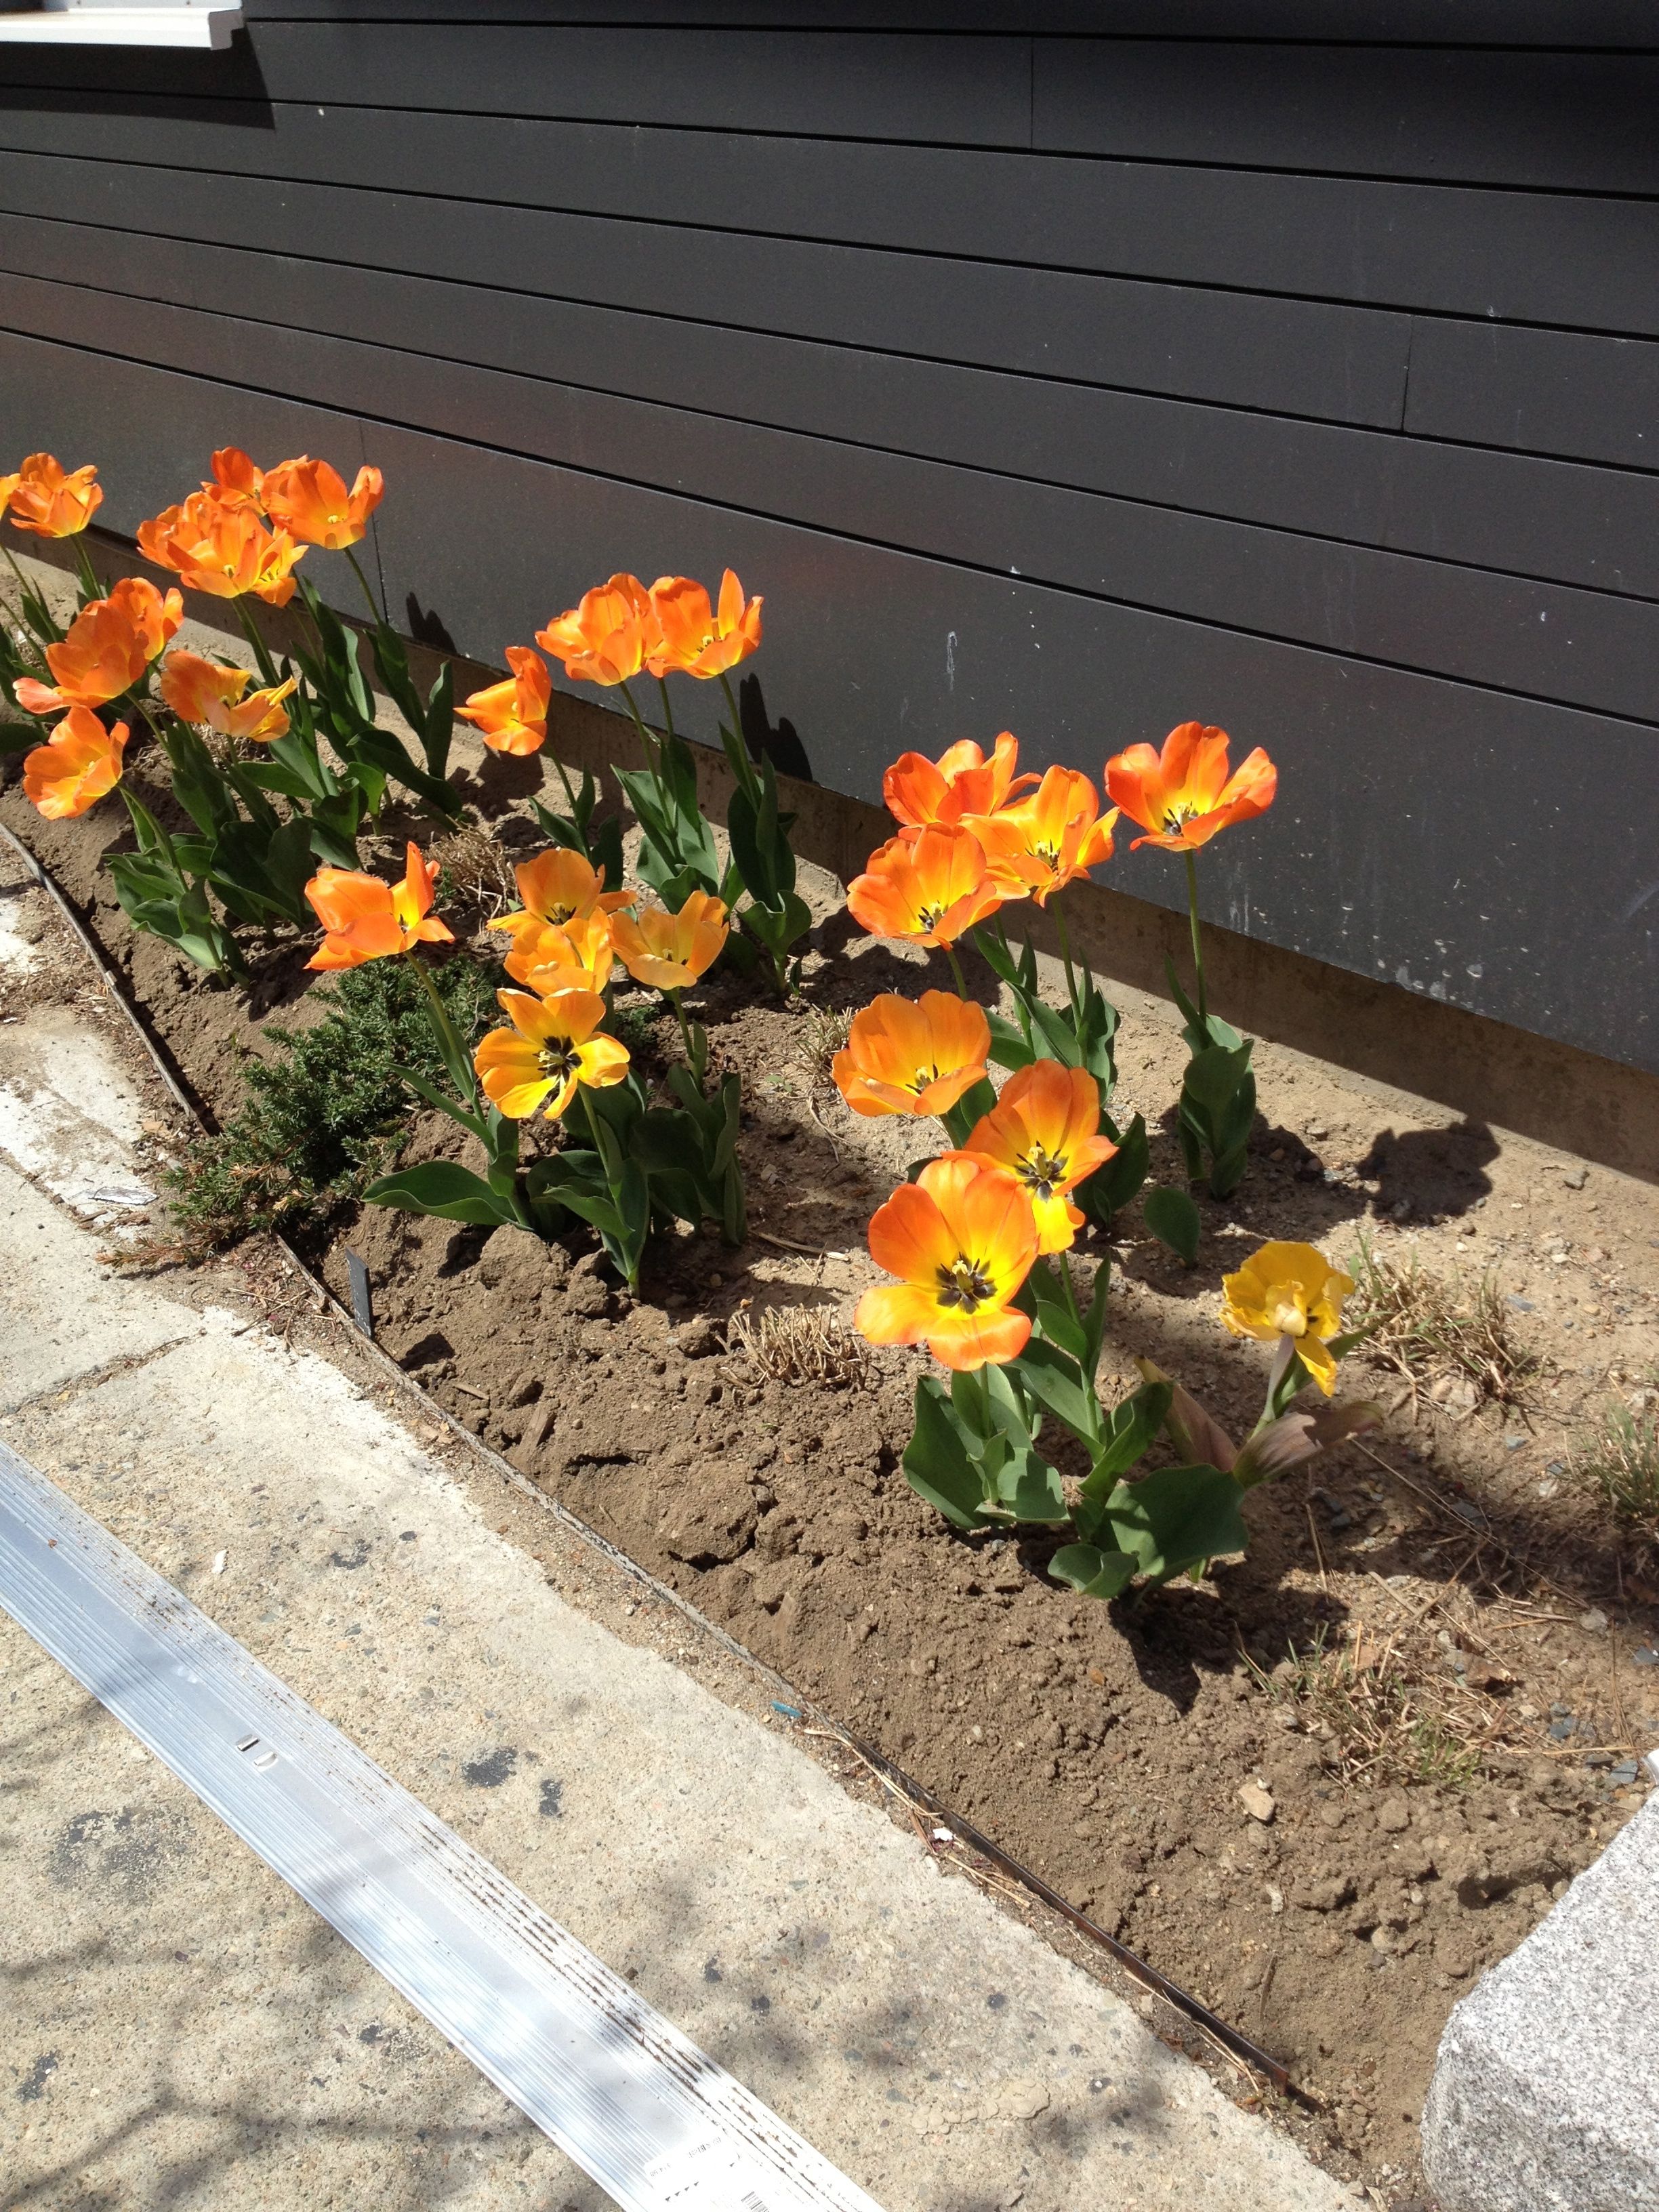
‘Daydream’ tulips in the new landscape.
Something was missing—other than the grasses, which I knew would emerge slowly over the course of April and May. What was missing was my favorite mulch—buckwheat hull mulch. Its dark color would really make those tulips so stunning. But in order to lay down the mulch, I needed something to hold the mulch inside the garden area without it washing away when it rained. After a little research, I decided on simple aluminum edging. I dug a shallow trench just behind the existing steel edging, inserted the aluminum edging about 1.5 inches down into the soil, secured it with some stakes every few feet, and backfilled with soil.

Landscape after the mulch and edging have been added.
Makes quite a difference, huh? Turns out the aluminum accents portions of the building’s edges, so that’s a bonus. And the edging and mulch will go well with the grasses once they emerge (you can just barely see one right there square in the front).
The best thing, though, is what the addition of the edging, the mulch, the plants—of the entire garden we are installing—is communicating to the neighbors. It says “We care about where we live and we really like it here.” In other words, curb your dog, put that wrapper in a trash can, throw that cigarette butt elsewhere, and it’ll continue to look nice for the whole neighborhood. While working on this over the course of several days many neighbors came up to me to comment on how nice it looks. “This was an overgrown trashy lot two years ago,” one young guy said to me. For a young man to even notice it enough to come up to a stranger and comment—well, I take it he was impressed with how that once empty lot has changed.
Because this garden space is so public, it’s not just for Jennifer and I to enjoy. It’s something the whole neighborhood can share in. That’s really what gardens are for. I’ll post more photos as the grasses grow and after I plant some annuals. Meanwhile I have a balcony herb garden in the works.
Let’s Grow Mushrooms
April 23, 2013 § Leave a comment
As a child I never liked mushrooms. Strike that—I never had the opportunity to eat mushrooms because my parents didn’t like them. Entering adulthood I just stayed away from encounters with mushrooms, picking them off the late-night pizzas ordered with friends at college and steering clear of them on Chinese food take-out menus.
Time has moved on, and so have my taste buds. I now love mushrooms. The earthier the mushroom, the better. Every shopping trip sees me sorting through the bins of different kinds. What a silly kid I was, I think as I marvel at the fresh and dried fungi.
This is the year I stop relying so heavily on store-bought mushrooms and I attempt to grow my own. With the popularity of “grow-your-own” everything—from bean sprouts to dinosaur kale to heirloom tomatoes—several different companies now offer grow-your-own mushroom kits. There are two that I know of:
Back to the Roots: Probably the most well-known of the mushroom-growing kits, the Back to the Roots kit promises to produce up to 1.5 pounds of pearl oyster mushrooms in about 10 days, and can produce at least two crops worth of mushrooms—maybe even three crops. Each box, which is shaped like a cardboard milk carton, contains 100% recycled plant-based waste which performs as the growing medium. Just open the lid, mist with water, and set it by a sunny window. How convenient to grow indoors! www.backtotheroots.com

Back to the Roots Pearl Oyster Mushroom Kit
Happy Cat Farm: This organic seed producer from Southeastern Pennsylvania offers a Shiitake Mushroom Log for outdoor mushroom growing. The log comes inoculated with a strain of mushroom spawn. Given proper shade and moisture, the log will produce shiitake mushrooms every 8-12 weeks for several years. Just place the log right on the ground in a place like a shaded mulched planting bed and keep it moist. If it dries out for more than a week, soak the log overnight in a container of water and it’ll be as good as new. www.happycatorganics.com

Happy Cat Shiitake Mushroom Log
Cool Wave Pansies for Cool Weather Color
April 4, 2013 § Leave a comment
My FedEx delivery person is a friendly woman, so chitchat usually ensues during the scrawling of my signature whenever she drops off a package. Last December when making a delivery, she commented on the beautiful pansies in my porch container. Mind you, it was pansies…in December. Not much blooms in December in New England, yet there these pansies were, looking as fresh as daisies in June. “What did you do to them to make them last so long?” she asked.
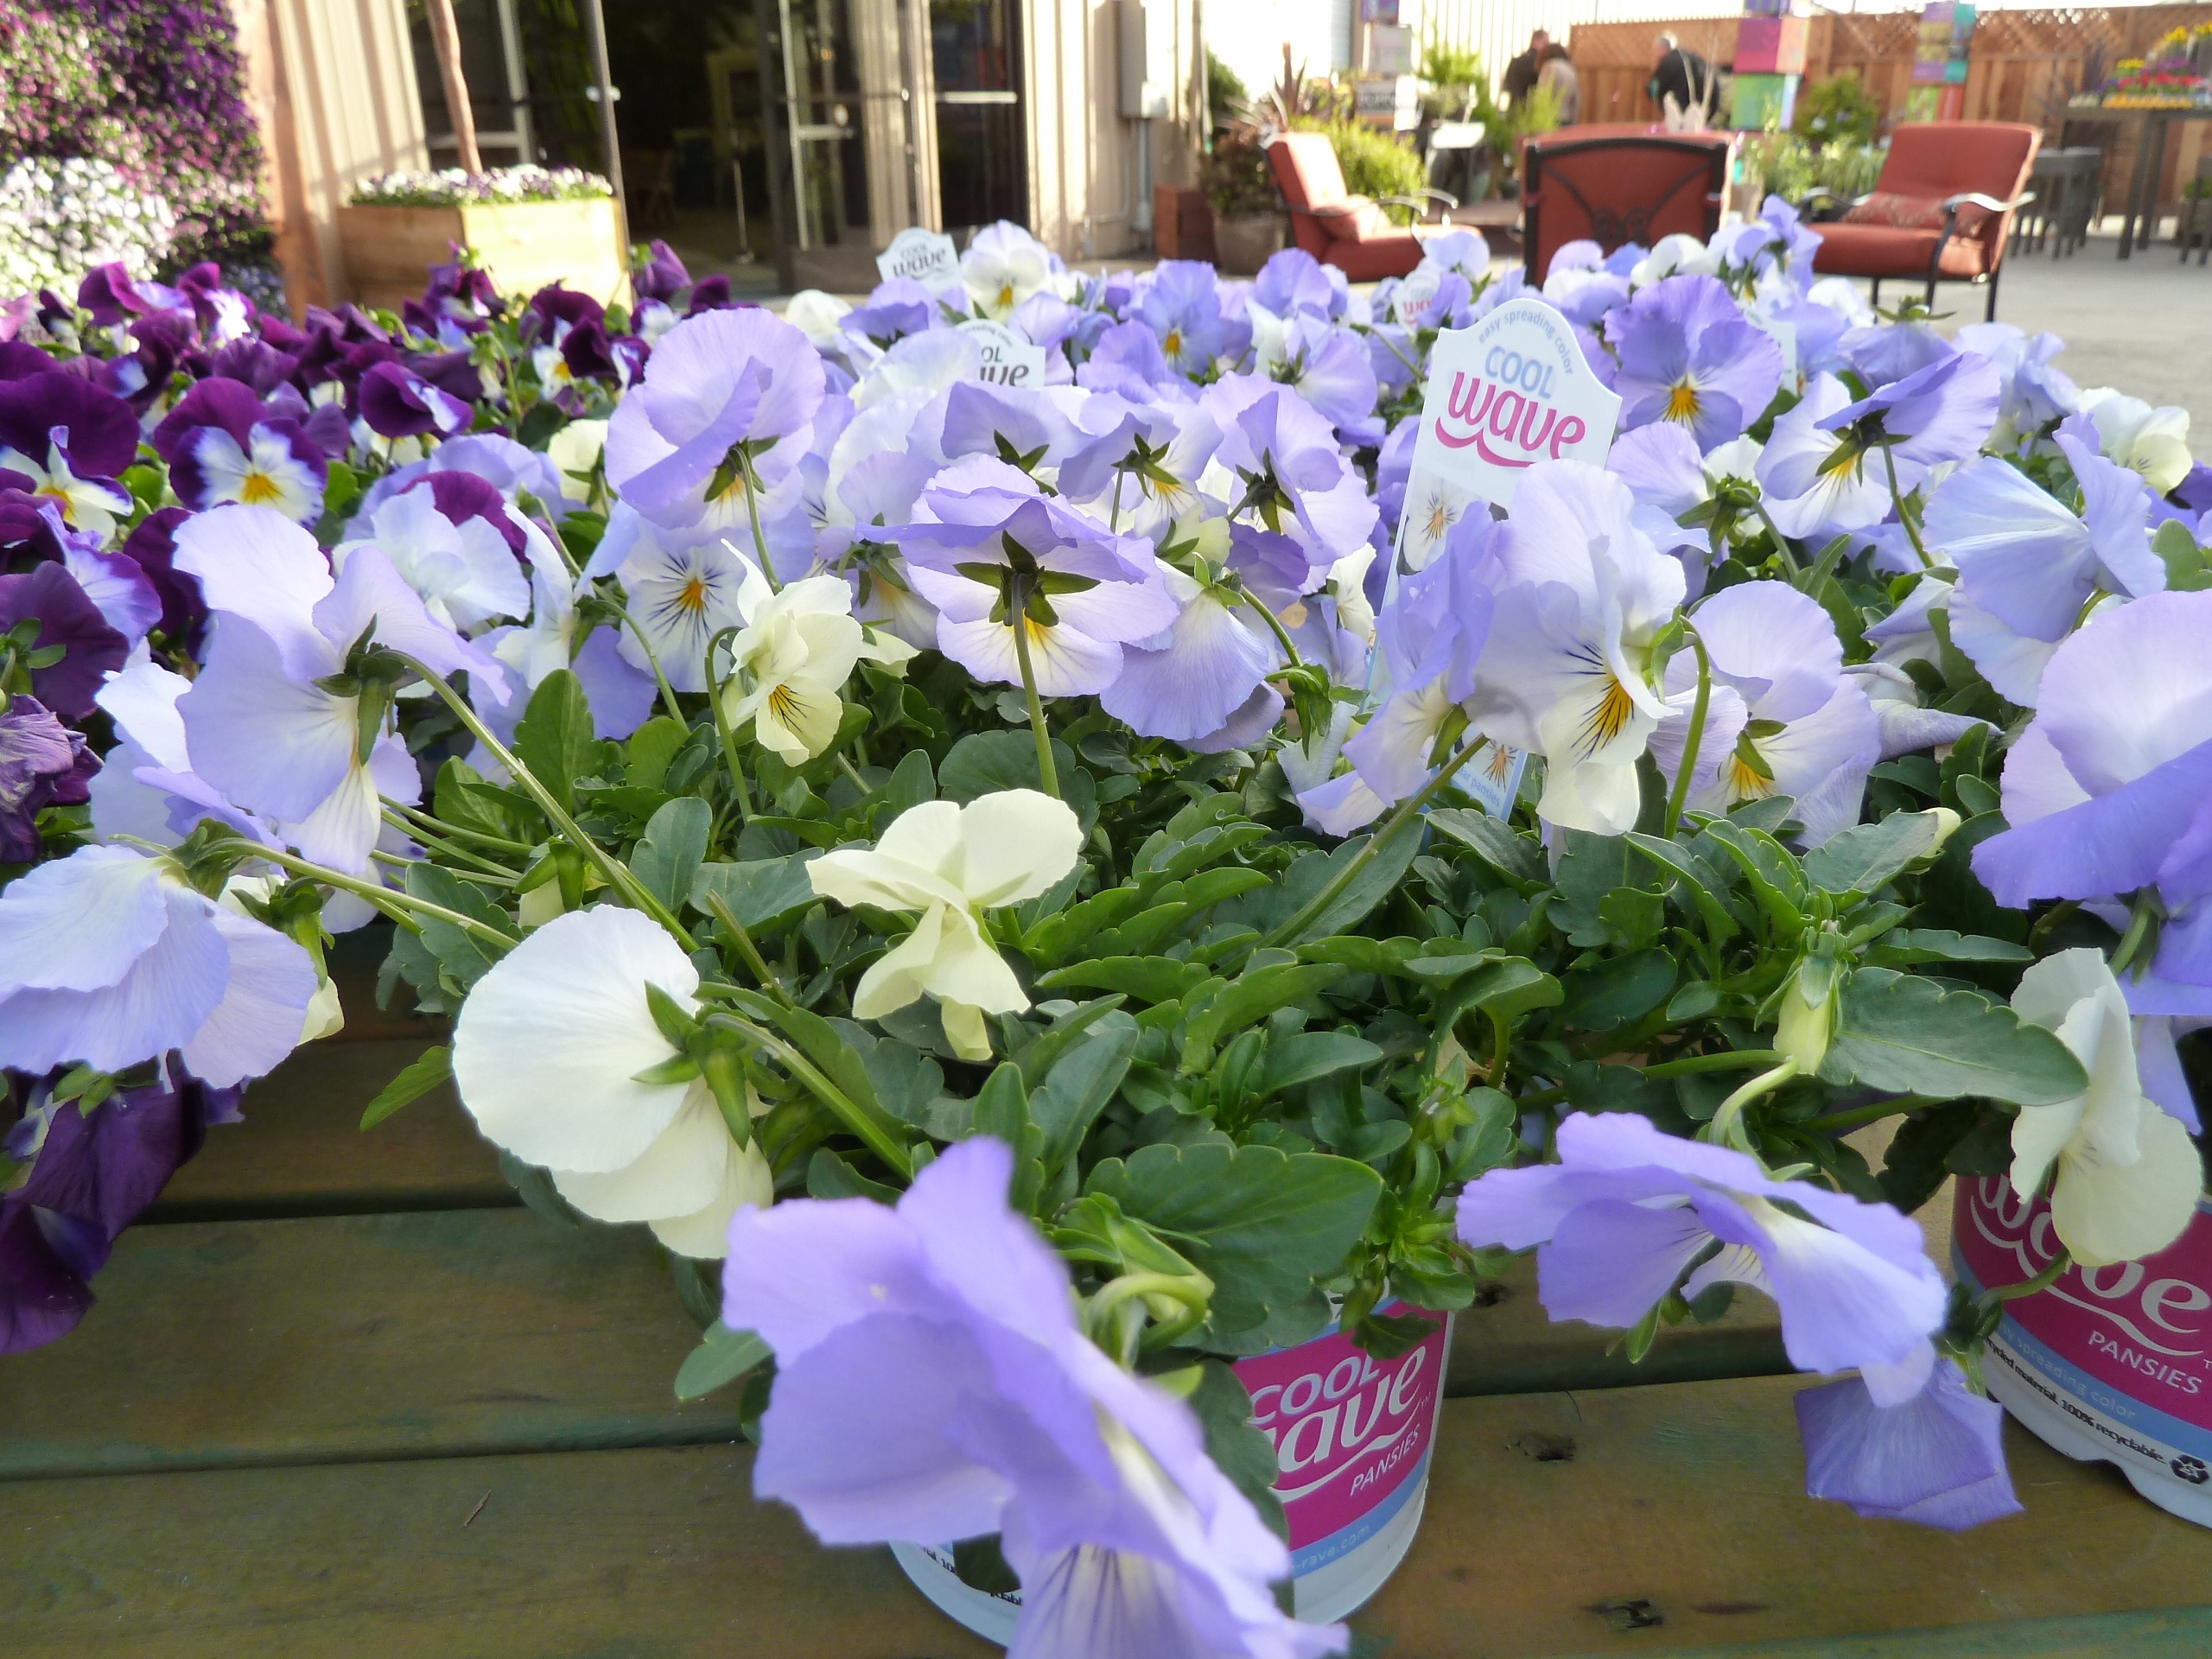
Cool Wave Blue
I did absolutely nothing to them. These were the new Cool Wave Pansies (obtained as free plant samples from the breeding company), and they can definitely stand the “cool” temperatures. At that time, the temperatures had definitely dipped down into the low 20s for several days and these plants were still looking great.
So, that’s the “Cool” part of the name. The “Wave” part of the name is inspired by the “wave” of vigorously blooming flowers on the plant, similar to what inspired the name of the Wave Petunia (from the same company). These Cool Wave pansies not only take cool temps, they spread themselves along the ground or trail from hanging baskets, creating a wave of color in the process.
My Cool Wave pansies finally succumbed to the cold weather—mostly. They hunkered down under at least a foot of snow on several occasions and, quite honestly, became an unsightly mess. However, in the beginning of March when the snow was finally gone, I noticed that some new growth emerging from the base of each plant and one lone flower that was about to bloom. It was a sad bloom that early on in the season, and it was eventually nipped by (yet another) snow storm. But during this first week of April each plant has about a half inch of new growth sprouting from its base. Resurrection time, indeed.
As luck would have it, I received another delivery of pansies to try out during early spring weather. Those are planted up right beside last season’s pansies. Both are still finding their feet as they settle into spring. In less than a month they should all look fabulous and really fill out the container.
Here are some further details:
Water: They like moist but not wet soil
Fertilizer: Every two weeks with an all-purpose liquid fertilizer
Spacing: Plant 12 inches apart, or for a lush-looking container, plant 3 plants in a 10- to 12-in. diameter container, basket or planter.
Height: They become 6-8 inches tall
Width: They trail to 2 feet in length or more!
Exposure: Full sun, at least 6 hours
Plants as Decor
March 28, 2013 § Leave a comment
There is something about plants that freak out people. I think because a plant is a living thing, people are worried about not caring for it. The plant’s death, they think, will haunt them like a ghost.
You know, it’s okay. Plants die. And you know something else? Plants live despite your worry. So go ahead and try to grow some plants, would you?
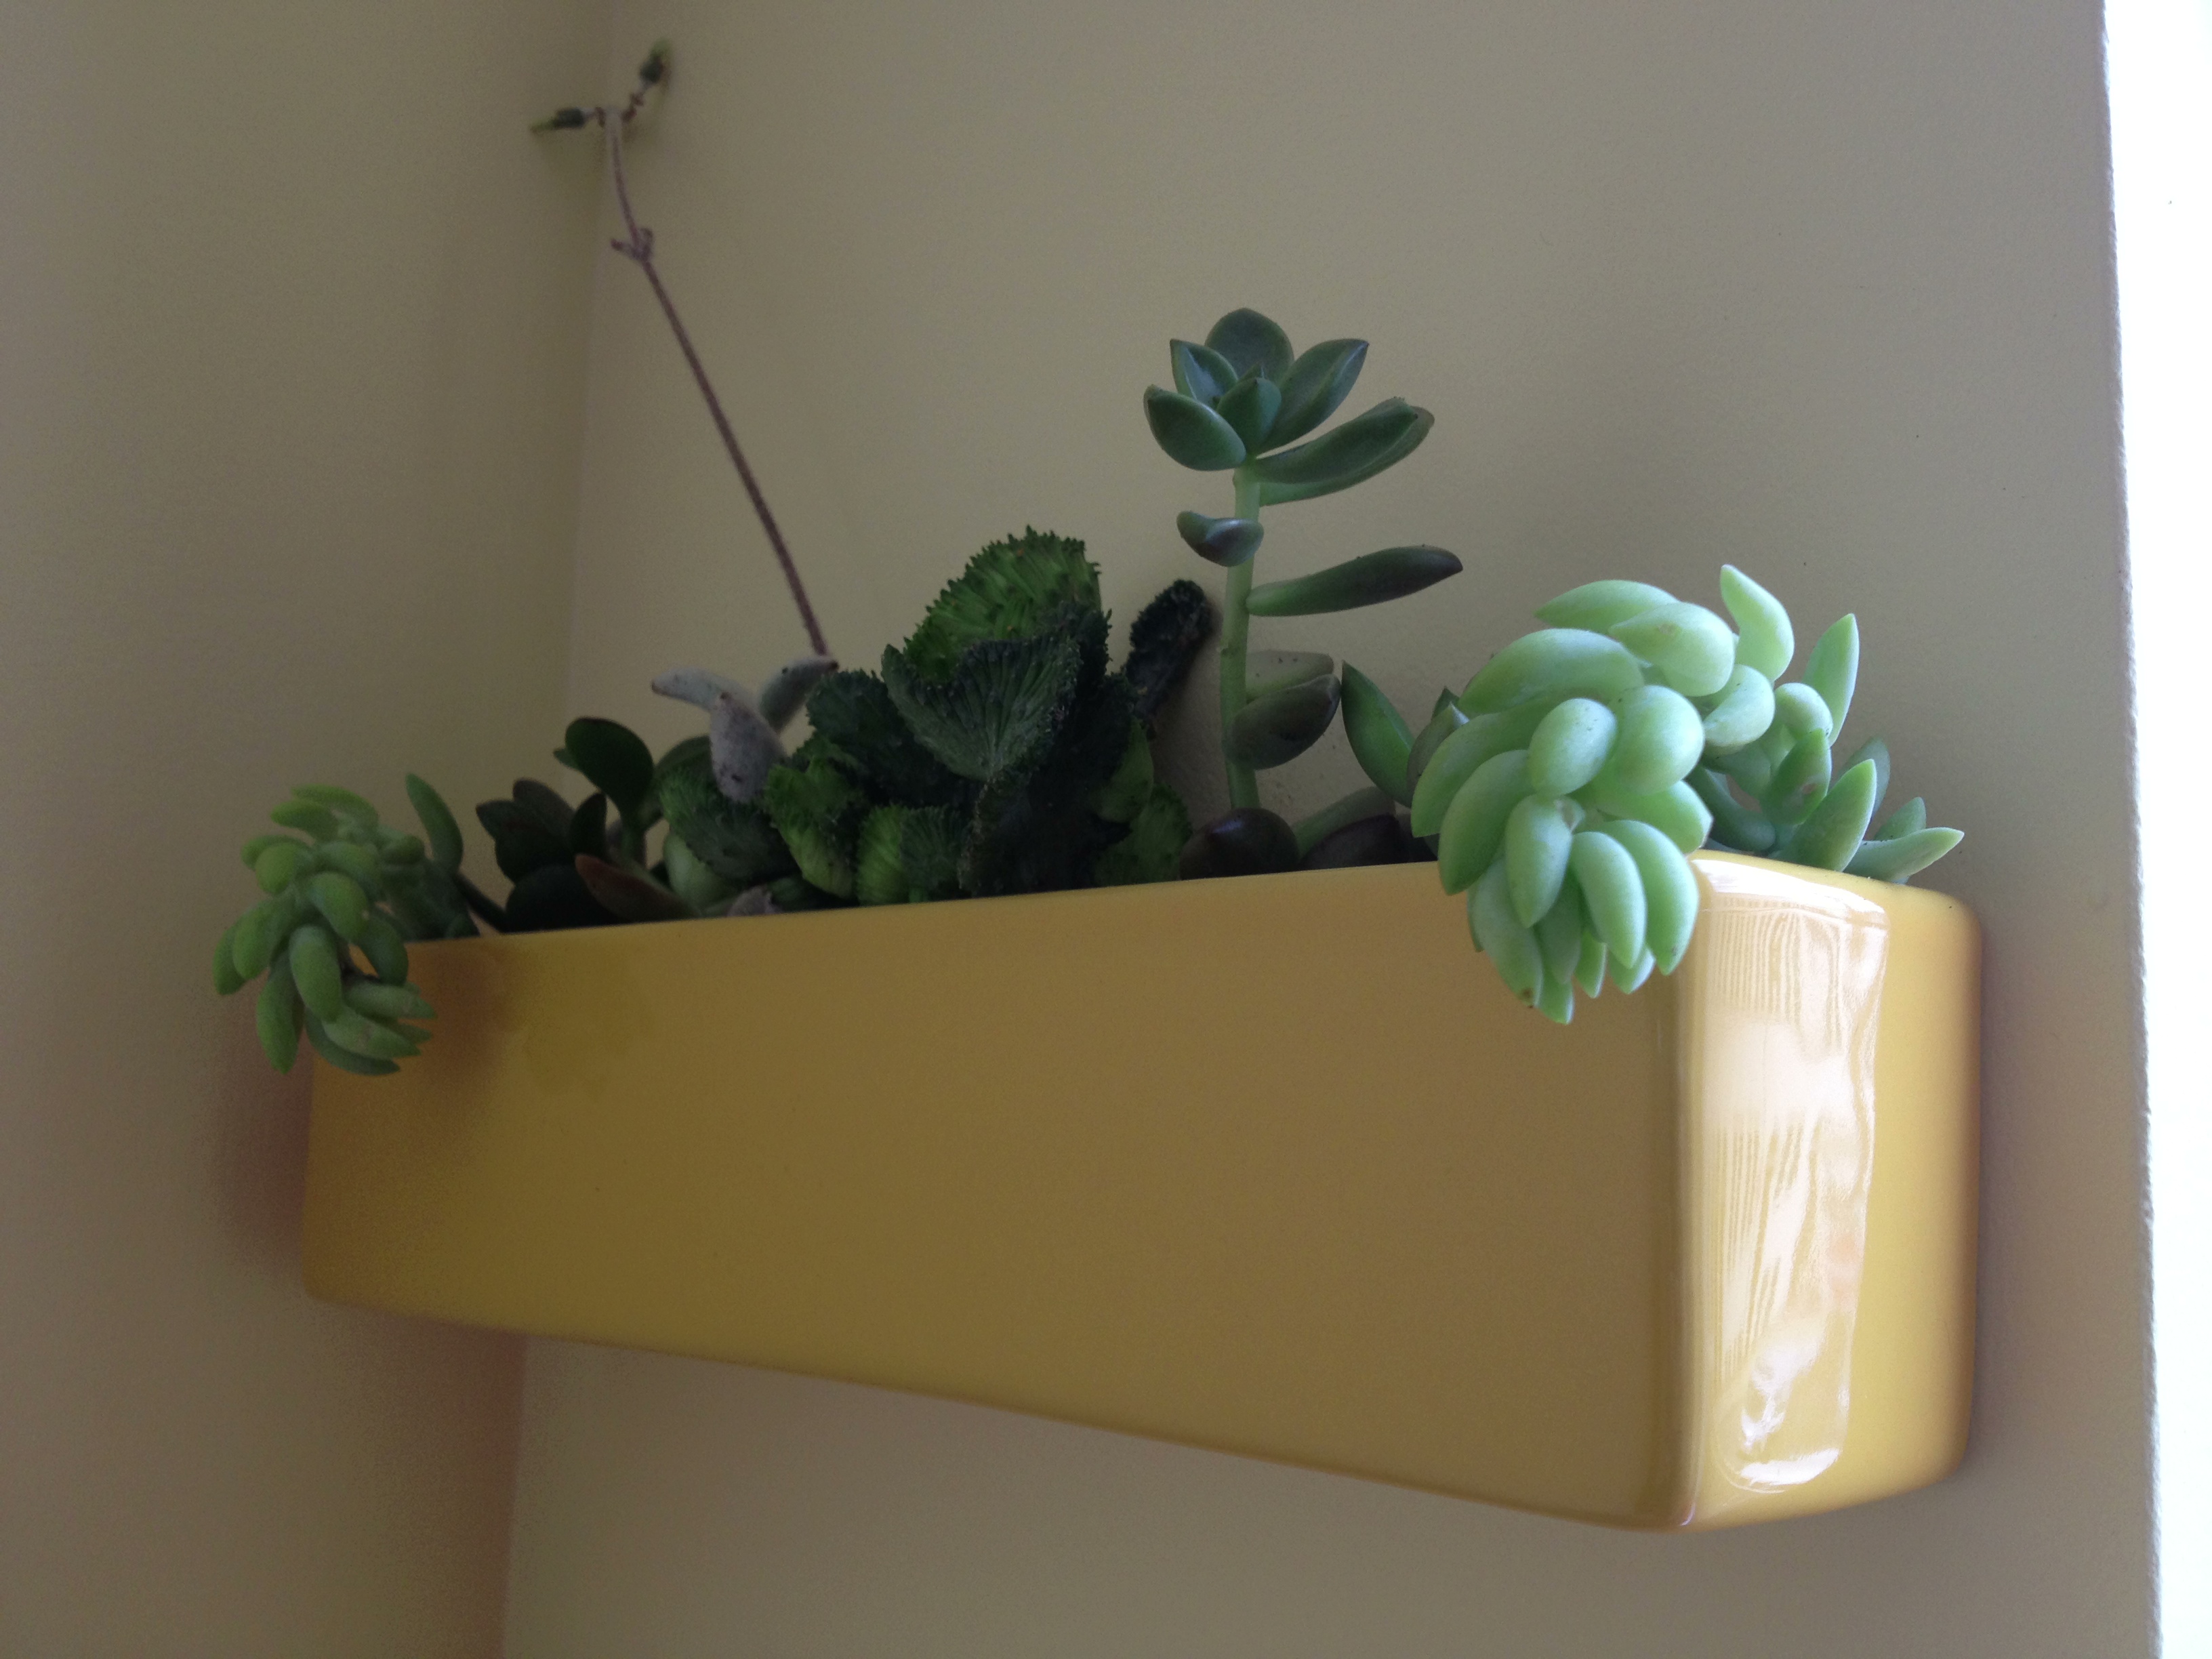
Try this: Think of plants as living decor. That’s exactly how I am treating my newest set of houseplants. And thanks to a nifty ceramic container sold by Chive.com, I can suspend my succulent garden on the wall, literally creating living art.
Some things to note:
- Succulents don’t need a lot of water. There are no drainage holes in this suspended container, so having plants that don’t need lots of water is a good thing. I won’t need to water this much at all.
- Because the container is horizontal, it was important to add some vertical elements to this “art.” One succulent has a long flowering stem and several others cascade over the container’s side.
- Succulents are fairly small and so are appropriate for such a small container.
- If the plants die, that’s ok. I can put other small plants in it. Or I could put non-plant things in the container, too. It’s decor, fashion, even. And I can change it up whenever I want.
Head on over to the Chive.com site and find a few plant and flower containers that fit your style. Then have some fun choosing otherworldly-looking succulents to pot up at your local farm market or garden center. It’s artwork as unique as any Rothko.
Hellebores for an Early Spring Garden
March 7, 2013 § Leave a comment
I made a spontaneous weekend trip to the Philadelphia Flower Show last weekend. What you usually see at early spring flower shows are flowers and shrubs and even trees that have been heated and pampered to produce blooms long before they’d do so with Mother Nature’s guidance alone. That’s what people come for—to be inspired by what the warmer weather promises.
Flower Show visitors don’t have to wait for long to see a few of the plants that were in full bloom indoors. The hellebore (Helleborus) is a good example of that.
Hellebores bloom in late winter and early spring—some varieties as early as January. There’s been a resurgence in interest in this perennial plant over the last decade or so, and plant breeders have introduced all sorts of cool flower colors and foliage colors. The hellebore’s leaves, by the way, are evergreen – they won’t die back in winter, which is another cool thing about this plant.
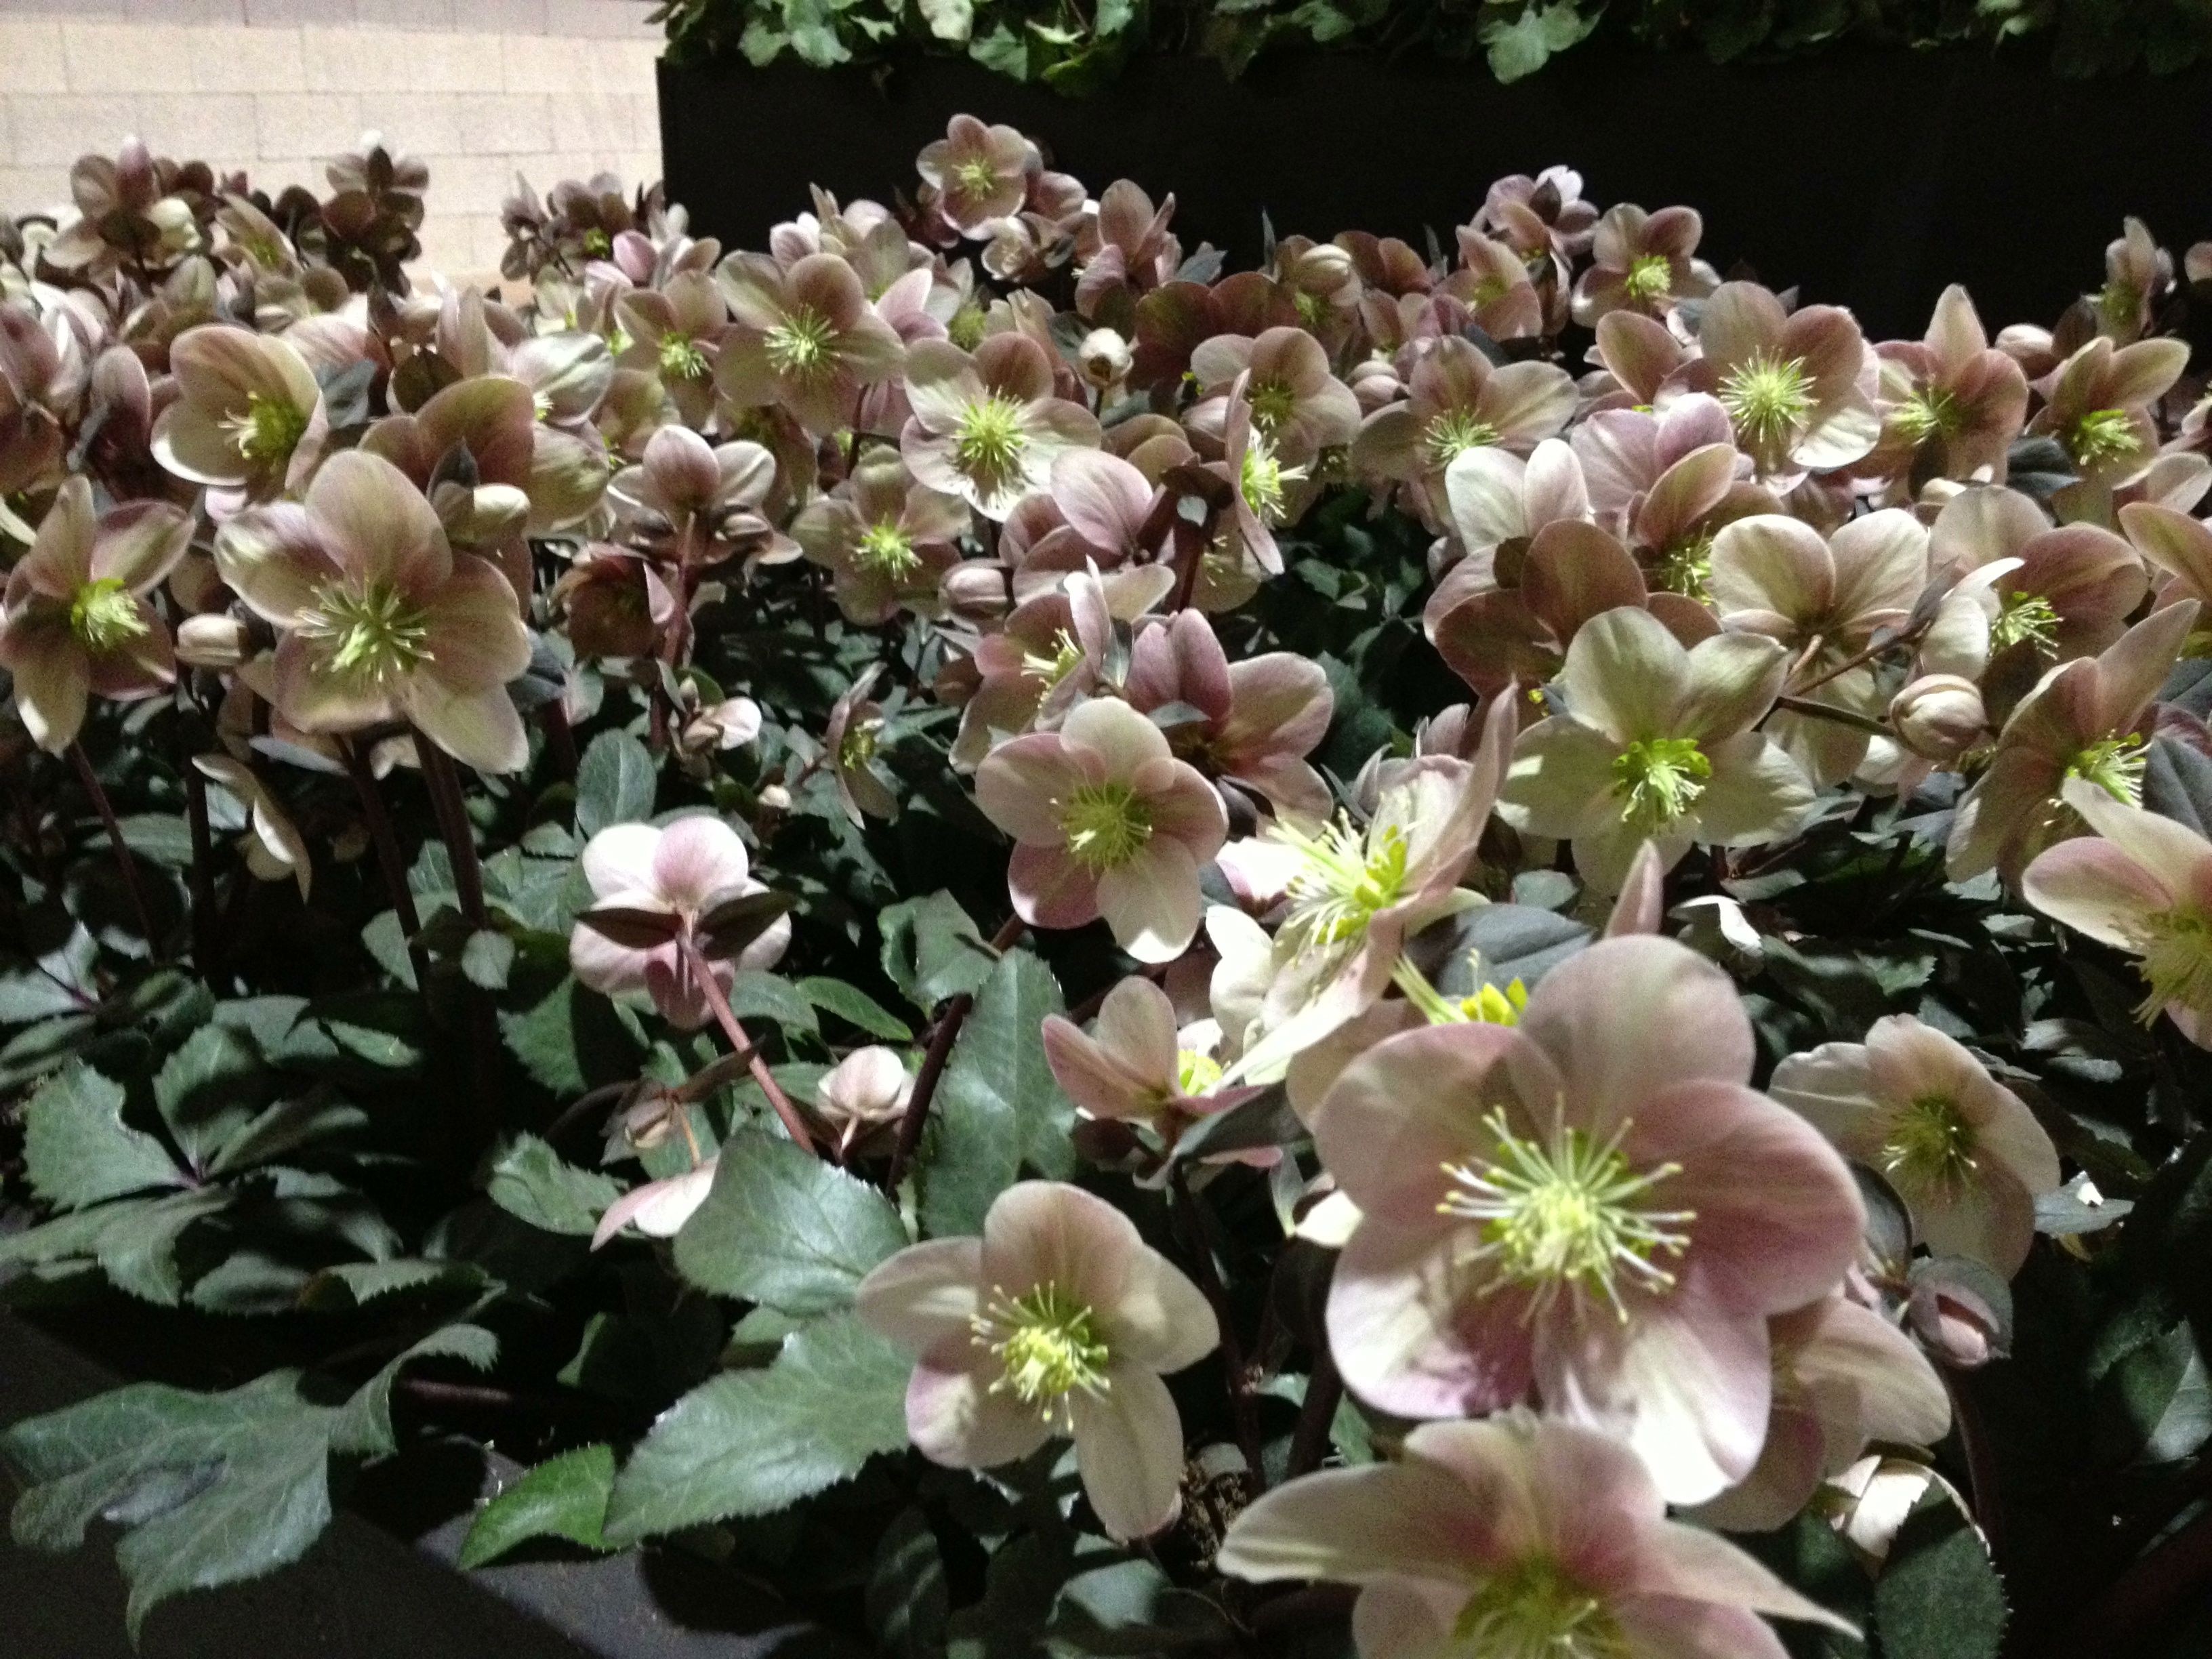
Helleborus ‘HGC Mahogany Snow’ planted en masse at the Philadelphia Flower Show
Take Helleborus ‘HGC Mahongany Snow’, for instance. This variety can begin blooming as early as January in some areas. And the blooms are beautiful—dusty rose buds open into creamy white flowers. The leaves are chocolatey in color and the flower stems reddish. The whole package—leaves, stems and blooms—gives the garden some low-key color at a low-key time of the year. And they’re astounding planted en masse like this.
There’s been a push in recent years to sell hellebores as potted plants in the late fall through winter. Give them as Thanksgiving and Christmas gifts, that sort of thing. Think of them as temporary blooming houseplants biding their time until you can plant them outdoors in spring. It’s a good idea. In fact, I have had a potted hellebore ‘Jacob’ in my office window since late December. It’s looking a little weak right now, but that’s ok—it’ll be heading outside in a few short weeks.
Why you might enjoy hellebores:
- Blooms way early in the year, just when your garden needs it!
- Come in some great colors—both flower and leaf color
- Perennials, so you’ll have them year after year, and they’ll get bigger each year
- Evergreen foliage for year-round color
- A good choice for your partial shade garden, under bushes, and so forth
- Deer resistant—bonus!
- Nice as winter houseplants—another bonus!
Have you tried hellebores? How have they held up in your garden? Leave a comment and let me know.
Poinsettias: Perks of the Job
December 6, 2012 § 3 Comments
With the nature of what I do for a living, I get free stuff. I write about plants and gardening, and companies send me free plants and gardening equipment. It’s nice. Really nice. And if any of those folks are reading this, I could really use a new pair of Felco hand pruners.
The “free stuff” slacks off in the off-season. Except each December I receive a nice gift from the folks at Ecke Ranch. Paul Ecke Sr. and Jr. “invented” the poinsettia as a holiday plant by giving away hundreds of plants for the sets of talk shows back in the 50s or 60s. And, well, now poinsettias are everywhere.
Being “everywhere” can backfire. Being everywhere can give any product the image of it being commonplace and worthless. And what’s happened is that you can now find poinsettias in your local Walmart or other big box store for 99 cents. And they are in pretty bad shape, too.
This gift I received from Ecke Ranch contained 8 samples of the antithesis of the throw-away poinsettia. They’re well-grown and beautiful—even shipped clear across the country via two-day FedEx. There’s something comforting in this plant that represents such such a hallowed season. The big, bushy, well-grown poinsettia really is not to be missed—and it’s well-worth the money, too.

And don’t they look so holiday-cheery grouped together?

holiday cheer
As you can see, not all poinsettias are red. This one is called Sparkling Punch. Pinks and off-whites—why not?

Poinsettia Sparkling Punch
And this one looks like it’s covered in tiny glittery dots. Kinda like Pointillism. Get it? Pointillism? Poinsettias? And it’s aptly named Monet. (This one plant has kinda slacky leaves—they aren’t all like this.)

This variety is called Monet.
I do like the large, bushy poinsettias, but something I like even more are the tiny tiny ones that are about 4 in. tall. Very cute, and you can set them around the house wherever you want. If you see one, grab one—or a half dozen—you’re gonna find them adorably fun to decorate with.
Oh, and about that “Watch out! They are poisonous to cats!” thing. It’s a myth. Well, it’s not a myth. They are poisonous. BUT, your cat or puppy or baby or you would have to eat several whole plants before anyone starts getting ill. And how likely is that going to happen? So, don’t fret about it.

Zucchini Tomato Mozzarella Sliders
July 27, 2012 § 4 Comments
Zucchini. It doesn’t stop.
Turn around for a minute and the long green veggie is 3 inches longer on the vine. Not kidding. Hold off on picking it for a day and … well … it becomes a billy club. Growing up, we’d throw the very large zukes into the pig pen. Healthy, zucchini-loving pigs, that’s what we had.
Lately, thoughts during my 25-minute walk back home from yoga have turned to how to use that day’s zucchini. Pizza. Pasta. Salad. I’ve done them all and wanted something different. Last night, my craving for a burger—really, the craving for something meaty between two bready buns—decided dinner for me. Why should sliders be reserved for meat eaters? Zucchini can play that game, too.
Ingredients
1 5-6 in. zucchini
2 tbs olive oil
1+tbs balsamic vinegar
1 spring oregano
kosher salt and freshly ground pepper
6 small French rolls, cut into top and bottom halves
2 cloves garlic, peeled
1-2 tbs olive oil
1 deliciously red heirloom tomato
mozzarella
1. Slice zucchini into rounds slightly thicker than 1/2 in. Discard (or eat!) the smaller rounds. Shoot for using 12 rounds.
2. Combine oil, vinegar, oregano, a big pinch of kosher salt and several turns of the pepper grinder in a medium bowl. Dip your finger in there and adjust seasoning if you’d like (more vinegar? more oil? It’s your food—make it taste the way you like!). Add zucchini slices and toss. Put aside.
3. Smash those garlic cloves with the back of your chef’s knife (on a cutting board, of course) and schmear it together until the garlic becomes kinda pasty. You can add a sprinkle of salt or not. Add this to a small bowl of 1-2 tbs olive oil. Brush this oil onto the bun halves.
4. Set a grill pan onto medium-high heat. When it’s hot, place buns, cut side down, onto the pan and flatten slightly. 10-15 seconds will do. Put grilled buns into a bowl and cover with a tea towel for now. Turn off grill pan.
5. Meanwhile … we’re still waiting for the zucchini to marinate a bit. Take this time to make a small side salad and whip up a quick vinaigrette.
6. Okay, done with the salad? Time to move on. Get that grill pan back up to medium high. Place your zucchini rounds onto the grill pan. Using a brush, dab some of the liquid remaining in the bowl onto each slice. Let them sit for 4-5 min, or until they get some nice-looking grill marks on the bottom.
7. While those are grilling, slice the tomato into 6 slices and add to whatever liquid remains in the bottom of that bowl.
8. Mozzarella. Time to slice it. Slice it about 1/4 in. thick or less, and into whatever size will sit nicely on top of a zucchini round.
9. Back to those zucchinis. They should be ready to flip onto the other side. Do that. Then place a bit of mozzarella on top of each. Let them grill for a minute.
10. Get your buns ready, working with one top and bottom at a time. This part is optional: Make some room in that grill pan and place the buns cut side down into the goodness the zucchini has been cooking in. Only takes a second, and remove quickly. If not doing that: Place one zucchini slice onto the bun bottom, and overlap a second on top of that. Add a slice of tomato. Top it off with other half of the bun. Repeat with the remaining zukes and buns.
Super. Good. I ate one and a half. Coulda had two. Or three.
Enjoy. I’m off to make zucchini bread now.
Do you have a favorite zucchini recipe? Share it in the comments section.
Cilantro Pesto
July 9, 2012 § 1 Comment
Pesto makes me happy. It just does. Just like the pop of a champagne bottle means something celebratory is about to happen, the knowledge that pesto is in a dish means something tasty is about to be experienced.
Basil is just the tip of the pesto iceberg. It’s the easy and expected version. But when the garden presents one with an abundance of other herbs, it’s a prime opportunity to explore other pesto flavors. That’s how this batch of cilantro pesto came about. A 3-ft. row of cilantro plants was beginning to bolt (i.e. grow quickly and produce flowers), and rather than let it go to seed, I opted to harvest it all. And what’s the best way to use large amounts of herbs? Pesto.
Like anything with cilantro, this pesto goes pretty darn well with Mexican food. It’s also tasty spread inside a grilled cheese and as a base for a pizza. And the best thing about this version is … it’s accidentally vegan.
Ingredients
- 1 cup loosely packed cilantro leaves (and I also threw in the flowers)
- 1 cup loosely packed parsley leaves
- 1/3 cup whole almonds
- 1 small fresh chili (jalapeno is good)
- 2 garlic cloves coarsely chopped
- 2 tbs fresh lime juice (I used a whole lime)
- 1/4 cup vegetable oil
- salt and pepper to taste
-Place all ingredients except lime juice and oil in a food processor and pulse several times to chop finely.
-With the foodpro on, add the juice and oil in a steady stream. If you like your pesto saucy, add a bit more oil.
All my pesto recipes come from the The Moosewood Kitchen Garden cook-garden book. The dill pesto recipe is also a keeper. I’ll share, but first my dill needs to grow a bit more.
Update on Dainty: Where’d June Go?
June 26, 2012 § 2 Comments
Hey, hi. Remember me?
Nope, haven’t forgotten about Dainty Dot. Truly have not. It’s been a bit of a busy month. And I’ve had other things on my mind. Dainty took a backseat for a bit.
A backseat to what, you ask? I’ll review in photos …

Boo – she’s growing too fast. My iPhone can barely hold all the photos I take of her.

June has so many Instagram opportunities. I can’t keep up. Pretty, huh?
 I’ve been perfecting my pizza-making skills. And man, do I have mad skills with the dough.
 Provincetown. Vacation. Roof deck. Water views. That really about says it.
 Thanks, Martha Stewart, for the most-appropriate Ptown vacation drink—the Cucumber Cape Codder. I’ll post that recipe soon. Really, so good.
 I’m slightly obsessed with yoga. Just slightly, but in a good way. Maybe I’ll talk to you about it someday. But for now, know that this mat has become a good friend of mine. And it’s fashionably orange.
 So, I’m a potato farmer’s daughter. And an avid gardener. And for the first time this spring, it dawned on me: Why not grow some potatoes? And it shall be so. Technically once the flowers bloom, there should be potatoes under the ground. But I want them bigger than peas, so I’ll await awhile.
 Oh, yeah, and by the way … we’re buying a brand-spankin’-new unit in a brand-spankin’-new building. New as in, this was a vacant lot last July. And it’s highly energy efficient and will have solar panels and is built like a German tank – and that’s with good reason. Obviously, more on this later.
 And have I mentioned lately that I love this person? I do, and I’ll do it all again in a split second. (Ain’t she a cutie, too?)
 More pizza. I might be slightly obsessed with pizza, too. Always in a good way.
 But just because I haven’t been writing here doesn’t mean I haven’t been writing. I’ve been taking a spin at fiction. More of a poetry-short fiction hybrid type of writing. And the cool thing is it’s fiction inspired by photos. The images are all iPhone Instagram pics taken by a friend who has a knack for knowing there’s a story behind a scene. Take this one, for instance. Who left the phone? Why? Who was on the other end? I took a stab at it—and a bunch of other photos, too—and am publishing them at The Skinny Fedora. The one above is “Hope Asked.”
So, give The Skinny Fedora a quick read and let me and the other skinny girl know what you think. Leave comments here or at www.theskinnyfedora.com.
Chive Vinaigrette
April 23, 2012 § 3 Comments
Stones. That’s my usual response to what fills my first harvest in my community garden in early spring. I spend days clearing the surface of these leaden balloons. But not really. They’re always right below the soil, ready to buoy themselves up. Stones float. That’s the only possible reason for their constant surfacing.
This year, though, my garden has a new, less stony epidermis. Long story short, there’s 6 inches of new soil in my garden. Stones, still, but not as in springs past. Give it some time.
This spring’s first harvest is chives. Thrilling, I know. I had never planted them in my plot. They were just sorta there, leftovers from previous gardeners. But just before that 6 inches was layered down, I thought to rescue the just-emerging greeny spikes. And because I gave them a second chase at life, I decided to fulfill their purpose. I decided to use them in some way in my kitchen.
Right. And exactly how would I do this? What does one do with chives, anyway? I’m sure something, but nothing came to mind. Google rescued me, of course, sending me to several different sites. Oh yes, biscuits were made—cheddar-chive biscuits. And a chive chip is on my wait list. But for now, let’s start with something easy. Let’s get all vinaigrette.
Epicurious, thank you for this green-as-goodness dressing. Faced with a minimalistic salad (i.e., I really didn’t have much in the fridge and the salad, therefore, was a bit weak), this vinaigrette perked up what was paltry. You could say, I suppose, that the chives did indeed fulfill their purpose.
Chive Vinaigrette, ala Epicurious:

Chive vinaigrette
- 1/3 cup chopped fresh chives
- 1/4 cup Champagne vinegar
- 1 small shallot, coarsely chopped
- 1 tsp honey
- 1 tsp Dijon mustard
- 2/3 cup vegetable oil
- 1/3 cup extra-virgin olive oil
1. Blend the first five ingredients in a blender. Just a note here: I used white wine vinegar – didn’t have Champagne vinegar in the house. And show yourself some respect—use a good Dijon.
2. Next up, the oils. With motor running, slowing add in the veg oil and evoo. Hold off on the last quarter of that 1/3 cup evoo. Give it a taste first and see if more is needed.
3. You’re done. Well, not really. Before you’re done, give it a taste. It’ll benefit from a pinch of kosher salt. Or two.
The result: a more-beautiful-than-you-expected green green green dressing with a light but full-flavored expression. But I give you fair warning before you enjoy —you’ll want to be sure the person you kiss next has also partaken. Chives are onions, after all.
