
Martha’s Chocolate Chip Cookie Icebox Cake
July 24, 2011 § Leave a comment
Martha, Martha, Martha … what where you thinking? Turning cookies into a cake? It’s this kind of thinking that made you rich and famous.

Martha's Chocolate Chip Cookie Icebox Cake
Spotted in the July issue of Martha Stewart Living, I just knew this dessert—alternating layers of homemade chocolate chip cookies with a marscapone whipped cream—would make my recuperating friend very, very happy. Okay, okay, I admit it, it would make me very happy, too. But I needed an excuse … and a houseful of people to eat it. No better time than weekend visit to Provincetown, I say.
As I said, the cake is layers of cookies—seven layers, in fact—and whipped cream. As it sits in the fridge overnight, the cookies soften a bit, just enough, from the whipped cream surrounding them. By the next day, you can slice right through the cake with no trouble.
Ingredients
8 dozen 2 1/4-in. chocolate chip cookies (use your favorite recipe)
4 cups heavy cream
8 oz. marscapone cheese
2+ tbs. sugar
-Chill a mixing bowl (preferably from a standing mixer). Whip up the heavy cream, cheese and sugar on medium high speed at first. It takes a while to form soft peaks. When it does, taste for sweetness and add a bit more sugar if you wish. Continue whipping until the mixture stiffens. Refrigerate until you’re ready to assembly the “cake.” At least an hour.
-Arrange 5-7 cookies on a plate or cake stand. If you use a plate, make the surface as flat as possible.
-Scoop out a big dollop or two of the cream mixture and spread it over the first layer of cookies. Don’t make it too thick or you’ll run out before you build up your seven layers. And don’t make it too thin or there won’t be enough cream to soften the cookies.
-Continue stacking the layers of cookies and spreading cream. Put your structural engineer’s cap on and try to build it as sturdily as you can.
-Really, it doesn’t matter how many layers you make it. If you want leftover cookies, great – don’t add as many layers. Just make sure you end with a layer of cookies on top and about a heaping cup of cream. Pop the cream in the fridge.

After sitting in the fridge overnight, the cookies are surprisingly easy to slice through.
-Cover the cake with plastic wrap. I lightly inserted a few toothpicks on top to make sure the wrap didn’t cling too much to the cake. Pop that in the fridge, too. Let it sit overnight.
-When you’re ready to serve, spread the last cup of cream over the top of the cake. Grate some chocolate shavings on top if you wanna get fancy.
This would be a fun cake for a kid’s birthday party. If you cover the cake completely with cream – sides, too – they’ll have no idea it’s filled with cookies. Surprise! Cookies! Cake! Whipped cream! You’ll be the hero.
Spicy Eggplant Relish ala Moosewod
July 22, 2011 § 1 Comment
One of the things we do when we spend time in Provincetown is head over to the Saturday farmers market. This time of year the stalls offer some great fresh produce we haven’t seen locally since last summer. This time we picked up two smallish eggplants. Versatile! Yummy! Pretty! Eggplants are all of the above … And also a bit short-lived on the countertop, especially in weather like this.
What to do with them? We could grill. We could stuff. We could make lasagna. We could bread. And we did none of those. Instead, when they began getting “long in the tooth,” we turned to an old standby – spicy eggplant relish.
I pulled this recipe from my Moosewood cookbook a few years ago for a get-together and used it as a dip. It got a great response. We used the leftovers in numerous ways, such as a spread for sandwiches, and also as an eat-by-the-forkful snack. Can’t remember exactly which Moosewood cookbook it came from, possibly the original. Luckily its a popular recipe and we were able to find it online – hey, we’re on vacation, we don’t travel with old cookbooks.
Recipe
2-3 Tbs olive oil
1 medium onion
1 small red pepper, large dice
2 small-medium eggplant, small cubes, don’t bother peeling
Salt, pepper and cayenne to taste
-heat oil over medium-low. Add onions and sautée until softish, 4-5 min.
-add cubed eggplant and red pepper. The eggplant will soak up a lot of the oil. Stir really well to coat all of it. Let it cook low and slow. Add a generous pinch or two of kosher salt and several turns of fresh pepper.
-Let it cook down awhile – 5 min or so. Add in as much cayenne as is appropriate for you. Cook partially covered for another 4-5 min.
-is the eggplant soft? Take it off the heat. Season with salt/pepper if needed.
We ran into one small problem during this – there was no cayenne in the house. How is that possible? We made due with some chili powder and red pepper flakes. The chili powder gave it a smoky flavor, making it a bit more savory. It was a good addition, actually. I added a bit too much red pepper flakes. Adding a small sliver of cheese when serving on a cracker will take care of that. Looking forward to having this in a tofu wrap for lunch. Perfect beach food.

Hiking Wellfleet Bay Wildlife Sanctuary
July 20, 2011 § Leave a comment
It’s been a long, long spring and summer. All work and no play makes Dainty a very sad and tense Dot. Good thing we scheduled vacation for this week.
We typically vacation in Provincetown and spend the whole time lying low—as in low on a beach towel. But, as crazy as this is gonna sound, being on a beach towel soaking up the sun can be a bit boring after awhile. Our solution for that is taking a hike.
This time around, we headed to Wellfleet Bay Wildlife Sanctuary. It’s a Mass. Audubon sanctuary on the western edge of the Cape  Cod forearm, right on Wellfleet Harbor. Lots of marsh grass and sandy soil, lots of Cape woodland, lots of birds and wildlife, so bring a camera. And there’s lots of green head flies and sand flies, so arm yourself with repellent and you’ll be fine. There are … let’s see … close to 4-5 miles of hiking trails, so pack a light lunch and enjoy it while watching the shore birds at the end of the boardwalk.
The folks at Mass. Audubon must have gotten some inspiration of Groupon deals, because when we arrived at the nature center they were offering a “half-price sale” on membership. $10 would have gotten the two of us into the sanctuary for the day. For just $29, we could have a year-long family membership that would give us free admission to the 50 Mass. Audubon Wildlife Sanctuaries throughout the state. And, it feels pretty terrific to support an organization that is protecting our state’s natural habitat.
Somewhere along this hike my eye decided to focus on the little things nature had to offer. Except for a couple of spectacular angiosperms, I mainly captured slime molds, lichen, fungi and the occasional gymnosperm. (Look at me, throwing around fancy botanical references. I feel like I’m in college again!) The vistas at Wellfleet are beautiful, but some of the coolest things are underfoot.
In a Pickle
July 2, 2011 § 3 Comments
I was in a sour mood the other day. So, I made pickles.
I’ve been wanting to make pickles for a year or so, ever since I had an excess of small beets produced in our garden last year. I even kept the beets in a sealed bag in the fridge for several months, thinking I’d make pickled beets at some point. I didn’t. I searched for the just-right pickling recipe for so long, my beets eventually went bad.
And it’s not like I haven’t pickled anything before. I have. Pickled green cherry tomatoes. They were delicious. But still, there was something intimidating about the thought of making pickled beets.
I had had my eye on a Moosewood recipe for pickled red onions. I kept putting it off and putting it off. Then I spotted a recipe in Martha Stewart Living for pickled onions, radishes and snap peas – cocktail pickles. It got me thinking. Finally this week I decided to bite the bullet and pickle up some red onions.
I examined the Moosewood recipe – it called for brown sugar – and I examined the Martha recipe – white sugar. And then I dug out that old pickled green cherry tomato recipe – salt. I considered them all – and decided to go with this.
Jars:
Two jars of the one-pint jelly variety.
Ingredients:
1 cups cider vinegar
1/4 cup water
2 tbs packed brown sugar
-Boil the above and let cool.
-In each jar place
– 1/2 tsp coriander seeds
-1/2 tsp black peppercorns
-1/2 tsp mustard seeds
-1 bay leaf
-1 garlic clove
-1 sneaky dried chili pepper optional
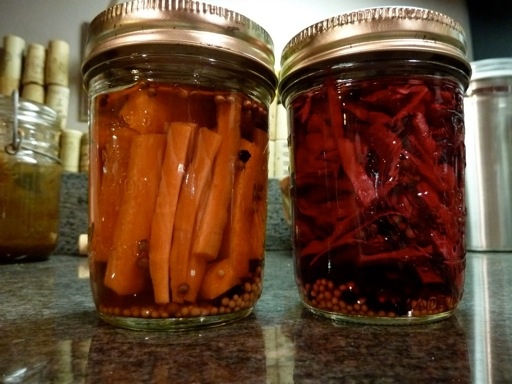
While I was boiling the liquid, I realized I didn’t have red onions. Digging through the hydrator drawers, I found an older head of red cabbage and a carrot. I shredded enough cabbage to lightly pack one jar, and julienned a carrot to fit into the other jar. I divided the vinegar liquid between the two jars, and it was enough to cover the veggies. I covered the jars with lids and tightened with the rings, and popped them into the fridge. A day later, I had a taste of the results. And I have to say, not bad.
Kitchen Cobb Salad
June 25, 2011 § Leave a comment
When staying at our friend’s winter getaway in Vermont, the “fridge-tata” is the breakfast of choice. But it’s summer now, and our summer getaway is our friend’s bay-side home in Provincetown. No fridgetatas here. Lunches call for something lighter, something a little more summery. But just as easy.
Open the fridge. pull out the freshly harvested lettuce from the garden. Assess the leftovers. Make yourself a Kitchen Cobb Salad.
Now, a Kitchen Cobb is not an actual Cobb salad. It could be, I guess, if you just happen to have strips of turkey and bacon and egg and such. The Kitchen Cobb is much less structured, much less formal. Really, it’s anything you find in your fridge that you wouldn’t mind having atop some greens. Leftover roasted asparagus? Sure. Grilled salmon? Why not. A dollop of cottage cheese? Throw it on there. When it comes to a Kitchen Cobb, anything goes.
Today’s Kitchen Cobb benefitted from last night’s meal cooked for eight – steak, salmon, and lentil-bulgur salad, with the leftover pear and red onion green salad as a base. No steak on our salads, of course. We also threw in some roasted asparagus and goat cheese, and topped with lemon-oregano vinaigrette.
Jennifer gets credit for the name. She’s good like that.

Greek Salad Dressing
June 23, 2011 § 3 Comments

Lettuce and spinach from the garden
Did I mention it’s salad season? We have a plot in the Washington-Rutland Community Garden, right across from Flour Bakery, and it’s spitting out lettuce at a pretty good clip now. What we have most of now, actually, is spinach. It’s late June, and considering the warm temps, its the end of the spinach season. As my garden neighbor said, we had March until Memorial Day, then we had August. No normal spring weather – cool days and nights – to get a really good spinach crop going. Just cold and wet, not very good for seeds to germinate. And when they did finally come up, the seedlings didn’t like the heat. They sent up flower stalks immediately – at just 2 inches tall. Yikes. So what fills my salad spinner now are small, small spinach leaves. But a lot of them. Along with some of my larger lettuce leaves.
And did I mention I recently trimmed our oregano plant? It’s massive, and it was about to flower. To keep an herb going strong through the growing season, I trim off any flowers that pop up. I have a big bag of oregano clippings wrapped in moistened paper towel and sealed in a ziploc bag, sleeping nicely in the fridge. My recipes this week are leaning towards oregano.
What to drizzle over my spinach and lettuce leaves? The Lemon Oregano Vinaigrette is fabulous, but we need a little variety now and then. I found this recipe for a Greek-style dressing online at The Food Network site – it’s by a guy named Ernie? Never heard of him, but he’s got a knack for dressing, that’s for sure.
Ingredients
- 1/4 cup red wine vinegar
- 1/8 cup white wine vinegar (equals 2 tbsp)
- 1 teaspoon Dijon mustard
- 1 teaspoon salt – it calls for “fine salt,” but I used kosher and added a bit more to compensate
- 1/2 teaspoon fresh ground black pepper
- 1/4 teaspoon crushed red pepper or dash of cayenne, optional
- 1 small clove garlic
- 1/3 cup extra-virgin olive oil
- 1/2 cup canola oil
- 1 tablespoon chopped fresh oregano leaves
-Use a blender to combine the vinegars, mustard, salt, pepper, red pepper, and garlic on the puree setting. With the motor running, very slowly pour in a steady stream of olive oil to make a smooth dressing. Repeat with the canola oil.
-Transfer the dressing to a glass storage container and mix in the oregano. Season with salt and pepper to taste.
Under the Bruins Flag
June 21, 2011 § 1 Comment
This is not your typical Dainty post. But I have a set of photos I think you’re gonna like. Especially if you’re a Boston Bruins fan.
I was on the South End Garden Tour on June 18—I know, bummer, I couldn’t make it to the Bruins Rolling Rally. But one of the garden tour stops just happened to have a great view of the Hancock buildings. It was a gorgeous day in the city and it was a gorgeous shot of the Bruins championship flag flying from the smaller Hancock building.

Bruins flag flying proudly on the Hancock building
Thinking it would make a really cool Facebook profile pic, I zoomed in and framed the flag. When I downloaded, I noticed a little somethin’ somethin’ under the flag. And it just happened to be a person.

He had the best view of the Bruins Rolling Rally
So, if you know this guy, or you know someone who knows someone who knows this guy, tell him about it. He deserves to make it his own FB profile pic.
Work-Life Balance Off Kilter
June 12, 2011 § Leave a comment
I’m throwing a pity party for myself. Bear with me.
My plate is full. Dripping gravy off the side, actually. A sample of what I have going on:
- I’m an editor for a trade magazine. Full time. Travel, writing, managing freelancers and editorial schedules and advertising opps, putting out (a kickass) weekly enewsletter, being a resource 24/7 for my industry, etc etc.
- I am a paid blogger, weekly posts.
- I put in about 16 hours a week managing a series of gardens. Seasonal, but still.
- I’m also a paid podcaster. Twice a month and I’m just the color commentator. But still, it’s about scheduling.
That’s the paid stuff, as meager as it is. On top of that:
- I volunteer for my local garden tour – on the committee, actually.
- I’m on my community garden’s board of directors.
- I’m a die-hard Red Sox fan. That’s three hours a day right there. I know, that’s not a good excuse, but still.
- I run and bake and cook, or at least I try to. When I have the time.
And all I really want to do is that last line. The running and baking and cooking. All I want to do is Dainty.
Get over it, we’re all in the same boat, right? I know that, but why? Because all the work gets us more money which gets us more stuff? That may be true for some people, but not I. My portion of the spoils pays for half the mortgage and monthly bills, and self-employment income tax—that’s about it. So, it’s not about the money. Okay, so maybe it’s about paying the mortgage—banks do like to get paid. But I’m not doing this for the money.
If I’m not doing it for the fortune, it must be for the fame. Ha! Okay, so, when I travel on business, people I don’t even know do come up to me and talk to me like we’re great friends. And that’s only because I appear in their inboxes weekly and mailboxes monthly and Facebook feeds randomly. Is that fame? Nope. It’s kinda nice, but still.
Then I must do it because it’s all easy, right? Wrong. On my daily to-do list, there is at least one thing (who am I kidding? Three things!) that just doesn’t happen. Even remotely. I have so much going on, I can give none of them the quality and respect due to them. Oh boy, and does that stink. My father the farmer, god love him, is and was always saying, “good enough.” The weed-choked garden was good enough. The produce with spots going into the bag for sale, good enough; the plowing job, good enough; the barn in need of repair, good enough. His health, his family, always just good enough. Dear lord, it’s happening to me. Just in order to get it done—and good enough—to move on to the next.
Why am I doing it, then?
That’s a very good question. One I’ve been asking myself a lot lately.
Lemon-Oregano Vinaigrette
June 11, 2011 § 1 Comment
Salad season is here. Fresh lettuce is popping up all over garden, and balsamic vinaigrettes are a little too heavy and wintry for delicate, home-grown leaves. There’s nothing that says summer quite like this Lemon-Oregano Vinaigrette. Sits politely and lightly but adds a lot to a conversation—yeah, that’s exactly how I’d describe it.
Jennifer found the recipe in the “R.S.V.P.” column in a few-years-old Bon Appetit, an adaptation of a recipe found at The Signature Room. We momentarily lost it, gone in the recycling maybe. But found once again—just last night—as a grainy photo on my computer. So, here it is, hopefully never to be lost again.
Ingredients
- 1/2 garlic clove
- 1 1/2 tsp freshly grated lemon zest
- 2 tbsp fresh lemon juice
- 1 tbsp distilled white vinegar
- 1 1/2 tsp Dijon mustard
- 1 1/2 tsp mild honey
- 1/4 tsp salt (kosher)
- 1/4 tsp black pepper
- 3 tbsp extra-virgin olive oil
- 2 tbsp canola oil
- 1 1/2 tsp chopped fresh oregano
-Blend all ingredients except oregano in blender until combined.
-Transfer to a bowl and stir in oregano. Salt and pepper to taste.
Biga-Based Pizza Dough
June 1, 2011 § 5 Comments
Pizza is one of our fallback meals in the Dainty domicile. And it’s not delivery; not even DiGiorno. It’s made with good ol’ homemade, hand-thrown dough. With a special addition. Let’s call it Dainty Dough.
There are two things that make the Dainty Dough a bit different. First, it’s made with biga, one of many types of dough starters. It’s a yeast-based starter, not a natural sourdough starter—meaning it contains commercial yeast and not yeast found naturally in the environment (have I lost you yet? Hang on for a minute.). The biga ferments—i.e. sits on your counter bubbling away—for 8 to 24 hours or so, all the while developing a richer, chewier flavor. Pizza crust with flavor, not just used as a platform for toppings, imagine that.
The second thing I do is add a dollop or two of my Sourdough Starter, aka Milo the Baby Dough, during the dough-making process. A few months back you may recall I was experimenting with natural yeast and tried creating a real sourdough. Well, after a month or so, Milo is alive and well. I feel like I created a golem, it’s so incredibly cool. It’s totally not necessary to add this sourdough starter, but I’ll explain in a minute why I do it.
Dainty Dough: Step 1
Biga Recipe (from my Basic Baking class at the Cambridge School of Culinary Arts)
- 1/4 oz. yeast
- 1/4 cup warm water (warm=dip in a finger and it should feel the same temp as your body)
- pinch of sugar
- 1 1/2 cups warm water
- 3 3/4 cups flour (I suggest all-purpose flour here. If you want wheat dough you can add wheat flour later)
-Add yeast and 1/4 cup warm water with sugar in a bowl and stir together. Let it sit for 10 minutes. Add remaining water and the flour and mix thoroughly. You’ll end up with a creamy mixture. Cover and either let sit on the counter 8 hours or place in the fridge for 24 hours. It will become creamy and bubbly. The biga will remain
-At this point you can proceed with the next step and make the pizza dough. Or, I suggest weighing out your biga into 4 oz. pieces, reserving one piece for your current pizza and placing the remaining into individual freezer baggies and popping them in the freezer. Label and date your baggies! Otherwise a year from now you’ll excavate your freezer and wonder what the heck that thing is. From this one batch of biga you will get up to 8 4 oz. pieces. And each 4 oz. biga gives you four pizza stone-sized pizzas. Do the math—that’s a lot of pizza!
Dainty Dough: Step 2
Pizza Dough Recipe
- 4 oz. biga
- 1/4 tsp. salt (kosher preferred)
- 2 Tbs. olive oil
- A dollop or two of Milo the Baby Dough sourdough starter (optional)
- 4 1/2 cup flour (for wheat dough use 2 1/2 cups all-purpose and 2 cups whole wheat)
- 1 1/2 cup water
-Add biga, salt, oil, sourdough starter and flour to the bowl of a stand mixer fitted with a dough hook. Turn on slow speed, let it mix together for up to a minute then add water slowly. Because I’ve added a bit of the sourdough starter, there is more moisture in the dough and depending on your weather conditions, you may not need all of that water. Yes, baking depends on weather conditions, believe it or not.
-If you’ve added all the water and the dough seems wet and watery, add a tablespoon of all-purpose flour and let it mix in. Keep adding flour one tablespoon at a time until the dough is no longer wet but not bone dry! You’ll likely need no more than four or five tablespoons of flour.
-Keep mixing on medium speed for about five minutes. The dough has a tendency to ride up the dough hook. Stop the mixer when the dough makes it above the hook’s collar and push the dough back down into the bowl. Keep mixing until the dough feels smooth and it’s started to relax a bit; i.e., it shouldn’t feel like a hard tight wad of flour.
-Oil a medium bowl. Roll the dough around in the oil so it’s slightly oily all over. Cover with plastic wrap and let it sit for an hour. The dough won’t have risen all that much—it’s not rising like bread, we just want it to become elastic.
-Cut the dough into four equally sized pieces—they’ll likely have a triangular shape. Want an oddly shaped pizza? Then place these dough pieces as they are on a baking sheet or on the counter and cover with oiled plastic wrap. Want a perfectly round pizza? Then do this: Holding the dough piece in your hands, pull all the dough from around the piece into a central point. Go around the outside a couple times pulling it all into the center. Now, do your best to pinch that central point closed, then place the dough with that point facing downward. What you will have is a little ball with a perfectly round top, no seams showing anywhere except on the bottom. Cover these with oiled plastic wrap and let sit for about 20 minutes.
So, about adding that dollop or two of sourdough starter to the dough … here’s why I did it. I did, in fact, excavate my freezer recently and found two baggies of 13 month-old biga. Doing a little research I found that the recommended time for biga in the freezer is a max of four months. Oops. I added the sourdough starter as a way to give the dough a kick of fresh yeast. I think it worked. Plus, I noticed the crust did have telltale sourdough bread-like air bubbles. Tasty!
Hmm … turns out I have absolutely no photos of any of this. Bummer. Guess I’ll have to make some biga and dough later today.
By the way, biga can be used for more than just pizza dough. So instead of making 4 oz. balls of biga for the freezer, you can use what you have left for bread baking.
Wait, what? Am I leaving you without actually making a pizza? You bet. That’s for another day, when Jennifer can chime in on her favorite toppings. I make the dough, but she’s the pizza master.
